Retevis RT-5R Dual Band Two Way Radio User Manual
Model: RT-5R (5687E4D31DA1DA7A)
Brand: Retevis
Introduction
This manual provides detailed instructions for the safe and effective operation of your Retevis RT-5R Dual Band Two Way Radio. Please read this manual thoroughly before using the device to ensure proper functionality and to prevent damage.
The Retevis RT-5R is a versatile dual-band handheld radio designed for reliable communication. It features 128 memory channels, a 1400mAh battery, a built-in flashlight, and an SOS siren function, making it suitable for various applications including outdoor activities, business, and industrial use.
What's in the Box

Image: All components included in the Retevis RT-5R package, neatly laid out.
Your Retevis RT-5R package includes the following items:
- 4 x Retevis RT-5R 2-way radio units
- 4 x Antennas
- 4 x AC adapters
- 4 x DC Charger bases
- 4 x Belt clips
- 4 x Hand straps
- 4 x Desktop Chargers (100V ~ 240V)
- 4 x English User's manuals
- 4 x Speaker mics
- 4 x Battery packs (1400mAh Li-ion)
Product Overview

Image: Front view of the Retevis RT-5R radio with key components labeled.
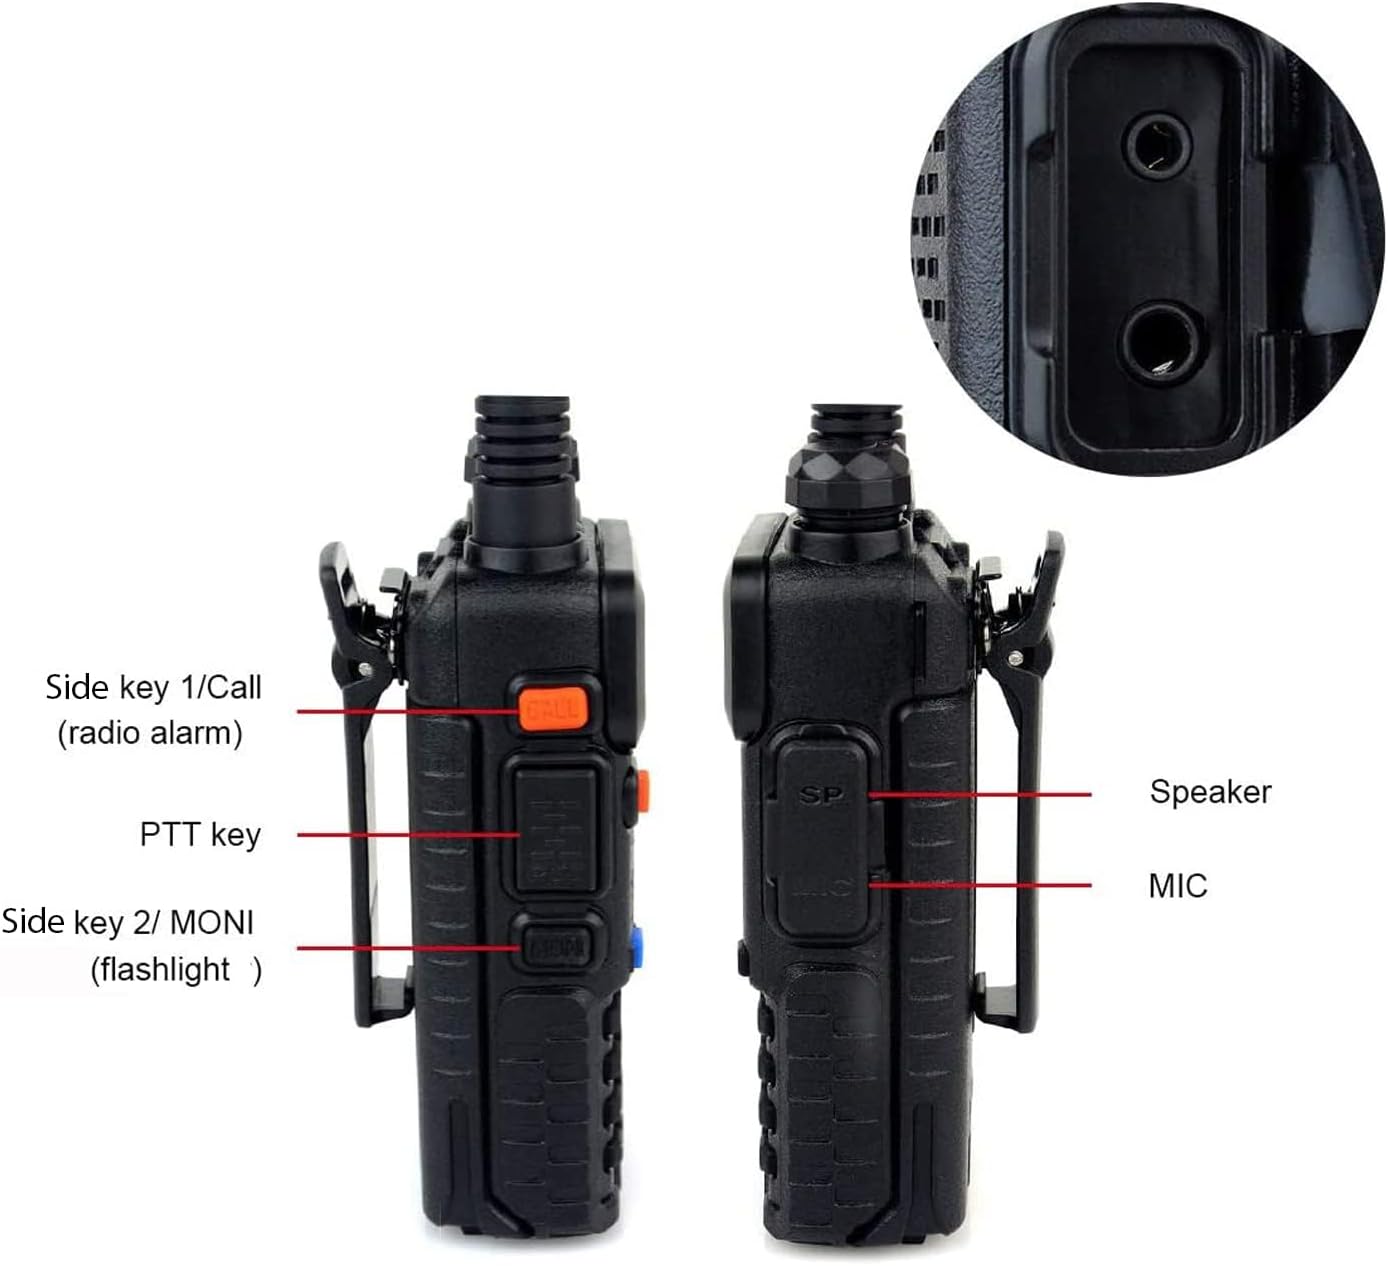
Image: Side view of the Retevis RT-5R radio highlighting the PTT button, side keys, speaker, and microphone ports.
Key Features:
- Dual Band Operation: Supports communication across two frequency bands.
- 128 Memory Channels: Allows for extensive channel storage.
- High Power Design: Provides strong signal penetration and extended range.
- 1400mAh Li-ion Battery: Offers extended operating time.
- Built-in Flashlight: Provides illumination in low-light conditions.
- SOS Siren: Emergency function for seeking help.
- VOX Function: Hands-free operation for voice-activated transmission.
- LCD Backlighting: Ensures readability in the dark.
- Durable Construction: Features like a durable belt clip and secure battery contacts.

Image: Detailed views of the radio's durable screw, battery charging contacts, and belt clip.
Setup
1. Attaching the Battery Pack
- Align the battery pack with the grooves on the back of the radio.
- Slide the battery pack upwards until it clicks into place.
- To remove, press the release latch (if present) and slide the battery downwards.
2. Attaching the Antenna
- Screw the antenna into the connector on the top of the radio clockwise until it is finger-tight. Do not overtighten.
3. Charging the Battery
- Connect the AC adapter to the DC charger base.
- Plug the AC adapter into a standard wall outlet (100V ~ 240V).
- Place the radio (with battery attached) into the charger base. Ensure the charging contacts align.
- The charging indicator light on the base will typically show red during charging and turn green when fully charged.
4. Attaching the Speaker Mic (Optional)
- Open the rubber cover on the side of the radio where the speaker/mic ports are located.
- Carefully insert the speaker mic's dual-pin connector into the corresponding ports.
- Ensure a secure connection.

Image: A Retevis RT-5R radio with the speaker microphone attached.
Operating Instructions
1. Power On/Off and Volume Control
- To power on the radio, rotate the top knob clockwise.
- To adjust the volume, continue rotating the knob.
- To power off, rotate the knob counter-clockwise until it clicks.
2. Channel Selection and Frequency Mode
- Use the A/B button to switch between the upper and lower display frequencies.
- Use the BAND key to switch between VHF and UHF bands.
- Enter frequencies directly using the keypad or navigate through stored channels.
3. Transmitting and Receiving (PTT)
- To transmit, press and hold the PTT (Push-To-Talk) button on the side of the radio. Speak clearly into the microphone.
- Release the PTT button to receive.
4. VOX Function (Voice Operated Exchange)
The VOX function allows for hands-free transmission when your voice is detected.
- In standby mode, press the MENU button.
- Press the 4 button on the keypad. "VOX" will appear on the screen.
- Press the MENU button again to confirm.
- Use the Up or Down arrow keys to select the desired sensitivity level (1-10, with 1 being least sensitive and 10 most sensitive).
- Press the MENU key to save the setting.
- Press the PTT button to exit the menu.
5. Flashlight and SOS Siren
- To activate the flashlight, press the Side Key 2 (MONI) button. Press again to turn off.
- To activate the SOS siren (radio alarm), press the Side Key 1 (CALL) button. Press again to turn off.
6. Power Levels
- The radio supports two power levels: High and Low.
- High power extends the communication range but consumes more battery.
- Low power conserves battery life, suitable for shorter distances.
- Refer to the full user manual for instructions on how to change power levels.
Maintenance
- Cleaning: Use a soft, damp cloth to clean the radio's exterior. Do not use harsh chemicals or solvents.
- Battery Care: Charge the battery fully before first use. Avoid overcharging or completely draining the battery for optimal lifespan. Store the radio and battery in a cool, dry place when not in use for extended periods.
- Antenna: Ensure the antenna is securely attached. Avoid bending or forcing the antenna, as this can damage the connector.
- Water Resistance: This radio is NOT water resistant. Avoid exposure to rain, splashes, or immersion in water.
- Storage: Store the radio in a clean, dry environment away from extreme temperatures and direct sunlight.
Troubleshooting
| Problem | Possible Cause | Solution |
|---|---|---|
| Radio does not power on | Battery is low or not properly installed. | Charge the battery or re-install it correctly. |
| Cannot transmit or receive | Incorrect frequency/channel. Antenna not attached. Battery low. | Verify frequency/channel settings. Ensure antenna is secure. Charge battery. |
| Poor audio quality | Weak signal. Volume too low/high. Obstructions. | Move to an area with better signal. Adjust volume. Reduce obstructions. |
| VOX not working | VOX sensitivity too low. VOX not enabled. | Increase VOX sensitivity in the menu. Ensure VOX is enabled. |
Specifications
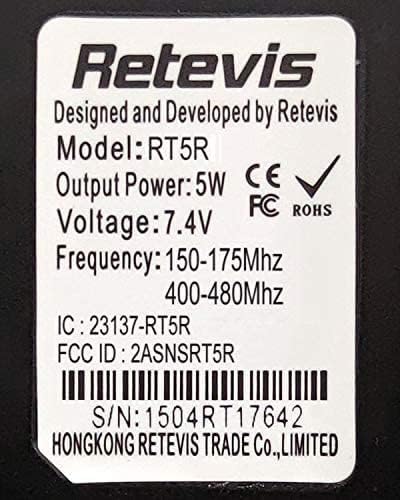
Image: Product label displaying technical specifications and regulatory information.
| Feature | Detail |
|---|---|
| Model Number | RT-5R (5687E4D31DA1DA7A) |
| Product Dimensions | 4.33 x 2.28 x 1.26 inches |
| Item Weight | 6.6 ounces |
| Battery Type | 1 Lithium Ion battery (included) |
| Number of Channels | 128 |
| Frequency Range | Dual Band (VHF: 150-175MHz, UHF: 400-480MHz) |
| Voltage | 7.4 Volts (DC) |
| Output Power | 5W |
| Water Resistance Level | Not Water Resistant |
| Special Features | Easy to use, Dual Band, Flashlight, SOS Siren |
| Color | Black |
Warranty and Support
For warranty information, technical support, or service inquiries regarding your Retevis RT-5R radio, please refer to the official Retevis website or contact their customer service directly. Details can typically be found in the included user manual or on the manufacturer's product support pages.
You may also visit the Retevis Store on Amazon for additional product information and support resources.