1. Product Overview
The ASUS H97M-E is a micro ATX motherboard designed for Intel LGA1150 socket processors. It features the Intel H97 chipset, offering robust performance and essential connectivity for a reliable computing experience. This motherboard is built with ASUS 5X Protection, ensuring long-term durability and reliability.
Key Features:
- mATX form factor, LGA 1150 Socket, Intel H97 Chipset
- 4 x DIMM slots supporting up to 32GB DDR3 RAM
- Integrated graphics output: HDMI, DVI-D, RGB
- Gigabit LAN for high-speed network connectivity
- UEFI AMI BIOS for intuitive system management
- M.2 storage support for fast SSDs (up to 10Gb/s)
- Crystal Sound 2 for enhanced audio experience
- Fan Xpert 2+ for advanced cooling control

Image 1.1: The ASUS H97M-E motherboard shown with its retail packaging. This micro ATX board is designed for Intel LGA1150 processors and features the Intel H97 chipset.
2. System Setup and Installation
This section guides you through the physical installation of the ASUS H97M-E motherboard and its components into your computer case.
2.1. Pre-Installation Checklist
- Ensure your power supply is compatible (ATX 24-pin and 8-pin 12V connectors).
- Gather necessary tools: Phillips screwdriver, anti-static wrist strap.
- Confirm CPU compatibility (Intel LGA1150 socket processors).
- Prepare your computer case by installing standoffs.
2.2. Motherboard Installation
- Install CPU: Carefully place your Intel LGA1150 processor into the CPU socket. Ensure the triangular markers on the CPU and socket align. Secure the retention arm.
- Install CPU Cooler: Attach the CPU cooler according to its manufacturer's instructions.
- Install RAM: Insert DDR3 memory modules into the DIMM slots. Push down firmly until the clips on both sides lock into place. The board supports up to 32GB across 4 DIMM slots.
- Mount Motherboard: Install the I/O shield into your case's rear opening. Carefully align the motherboard with the standoffs in your case and secure it with screws.
- Connect Power: Connect the 24-pin ATX power connector and the 8-pin ATX 12V power connector from your power supply to the motherboard.
- Connect Storage Devices: Connect SATA data cables from your storage drives (HDDs/SSDs) to the SATA 6Gb/s ports on the motherboard. If using an M.2 SSD, install it into the M.2 Socket 3.
- Connect Front Panel Cables: Connect the power switch, reset switch, HDD LED, power LED, and front panel USB/audio headers to their respective pins on the motherboard. Refer to the motherboard layout diagram for exact locations.
- Install Expansion Cards: If using a dedicated graphics card or other PCIe expansion cards, insert them into the appropriate PCIe slots (e.g., PCIe 3.0 x16 for graphics).
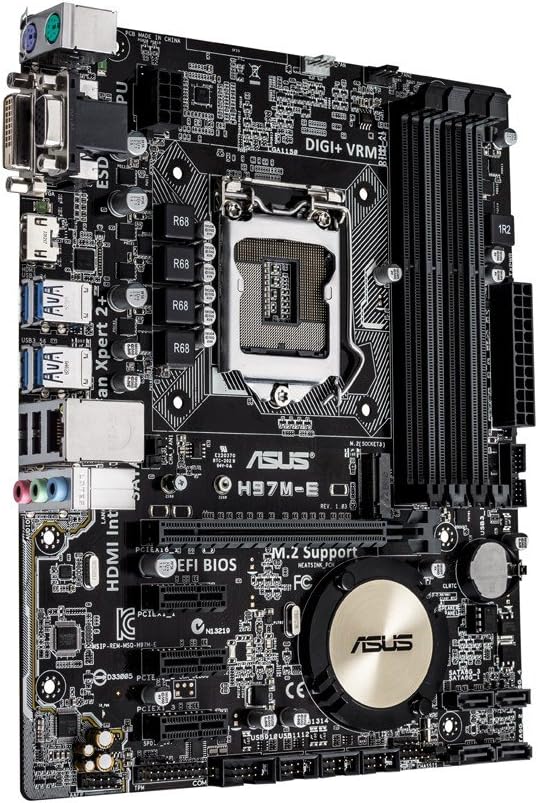
Image 2.1: A top-down view of the ASUS H97M-E motherboard, highlighting the LGA1150 CPU socket, four DDR3 DIMM slots, and various connectors.

Image 2.2: The included I/O shield and SATA cables for connecting storage devices. The I/O shield protects the rear ports and helps with airflow.
3. Operating Your System
Once all components are installed and connected, you can power on your system.
3.1. First Boot and BIOS Setup
Upon first power-on, the system will typically enter the UEFI BIOS.
- Accessing BIOS: Press the DEL key repeatedly during startup to enter the UEFI BIOS utility.
- Initial Configuration: Set the correct date and time. Verify that all installed components (CPU, RAM, storage drives) are detected correctly.
- Boot Order: Configure the boot order to prioritize your operating system installation media (e.g., USB drive, DVD drive) or your primary SSD/HDD.
- Saving Settings: Save changes and exit the BIOS. The system will restart.
3.2. Driver Installation
After installing your operating system, it is crucial to install the latest drivers for your motherboard's components to ensure optimal performance and stability.
- Chipset Drivers: Install the Intel H97 chipset drivers.
- LAN Drivers: Install the Realtek Gigabit LAN driver for network connectivity.
- Audio Drivers: Install the Realtek HD audio drivers.
- USB 3.0 Drivers: Ensure USB 3.0 drivers are installed for full functionality of the high-speed USB ports.
- Graphics Drivers: If using integrated graphics, install the Intel HD Graphics drivers. If using a dedicated graphics card, install drivers from its manufacturer.
Drivers can be found on the official ASUS support website for the H97M-E model.
4. Maintenance and Care
Proper maintenance ensures the longevity and stable operation of your motherboard and overall system.
- Dust Removal: Regularly clean dust from inside your computer case, especially from CPU cooler fins, case fans, and motherboard surfaces. Use compressed air.
- Cable Management: Ensure cables are neatly routed to allow for optimal airflow within the case.
- BIOS Updates: Periodically check the ASUS support website for BIOS updates. BIOS updates can improve compatibility, stability, and performance. Follow update instructions carefully.
- Driver Updates: Keep all system drivers updated to their latest versions.
- Environmental Conditions: Operate the system in a well-ventilated area, away from direct sunlight, excessive heat, and humidity.
5. Troubleshooting Common Issues
This section provides solutions for common problems you might encounter.
5.1. No Power / No Boot
- Check Power Connections: Ensure all power cables (24-pin ATX, 8-pin 12V, GPU power) are securely connected.
- Power Supply Test: Verify your power supply unit (PSU) is functioning correctly.
- Front Panel Connections: Double-check the power switch and reset switch connections on the motherboard's front panel header.
5.2. No Display Output
- Monitor Connection: Ensure your monitor is correctly connected to the appropriate video output port (HDMI, DVI-D, or VGA) on the motherboard or dedicated graphics card.
- RAM Reseat: Reseat the RAM modules. Try booting with only one RAM stick if you have multiple.
- Graphics Card: If using a dedicated graphics card, ensure it is properly seated in its PCIe slot and has adequate power. Try removing it and using integrated graphics if available.
- CPU: Ensure the CPU is correctly installed and the CPU cooler is properly seated.
5.3. Component Not Detected
- Reseat Component: For RAM, storage drives, or expansion cards, try reseating them in their slots.
- Check Cables: Ensure SATA data and power cables are securely connected to storage drives.
- BIOS/UEFI: Check the BIOS/UEFI settings to see if the component is detected there. Ensure SATA mode is correctly configured (AHCI for SSDs).
5.4. System Instability / Crashes
- Overheating: Monitor CPU and system temperatures. Ensure proper cooling and airflow.
- Driver Issues: Ensure all drivers are up-to-date and correctly installed.
- RAM Test: Run a memory diagnostic tool (e.g., Windows Memory Diagnostic) to check for faulty RAM.
- BIOS Settings: Reset BIOS to default settings if you have made changes that might cause instability.
6. Technical Specifications
Detailed specifications for the ASUS H97M-E Motherboard.
| Feature | Specification |
|---|---|
| Brand | ASUS |
| Series | H97M-E |
| Item Model Number | 90MB0IQ0-M0EAY5 |
| CPU Socket | LGA 1150 |
| Chipset Type | Intel H97 |
| Compatible Processors | Intel Celeron, Core i3, Core i5, Core i7, Pentium |
| RAM Memory Technology | DDR3 SDRAM |
| Memory Clock Speed | 1600 MHz |
| Memory Storage Capacity (Max) | 32 GB (4 x DIMM) |
| Product Dimensions | 9.61 x 7.8 x 1.97 inches (micro ATX) |
| USB Ports | 4 x USB 3.0 (rear), 2 x USB 2.0 (rear), 1 x USB 3.0 header (supports 2 ports), 3 x USB 2.0 headers (supports 6 ports) |
| LAN | Gigabit LAN (Realtek RTL8111GR) |
| Video Output | 1 x HDMI, 1 x DVI-D, 1 x D-Sub (VGA) |
| Storage Interfaces | 4 x SATA 6Gb/s, 1 x M.2 Socket 3 (Type 2260/2280 devices) |
| Expansion Slots | 1 x PCIe 3.0/2.0 x16, 2 x PCIe 2.0 x1 |
| Audio | Realtek ALC887 8-Channel High Definition Audio CODEC |

Image 6.1: The rear I/O panel of the ASUS H97M-E motherboard, showing various ports including USB, LAN, audio, and video outputs.
7. Warranty and Support
ASUS products are manufactured to the highest quality standards. For detailed warranty information, please refer to the warranty card included with your product or visit the official ASUS website.
7.1. Technical Support
For technical assistance, driver downloads, or further information, please visit the ASUS support page: www.asus.com/support/
You can also find more information about ASUS products at the ASUS Store on Amazon.


