1. Introduction
Thank you for choosing the Rain Bird Zeh TM Digital Tap Connector Timer. This device is designed to automate your sprinkler, hose, and soaker hose irrigation systems, providing consistent and efficient watering. This manual provides detailed instructions for setup, operation, and maintenance to ensure optimal performance and longevity of your timer.
The Rain Bird Zeh TM timer offers advanced features for worry-free and convenient irrigation, including programming up to two watering times per day, every day of the week, and override functions for immediate watering or rain delays.
2. Safety Information
- Use only with cold water.
- Protect the device from freezing temperatures to prevent damage. Disconnect and store indoors during winter months.
- Do not immerse the timer in water. It is designed for outdoor use and is weather-resistant, but not submersible.
- Ensure proper battery installation. Use 2 AA alkaline batteries (not included) and replace them annually or when the low battery indicator appears.
- Keep out of reach of children.
- Do not attempt to disassemble or repair the unit yourself. Contact customer support for assistance.
3. Product Overview
The Rain Bird Zeh TM Digital Tap Connector Timer features a user-friendly design with a large display and intuitive control dial for easy programming.

Figure 1: Rain Bird Zeh TM Digital Tap Connector Timer in retail packaging. This image shows the timer enclosed in its clear plastic packaging, highlighting the product name and key features.
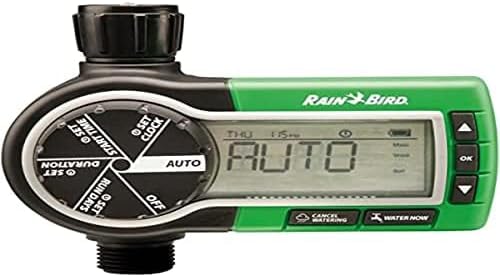
Figure 2: Close-up view of the Rain Bird Zeh TM Digital Tap Connector Timer's display and control dial. This image highlights the large digital screen and the rotary dial with settings for SET CLOCK, SET START TIME, SET DURATION, SET RUN DAYS, AUTO, and OFF, along with 'CANCEL WATERING' and 'WATER NOW' buttons.
Key Features:
- Digital Settings: Allows for precise and customized watering plans.
- Flexible Programming: Program up to two watering times per day, any day of the week.
- Large Display: Extra-large view screen for easy setting and checking of watering plans. Displays program status and countdown of the running cycle.
- Manual Override: "Water Now" button for immediate watering and "Cancel Watering" for pausing.
- Rain Delay: Option to delay watering for up to 96 hours without affecting the programmed schedule.
- Durable Design: Suitable for outdoor use with cold water.
- Compatibility: Works with drip systems.
4. Setup
4.1. Battery Installation
- Locate the battery compartment on the back of the timer.
- Open the battery compartment cover.
- Insert two (2) new 1.5V AA alkaline batteries, ensuring correct polarity (+/-).
- Securely close the battery compartment cover to maintain water resistance.
Note: Batteries are not included. Replace batteries annually or when the low battery indicator appears on the display.
4.2. Connecting the Timer to Your Tap

Figure 3: Rain Bird Zeh TM Digital Tap Connector Timer connected to an outdoor water tap. The timer is shown securely attached to a brass tap, with a garden hose connected to its outlet.
- Ensure your outdoor tap is turned off.
- Screw the inlet connector (3/4-inch female BSP) of the timer onto your outdoor tap. Hand-tighten only to prevent damage.
- Connect your garden hose or drip system to the outlet connector (male BSP) at the bottom of the timer.
- Turn on your outdoor tap fully. The timer will control the water flow.
5. Operating Instructions
The control dial allows you to navigate through different settings. Use the +/- buttons to adjust values and the OK button to confirm.
5.1. Setting the Current Time and Day
- Turn the control dial to SET CLOCK.
- Use the +/- buttons to set the current time (hour and minute). Press OK to confirm each setting.
- Use the +/- buttons to set the current day of the week. Press OK to confirm.
5.2. Programming Watering Schedules
You can program up to two watering cycles per day.
- Set Start Time: Turn the dial to SET START TIME. Use +/- to set the desired start time for the first cycle (e.g., 6:00 AM). Press OK. Repeat for a second start time if needed.
- Set Duration: Turn the dial to SET DURATION. Use +/- to set how long you want the watering to last (e.g., 30 minutes). Press OK.
- Set Run Days: Turn the dial to SET RUN DAYS. Use +/- to select the days of the week you want the timer to operate (e.g., Mon, Wed, Fri). Press OK to confirm your selection.
After programming, turn the dial to AUTO for the timer to operate automatically according to your schedule.
5.3. Manual Watering (Water Now)
To water immediately outside of your programmed schedule:
- Ensure the dial is in the AUTO position.
- Press the WATER NOW button.
- Use the +/- buttons to set the desired duration for manual watering.
- Press OK to start manual watering. The timer will revert to the automatic schedule after the manual cycle is complete.
5.4. Cancelling Watering / Rain Delay
- Cancel Current Watering: During an active watering cycle (manual or automatic), press the CANCEL WATERING button to stop the flow immediately.
- Rain Delay: To temporarily pause your automatic schedule due to rain or other reasons, press and hold the CANCEL WATERING button. Use +/- to select a delay period (e.g., 24, 48, 72, 96 hours). Press OK to activate the rain delay. The timer will resume its schedule after the delay period.
5.5. Turning Off the Timer
To completely stop all watering, turn the control dial to OFF. This will disable all programmed schedules and manual watering functions.
6. Maintenance
6.1. Battery Replacement
Replace the 2 AA alkaline batteries annually or immediately when the low battery indicator appears on the display to ensure continuous operation. Refer to Section 4.1 for battery installation instructions.
6.2. Cleaning
Wipe the exterior of the timer with a damp cloth as needed. Do not use abrasive cleaners or solvents. Ensure the battery compartment and connections remain clean and free of debris.
6.3. Winterization
Before the first frost, disconnect the timer from the tap and hose. Remove the batteries. Store the timer indoors in a dry, protected location where temperatures will not drop below freezing. Failure to do so may result in damage to the unit due to freezing water.
7. Troubleshooting
| Problem | Possible Cause | Solution |
|---|---|---|
| Timer does not turn on / Display is blank. | Dead or incorrectly installed batteries. | Replace with new AA alkaline batteries, ensuring correct polarity. |
| Water does not flow at scheduled time. | Tap is off; Timer is in OFF position; Incorrect programming; Low battery. | Ensure tap is fully open. Turn dial to AUTO. Verify programmed start times, durations, and run days. Replace batteries. |
| Timer continuously waters. | Timer stuck in manual watering mode; Internal valve issue. | Press CANCEL WATERING. Turn dial to OFF and then back to AUTO. If problem persists, contact customer support. |
| Water leaks from connections. | Loose connections; Missing or damaged washer. | Ensure all connections are hand-tight. Check for and replace any worn rubber washers. |
8. Specifications
- Model Number: ZA84006
- Brand: Rain Bird
- Power Source: 2 x 1.5V AA Alkaline Batteries (not included)
- Inlet Connection: 3/4-inch Female BSP
- Outlet Connection: Male BSP
- Water Pressure: 1 Bar (minimum) - 6 Bar (maximum)
- Operating Temperature: Protect against frost; Maximum temperature: 43°C (109°F)
- Item Weight: 379 Grams
- Screen Size: 1.91 Centimeters
- UPC: 751369163478, 700953322944, 700953322951, 741498611964
9. Warranty Information
Rain Bird products are manufactured to high quality standards. For specific warranty details, please refer to the warranty card included with your product or visit the official Rain Bird website. Keep your purchase receipt as proof of purchase for any warranty claims.
10. Customer Support
If you have any questions, require technical assistance, or need to troubleshoot issues not covered in this manual, please contact Rain Bird Customer Support. Contact information can typically be found on the Rain Bird official website or on the product packaging.
For additional resources, visit www.rainbird.com.