Introduction
The SINGER Monami Delight SP-70G is a computerized sewing machine designed for ease of use and versatility. This manual provides essential information for setting up, operating, and maintaining your sewing machine to ensure optimal performance and longevity.

Figure 1: SINGER Monami Delight SP-70G Computerized Sewing Machine. This image displays the overall design of the sewing machine, highlighting its compact and user-friendly appearance.
Setup
1. Unpacking and Placement
- Carefully remove the machine from its packaging.
- Place the machine on a stable, flat surface.
- Ensure adequate lighting and space for comfortable operation.
2. Power Connection
- Connect the power cord to the machine and then to a suitable electrical outlet.
- Turn on the power switch, usually located on the side of the machine.
3. Bobbin Winding
The SP-70G features an automatic bobbin winding stop function to prevent over-winding.
- Place a bobbin onto the bobbin winder spindle.
- Guide the thread from the spool through the tension disc and around the bobbin.
- Push the bobbin winder spindle to the right.
- Press the foot controller or start/stop button to begin winding. The machine will stop automatically when the bobbin is full.
4. Threading the Machine (News Threading System)
The News Threading System simplifies upper thread threading regardless of the needle position.
- Raise the presser foot.
- Place the thread spool on the spool pin.
- Follow the numbered threading path indicated on the machine.
- Use the automatic needle threader by lowering the lever to easily pass the thread through the needle eye. (Note: This feature is generally not suitable for household sewing machine needles smaller than size 11 or larger than size 16).
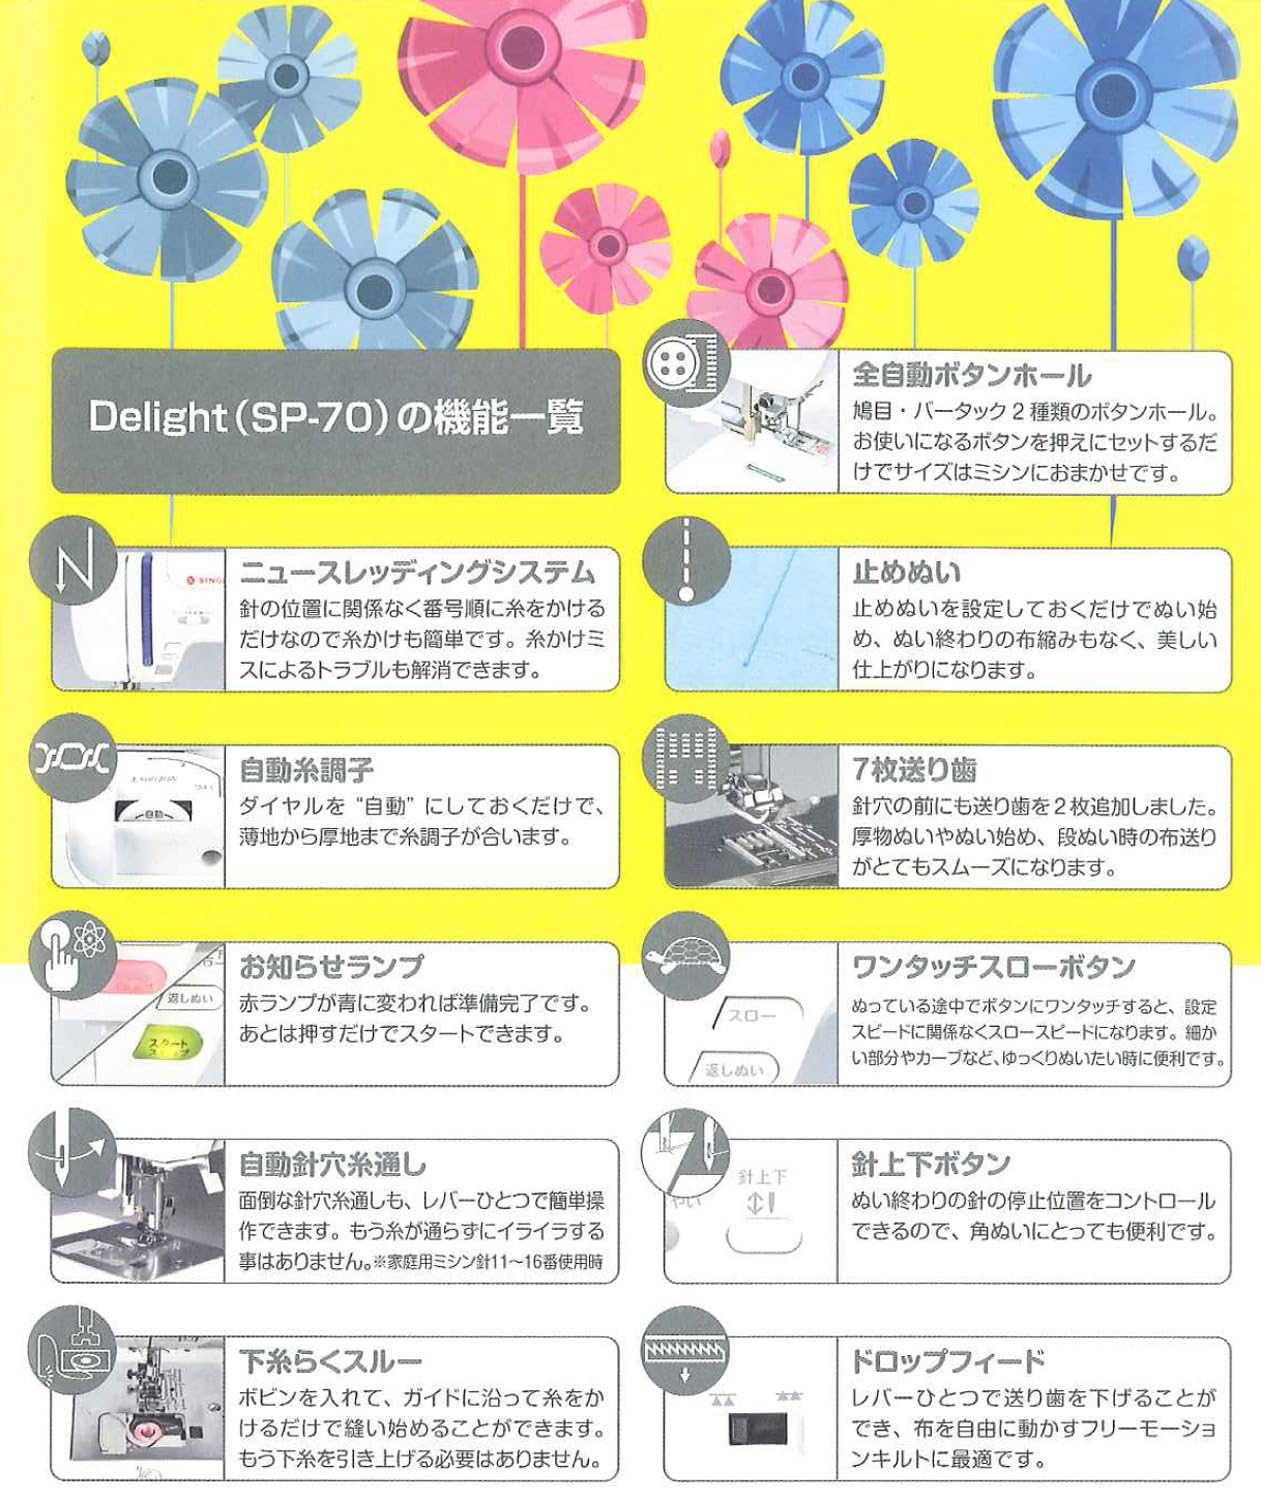
Figure 2: Key features of the SINGER Monami Delight SP-70G. This diagram illustrates various components and functions such as the News Threading System, Automatic Thread Tension, and Needle Up/Down button.
Operating Instructions
1. Stitch Selection (Pattern Direct Selection)
The machine offers 12 practical stitch patterns, which can be directly selected using the dedicated buttons.
- Refer to the stitch pattern chart on the machine or in this manual.
- Press the button corresponding to your desired stitch pattern.

Figure 3: The 12 practical stitch patterns available on the SINGER Monami Delight SP-70G. This image displays various utility and decorative stitches, including straight stitch, zigzag, and buttonhole options.
2. Automatic Thread Tension
Set the thread tension dial to "Auto" for automatic adjustment. The machine will optimize tension for various fabric thicknesses, from thin to thick materials.
3. Needle Up/Down Button
Use the Needle Up/Down button to control the needle's stopping position. This is particularly useful for pivoting fabric at corners or when removing the fabric from the machine.
4. Stop Stitch / Backstitch
To secure your seams, the machine can automatically perform a stop stitch (backstitch) at the beginning and end of your sewing. This feature ensures a neat and durable finish.
5. One-Touch Slow Button
Activate the One-Touch Slow Button for precise control when sewing intricate details, curves, or starting a seam. This reduces the sewing speed for enhanced accuracy.
6. Drop Feed
Lower the feed dogs using the Drop Feed mechanism to engage in free-motion sewing, darning, or embroidery. This allows you to move the fabric freely under the needle.
7. Free Arm
Remove the accessory storage compartment to reveal the free arm. This feature is ideal for sewing cylindrical items such as sleeves, pant hems, and small openings.
8. Presser Foot Lift Button
The Presser Foot Lift Button helps keep the presser foot horizontal, which is beneficial when starting to sew on thick fabrics or multiple layers, ensuring a smooth start.
9. Stitch Length and Width Adjustment
Adjust the stitch length and width according to your fabric type and desired sewing effect. This applies to various patterns including straight stitches, zigzags, and buttonholes.

Figure 4: Overview of additional useful features of the SINGER Monami Delight SP-70G. This image highlights features like the Horizontal Full Rotary Hook, LED Hand Lamp, Wide Sewing Base, and Quiet Design.
Maintenance
1. Cleaning
- Always unplug the machine before cleaning.
- Regularly remove lint and dust from the bobbin case area and feed dogs using a small brush.
- Wipe the exterior of the machine with a soft, dry cloth. Do not use harsh chemicals.
2. Needle Replacement
- Replace the needle frequently, especially after 8-10 hours of sewing or if it becomes bent or dull.
- Use only SINGER-approved needles appropriate for your fabric type.
Troubleshooting
This section addresses common issues you might encounter. For more complex problems, consult a qualified service technician.
1. Skipped Stitches
- Ensure the needle is inserted correctly and is not bent or dull.
- Check that the machine is threaded properly, both upper and bobbin threads.
- Verify that the correct needle type and size are being used for the fabric.
2. Thread Jamming
- Turn off the machine and unplug it.
- Remove the bobbin case and clear any tangled threads from the bobbin area.
- Re-thread the machine completely, ensuring the presser foot is raised during upper threading.
3. Uneven Stitches
- Check the thread tension settings. While the machine has automatic tension, manual adjustment may sometimes be necessary for specific fabrics.
- Ensure the fabric is fed evenly and not pulled or pushed excessively.
Specifications
| Feature | Detail |
|---|---|
| Model Number | SP-70G |
| Item Weight | 21.2 pounds |
| Package Dimensions | 19.92 x 15.51 x 11.1 inches |
| ASIN | B00K2IREWM |
| Date First Available | May 18, 2014 |
Warranty and Support
Warranty Information
For detailed information regarding the warranty coverage for your SINGER Monami Delight SP-70G sewing machine, please refer to the warranty card included with your product or visit the official SINGER website. Warranty terms and conditions may vary by region.
Customer Support
If you require technical assistance, have questions about your machine's operation, or need to arrange for service, please contact SINGER customer support. Contact details can typically be found on the SINGER official website or in the documentation provided with your purchase.


