
1. Introduction
This manual provides detailed instructions for the installation, operation, and maintenance of your Isenberg HSB.12SBN 12-inch Square Brass Shower Head. Please read this manual thoroughly before installation and retain it for future reference. Proper installation and care will ensure optimal performance and longevity of your product.
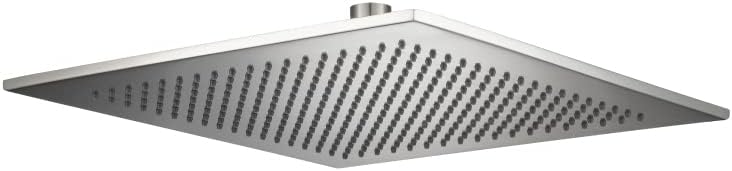
Figure 1: Isenberg HSB.12SBN 12-inch Square Brass Shower Head. This image displays the Isenberg HSB.12SBN 12-inch square shower head, featuring a brushed nickel finish and numerous water nozzles on its underside. The design is sleek and modern, intended for ceiling-mounted installation.
2. Safety Information
- Always turn off the main water supply before beginning any plumbing work.
- It is recommended to have this product installed by a qualified professional plumber.
- Wear appropriate personal protective equipment, such as safety glasses and gloves, during installation.
- Ensure all connections are secure to prevent leaks.
- Do not use harsh chemicals or abrasive cleaners on the product finish, as this may cause damage.
3. Package Contents
Verify that all components are present before beginning installation:
- Isenberg HSB.12SBN 12-inch Square Brass Shower Head (1 unit)
4. Specifications
| Feature | Specification |
|---|---|
| Model Number | HSB.12SBN |
| Material | Solid Brass |
| Finish Type | Brushed Nickel |
| Shape | Square |
| Product Dimensions | 12 x 12 x 3 inches |
| Item Weight | 8 pounds |
| Flow Rate | 2.0 GPM (Gallons Per Minute) @ 60 PSI |
| Installation Type | Ceiling Mounted |
5. Installation
5.1 Pre-Installation
- Ensure the main water supply to the installation area is turned off.
- Clear the work area and gather all necessary tools (e.g., pipe wrench, thread sealant tape, adjustable wrench).
- Inspect the shower head for any visible damage.
5.2 Ceiling Mounted Installation Steps
- Ensure the ceiling shower arm is securely installed and properly threaded.
- Apply thread sealant tape (Teflon tape) clockwise around the threads of the ceiling shower arm.
- Carefully thread the Isenberg HSB.12SBN shower head onto the shower arm.
- Hand-tighten the shower head until snug.
- Using an adjustable wrench, gently tighten the shower head an additional quarter to half turn. Avoid over-tightening, which can damage the threads or the finish.
- Turn on the main water supply and check for leaks around the connection point. If leaks occur, tighten slightly more or reapply thread sealant tape.
6. Operation
The Isenberg HSB.12SBN shower head is designed for a single, consistent spray pattern. To operate, simply turn on your shower's water control valve. The shower head will deliver water at a flow rate of 2.0 GPM at 60 PSI, providing a steady and ample water flow for your showering experience.
7. Maintenance
7.1 Cleaning the Finish
- To maintain the brushed nickel finish, clean regularly with a soft, damp cloth.
- For stubborn spots, use a mild soap solution and rinse thoroughly with clean water.
- Do not use abrasive cleaners, scouring pads, ammonia-based cleaners, or any cleaners containing bleach or alcohol, as these can damage the finish.
- Dry the surface immediately after cleaning to prevent water spots.
7.2 Cleaning the Nozzles
- Over time, mineral deposits can accumulate in the shower head nozzles, potentially affecting water flow.
- To clean, gently rub the rubber nozzles with your finger or a soft brush to dislodge any mineral buildup.
- For more extensive buildup, a solution of equal parts white vinegar and water can be used. Soak the shower head (if removable) or spray the solution onto the nozzles, let it sit for 15-30 minutes, then rinse thoroughly.
8. Troubleshooting
| Problem | Possible Cause | Solution |
|---|---|---|
| Low water flow | Clogged nozzles due to mineral buildup | Clean the shower head nozzles as described in Section 7.2. |
| Water leaks from connection | Loose connection or insufficient thread sealant | Turn off water supply, tighten the connection, or reapply thread sealant tape and re-tighten. |
| Uneven spray pattern | Partially clogged nozzles | Clean the shower head nozzles thoroughly. |
9. Warranty and Support
For detailed warranty information, please refer to the official Isenberg manufacturer website. Warranty terms and conditions may vary. If you require technical assistance or have questions not covered in this manual, please contact Isenberg customer support directly through their official website or contact information provided with your purchase.


