
1. Introduction
The FiiO E12 DIY Limited Edition is a high-performance portable headphone amplifier designed to enhance your audio experience. This special edition allows for user-replaceable operational amplifiers (op-amps) and buffers, offering a unique opportunity to customize the sound signature to your preference. Its robust power output is capable of driving a wide range of headphones, from sensitive in-ear monitors to demanding over-ear models, ensuring clear and dynamic sound reproduction on the go.
2. Safety Information and Warranty
IMPORTANT: ONCE YOU REMOVE THE TAMPER EVIDENT STICKER FROM THE DEVICE, WARRANTY/RETURN WILL BE VOIDED. NO EXCEPTIONS.
Please read and follow all instructions carefully to ensure safe operation and to maintain your warranty. Do not expose the device to water, moisture, extreme temperatures, or direct sunlight. Avoid dropping or subjecting the device to strong impacts. Use only the specified charging accessories. Any unauthorized modification or disassembly of the device, beyond the intended op-amp swapping, will void the warranty.
3. Product Overview
The FiiO E12 DIY features a durable aluminum chassis and intuitive controls. Key components include:
- Volume Knob: Controls the audio output level.
- Audio Input (Line In): 3.5mm stereo jack for connecting to your audio source.
- Headphone Output: 3.5mm stereo jack for connecting your headphones.
- Gain Switch: Adjusts the amplification level for different headphone impedances.
- Bass Boost Switch: Enhances low-frequency response.
- Power/Charging Indicator LED: Displays power status and charging activity.
- Micro USB Port: For charging the internal battery.
- Internal Op-Amp Sockets: Allows for swapping operational amplifiers and buffers (under the removable cover).
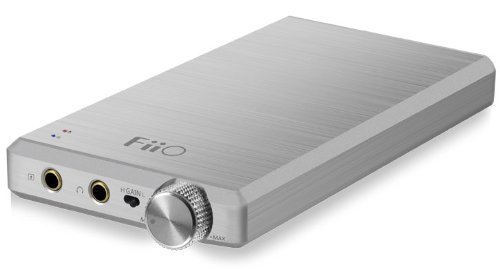
Image: FiiO E12 DIY Limited Edition Portable Headphone Amplifier. This image shows the compact design and typical layout of a portable amplifier, including input/output jacks and control switches.
4. Setup
- Charging the Device: Connect the supplied USB cable to the Micro USB port on the E12 DIY and the other end to a USB power adapter (not included) or a computer's USB port. The indicator LED will show charging status. A full charge typically takes several hours.
- Connecting to an Audio Source: Use a 3.5mm audio cable (not included) to connect your audio source (e.g., smartphone, DAP, computer) to the Line In jack on the E12 DIY.
- Connecting Headphones: Plug your headphones into the Headphone Output jack on the E12 DIY.
- Op-Amp Swapping (Optional): If you intend to swap op-amps, ensure the device is powered off and disconnected from all cables. Carefully remove the designated cover (refer to specific FiiO DIY instructions for your model if available) to access the op-amp sockets. Handle components with care, using appropriate tools and anti-static precautions. Re-secure the cover after swapping. Remember, removing the tamper-evident sticker voids the warranty.
5. Operating Instructions
- Powering On/Off: Rotate the volume knob clockwise until you hear a click to power on the device. The power indicator LED will illuminate. Rotate counter-clockwise until you hear a click to power off.
- Adjusting Volume: Start with the volume knob at its lowest setting. Begin playing audio from your source, then slowly increase the volume on the E12 DIY to a comfortable listening level. Avoid excessively high volumes to prevent hearing damage.
- Using the Gain Switch: The gain switch allows you to adjust the amplification level. Use the low gain setting for sensitive headphones or when the audio source output is strong. Switch to high gain for less sensitive, high-impedance headphones that require more power. Experiment to find the optimal setting for your headphones and source.
- Using the Bass Boost Switch: Flip the bass boost switch to activate or deactivate the bass enhancement feature. Use this according to your personal preference and the characteristics of your headphones and music.
6. Maintenance
- Cleaning: Use a soft, dry cloth to clean the exterior of the device. Do not use liquid cleaners or solvents.
- Battery Care: To prolong battery life, avoid fully discharging the battery frequently. If storing the device for an extended period, charge it to approximately 50% and recharge every few months.
- Storage: Store the E12 DIY in a cool, dry place away from direct sunlight and extreme temperatures.
7. Troubleshooting
- No Sound:
- Ensure the device is powered on and the volume is turned up.
- Check all cable connections (source to E12 DIY, E12 DIY to headphones) are secure.
- Verify the audio source is playing and its volume is not muted or too low.
- Confirm headphones are functioning correctly by testing them with another device.
- Distorted Sound:
- Reduce the volume on both the E12 DIY and the audio source.
- Try switching the gain setting (low/high) to match your headphones.
- Ensure the audio cables are not damaged.
- Device Not Charging:
- Verify the USB cable is properly connected to both the E12 DIY and the power source.
- Try a different USB cable or power adapter.
- Ensure the power source (USB port, wall adapter) is functional.
- Sound Imbalance:
- Check headphone connections and ensure the headphone cable is not damaged.
- If op-amps were swapped, ensure they are correctly seated and oriented.
8. Specifications
| Feature | Detail |
|---|---|
| Product Dimensions | 7.4 x 5.2 x 2 inches |
| Item Weight | 1.01 pounds |
| Batteries | 1 Lithium Polymer battery required (included) |
| Manufacturer | FiiO |
| ASIN | B00J7RY6WK |
| Date First Available | March 24, 2014 |
9. Support
For further assistance, technical support, or inquiries regarding your FiiO E12 DIY Limited Edition, please visit the official FiiO website or contact their customer service directly. Remember that removing the tamper-evident sticker will void the product warranty, as stated in the safety information.
Official FiiO Website: www.fiio.com