Introduction
This manual provides detailed instructions for the assembly, operation, and maintenance of your Relaxdays 10017695 4-Bicycle Parking Rack. Designed for both indoor and outdoor use, this robust steel rack offers a secure and organized solution for storing up to four bicycles. Please read these instructions carefully before installation and use to ensure safe and proper functionality.
Safety Information
- Always ensure all components are securely fastened before placing bicycles in the rack.
- Do not exceed the recommended capacity of four bicycles.
- If mounting to a wall, ensure the wall material is suitable and use appropriate fasteners for maximum stability.
- Keep children and pets away from the assembly area.
- Regularly inspect the rack for any signs of wear, damage, or loose connections.
Package Contents
Verify that all parts are present before beginning assembly. Refer to the image below for a visual representation of the components.

Image: All components included in the package for the Relaxdays 4-Bicycle Parking Rack.
- Main base rails (2 sections)
- U-shaped bicycle supports (4 pieces)
- Connecting bars (2 pieces)
- Mounting hardware (screws, nuts, wall plugs)
Setup and Assembly
The Relaxdays 4-Bicycle Parking Rack can be assembled for floor standing or wall mounting. Follow these steps for assembly:
- Connect Base Rails: Join the two main base rail sections using the provided connecting bars and screws. Ensure they are tightly secured.
- Attach U-shaped Supports: Insert the U-shaped bicycle supports into the designated slots on the base rails. Secure each support with the provided screws and nuts.
- Choose Mounting Option:
- Floor Standing: Place the assembled rack on a flat, stable surface. For added stability, you may use the provided floor anchors to secure it to the ground.
- Wall Mounting: Position the rack against the desired wall. Mark the drilling points through the pre-drilled holes on the base rails. Drill holes, insert wall plugs, and secure the rack to the wall using the appropriate screws.
- Final Check: Verify that all screws and connections are tight and the rack is stable before use.
Video: Assembly and usage demonstration of a similar bicycle rack. This video illustrates the general assembly process and how to place bicycles in the rack.

Image: The 4-Bicycle Parking Rack configured for floor mounting.

Image: The 4-Bicycle Parking Rack configured for wall mounting.
Operating Instructions
Using your bicycle parking rack is straightforward:
- Position Bicycle: Roll the front or rear wheel of your bicycle into one of the U-shaped supports.
- Secure Bicycle: Ensure the bicycle wheel is fully seated within the support for maximum stability. The rack is designed to accommodate tires up to approximately 5 cm (2 inches) wide.
- Optimize Space: For multiple bicycles, alternate the direction of each bike (e.g., front wheel in, then rear wheel in) to prevent handlebars from clashing and maximize space efficiency.
- Additional Security: For enhanced security, you can chain your bicycle to the rack using a suitable lock (not included).
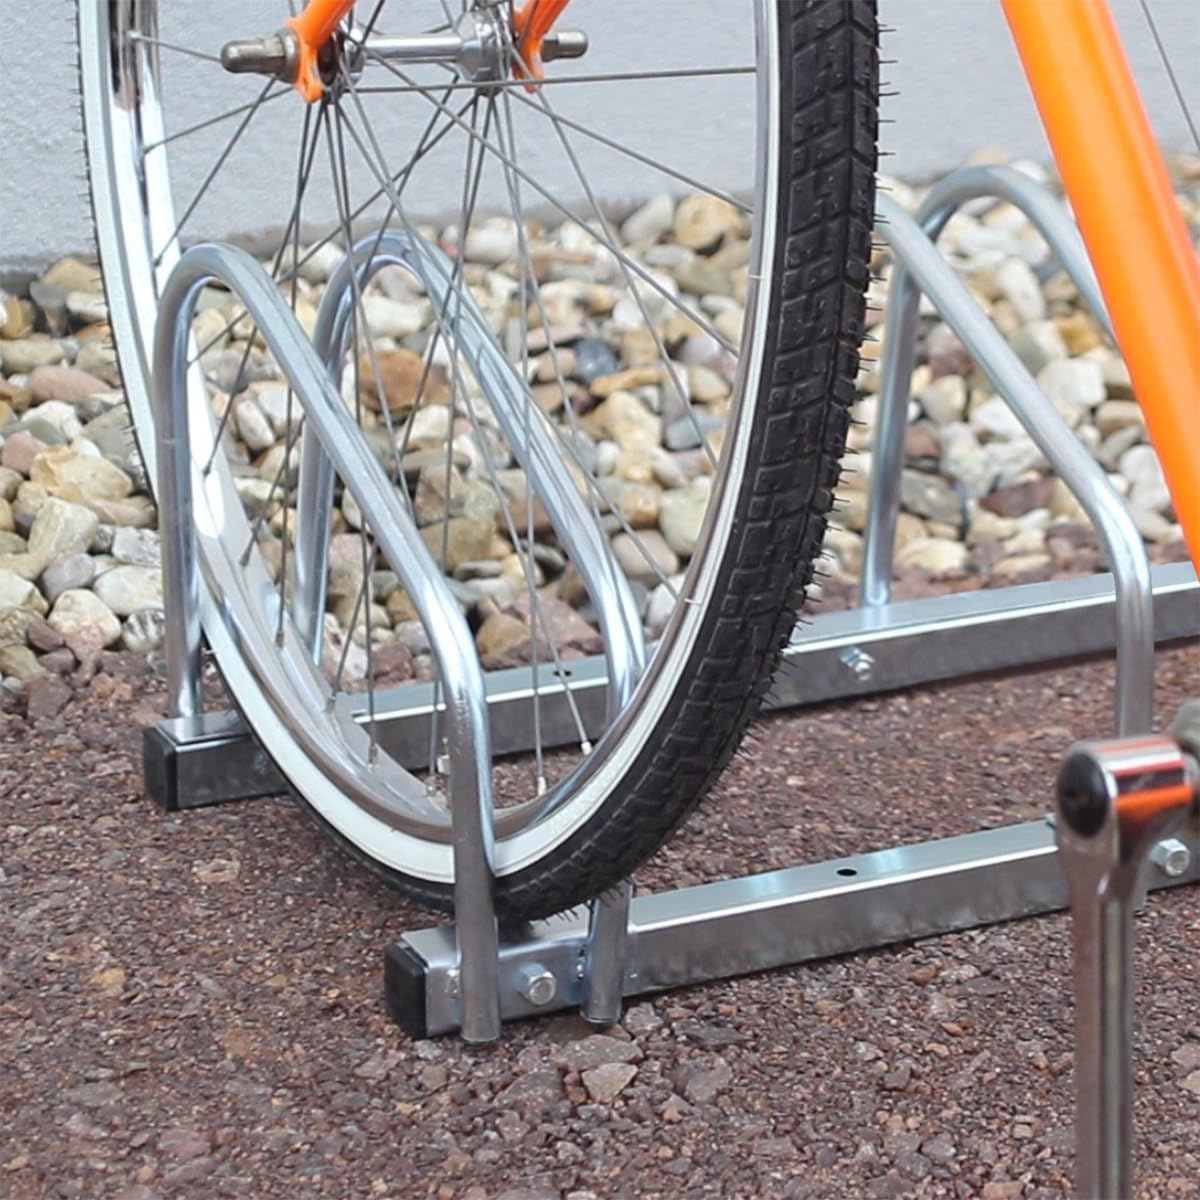
Image: A bicycle wheel properly positioned in the rack.
Maintenance
To ensure the longevity and continued performance of your Relaxdays 4-Bicycle Parking Rack, follow these maintenance guidelines:
- Cleaning: Wipe down the rack periodically with a damp cloth to remove dirt and debris. For stubborn grime, a mild soap solution can be used.
- Inspection: Regularly check all screws, nuts, and connections to ensure they remain tight. Re-tighten if necessary.
- Corrosion Check: Although made from corrosion-resistant steel, inspect for any signs of rust, especially if used outdoors. Address any rust spots promptly with appropriate rust treatment.
- Damage: If any part of the rack becomes bent or damaged, discontinue use and replace the affected components or the entire unit to prevent accidents.
Troubleshooting
If you encounter any issues with your bicycle parking rack, consider the following:
- Instability: Ensure all screws are tightened. If floor-mounted, consider anchoring it to the ground. If wall-mounted, verify the wall material is suitable and anchors are correctly installed.
- Bicycles not fitting: Check the tire width of your bicycles. The rack is designed for tires up to approximately 5 cm (2 inches) wide.
- Difficulty assembling: Review the assembly steps and ensure all parts are oriented correctly. Do not force components together.
Specifications
| Model Number | 10017695 |
| Brand | Relaxdays |
| Capacity | 4 Bicycles |
| Material | Galvanized Steel |
| Color | Silver |
| Dimensions (L x W x H) | Approx. 100 x 32 x 26 cm (39.4 x 12.6 x 10.2 inches) |
| Weight | Approx. 5.5 kg (12.1 lbs) |
| Max. Tire Width | Approx. 5 cm (2 inches) |
| Mounting Options | Floor or Wall Mount |
| Special Feature | Corrosion Resistant |
Warranty and Support
For warranty information, product support, or to inquire about replacement parts, please contact Relaxdays customer service or refer to the official Relaxdays website. Keep your purchase receipt as proof of purchase.