
Solis Vac Professional 572 (Model 92218)
Solis Vac Professional 572 Vacuum Sealer
Instruction Manual
Model: 92218
1. Introduction
Thank you for choosing the Solis Vac Professional 572 Vacuum Sealer. This appliance is designed to extend the freshness of your food by removing air from specially designed bags and containers, preventing spoilage and freezer burn. It features a powerful vacuum pump, a sealing bar, a convenient roll compartment with an integrated film cutter, and specialized functions like pulse vacuum and marinating.
Please read this instruction manual carefully before first use to ensure safe and optimal operation of your device. Keep this manual for future reference.

Image: Front view of the Solis Vac Professional 572 Vacuum Sealer, showcasing its stainless steel finish and control panel.
2. Important Safety Instructions
Always follow basic safety precautions when using electrical appliances to reduce the risk of fire, electric shock, and injury.
- Read all instructions before operating the appliance.
- Do not immerse the appliance, power cord, or plug in water or other liquids.
- Keep out of reach of children. Close supervision is necessary when the appliance is used by or near children.
- Unplug from outlet when not in use and before cleaning.
- Do not operate any appliance with a damaged cord or plug, or after the appliance malfunctions or has been damaged in any manner.
- Use only attachments recommended or sold by the manufacturer.
- Do not use outdoors.
- Do not place on or near a hot gas or electric burner, or in a heated oven.
- Always ensure the lid is properly closed and latched before operating.
- The sealing bar becomes hot during operation. Avoid direct contact.
3. Product Overview
Familiarize yourself with the components of your Solis Vac Professional 572:
- Control Panel: Contains buttons for various functions (Vacuum & Seal, Seal Only, Pulse, Marinate) and indicator lights.
- Lid: Opens to access the vacuum chamber and sealing bar.
- Vacuum Chamber: Area where the bag opening is placed for vacuuming.
- Sealing Bar: Heats up to create a strong, airtight seal.
- Roll Compartment: Located under the lid, designed to hold a roll of vacuum film.
- Integrated Film Cutter: Slides across to cut film from the roll to desired bag length.
- Accessory Port: For connecting the vacuum hose for external containers.
- Power Cord Storage: Located at the bottom of the unit for neat storage.

Image: Top view of the Solis Vac Professional 572, showing the control panel and handles.

Image: The Solis Vac Professional 572 with its lid open, revealing the vacuum chamber and the sealing bar.
4. Setup
4.1 Unpacking and Placement
Carefully remove the vacuum sealer from its packaging. Place the unit on a flat, stable, and dry surface. Ensure there is enough space around the appliance for proper ventilation.

Image: Underside of the Solis Vac Professional 572, showing the integrated power cord storage compartment.
4.2 Loading the Film Roll
The Solis Vac Professional 572 comes with an integrated roll compartment and cutter, allowing you to create custom-sized bags.
- Open the lid of the vacuum sealer.
- Place the vacuum film roll into the designated compartment.
- Pull out the desired length of film and use the integrated cutter to create a bag. Ensure one end of the bag is sealed before vacuuming.

Image: The Solis Vac Professional 572 with its lid open, showing a roll of vacuum film placed in the internal compartment.
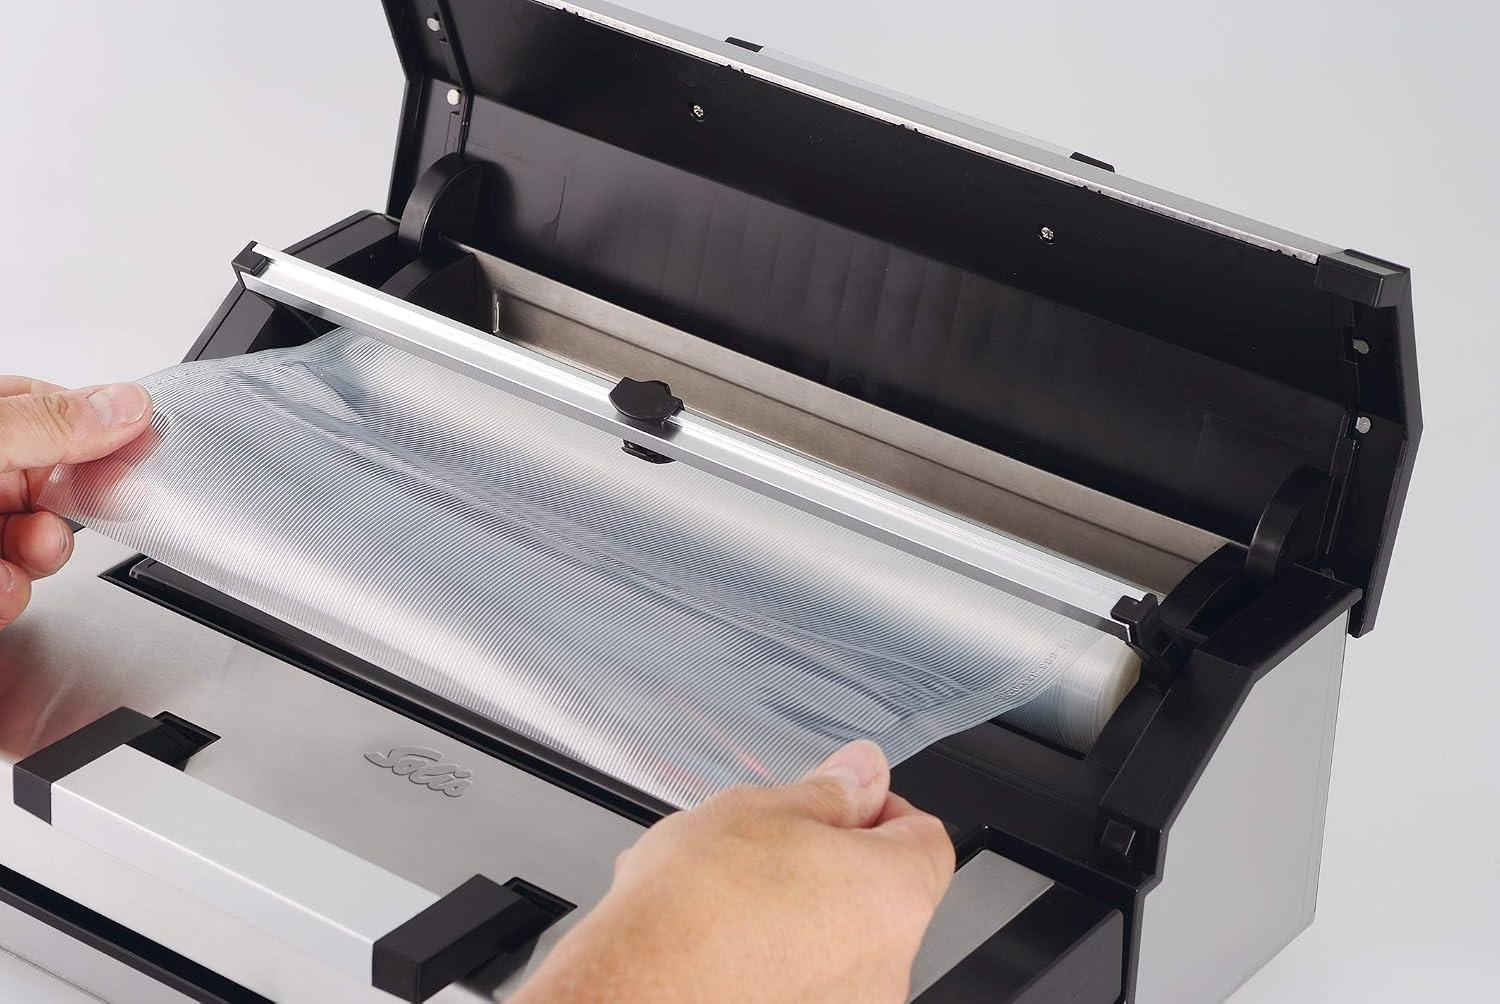
Image: A user demonstrating how to pull and cut film from the integrated roll compartment of the Solis Vac Professional 572.
4.3 Power Connection
Plug the power cord into a grounded electrical outlet. The appliance is now ready for use.
5. Operating Instructions
5.1 Vacuum Sealing Bags
This function is ideal for preserving dry foods, extending their shelf life significantly.
- Prepare your food and place it inside a vacuum sealer bag, leaving at least 5-7 cm of space from the top opening.
- Ensure the inside of the bag opening is clean and dry.
- Place the open end of the bag flat into the vacuum chamber, ensuring it lies smoothly over the sealing bar.
- Close the lid firmly until both side latches click into place.
- Press the "Vacuum & Seal" button. The appliance will automatically remove air from the bag and then create a strong seal.
- Once the process is complete and the indicator light turns off, open the lid by pressing the release buttons (if present) or lifting the handles.
- Remove the sealed bag.
5.2 Marinating Function
The marinating function allows for quick and efficient marination of food using an external vacuum container (sold separately).
- Place your food and marinade into a compatible vacuum marinating container.
- Close the container lid securely.
- Connect one end of the vacuum hose (included) to the accessory port on the vacuum sealer and the other end to the port on the marinating container.
- Press the "Marinate" button on the control panel. The appliance will cycle through vacuum and release phases to infuse the marinade into the food.
- Once the cycle is complete, disconnect the hose and store the container as desired.

Image: Side view of the Solis Vac Professional 572, showing the compartment for the vacuum hose accessory.

Image: The Solis Vac Professional 572 connected via its vacuum hose to an external vacuum container for marinating or storage.
5.3 Pulse Vacuum Function
The pulse vacuum function provides manual control over the vacuum process, ideal for delicate or moist foods that could be crushed or have liquids drawn into the machine.
- Place the bag opening into the vacuum chamber as described in section 5.1.
- Close the lid firmly.
- Press and hold the "Pulse" button. The appliance will vacuum as long as the button is held.
- Release the button when the desired vacuum level is reached (e.g., just before liquids are drawn up or delicate items are crushed).
- Immediately press the "Seal Only" button to seal the bag.
- Once sealed, open the lid and remove the bag.
6. Maintenance and Cleaning
Regular cleaning ensures optimal performance and extends the life of your vacuum sealer.
- Always unplug the appliance before cleaning.
- Wipe the exterior of the unit with a damp cloth and mild soap. Do not use abrasive cleaners.
- Clean the vacuum chamber and drip tray (if removable) with a damp cloth. Ensure no food particles or liquids remain.
- Carefully wipe the sealing bar with a dry cloth. Do not touch it when hot.
- Ensure all parts are completely dry before storing or next use.
7. Troubleshooting
If you encounter issues with your Solis Vac Professional 572, refer to the following common problems and solutions:
| Problem | Possible Cause | Solution |
|---|---|---|
| Appliance does not turn on. | Not plugged in; power outlet issue. | Ensure power cord is securely plugged into a working outlet. |
| Bag does not vacuum properly. | Bag not placed correctly; lid not latched; bag leakage; vacuum chamber dirty. | Ensure bag opening is flat and fully inside the vacuum chamber. Close lid firmly until latches click. Check bag for holes or tears. Clean vacuum chamber. |
| Bag does not seal. | Sealing bar dirty/wet; bag material incompatible; too much moisture in bag. | Wipe sealing bar clean and dry. Use only official vacuum sealer bags. Pre-freeze moist foods or use a paper towel to absorb excess liquid. |
| Vacuum is weak. | Gaskets/seals dirty or damaged; bag not properly aligned. | Clean or inspect gaskets for damage. Ensure bag is perfectly aligned over the vacuum channel. |
If the problem persists after trying these solutions, please contact Solis customer support.
8. Specifications
| Feature | Detail |
|---|---|
| Brand | Solis |
| Model Number | 92218 |
| Color | Silver |
| Product Dimensions (L x W x H) | 42.5 x 28 x 16 cm |
| Item Weight | 4.65 Kilograms |
| Power | 180 Watt |
| Material | Stainless Steel |
| Operating Mode | Automatic |
9. Warranty and Support
Solis products are manufactured to high-quality standards. For information regarding warranty terms and conditions, please refer to the warranty card included with your product or visit the official Solis website. For technical support, spare parts, or service inquiries, please contact Solis customer service directly.
You can find contact information on the Solis website or in the product packaging.
Related documentsVac Professional 572 (Model 92218)


Ask a question about this manual
Ask about setup, troubleshooting, compatibility, parts, safety, or missing instructions. Manuals+ will review the question and use this page’s manual context to help answer it.