Lock N Load BK1000
Lock N Load BK1000 Deluxe Motorcycle Wheel Chock Instruction Manual
Brand: Lock N Load | Model: BK1000
1. Product Overview
The Lock N Load BK1000 Deluxe Motorcycle Wheel Chock Combo Kit is designed to provide a secure and stable trailering system for various motorcycle sizes, from cruisers to dirt bikes. This comprehensive kit includes a steel wheel chock that automatically secures the front wheel, a front tire tie-down, and rear tire ratcheting tie-downs. This system ensures your motorcycle remains stable and secure during transport, even over challenging road conditions.

Figure 1.1: Lock N Load BK1000 Deluxe Motorcycle Wheel Chock Combo Kit, showing the orange wheel chock and two black and orange ratcheting tie-downs.
2. Components Included
- (1) BK100 Deluxe Wheel Chock
- (2) BK200 Auto-Ratchet Tie-Downs
- (1) BK100-1 Mounting Plate
- (1) BK100-2 Front Tire Tie-Down
- Necessary mounting hardware (bolts, washers, nuts, quick-release thumb nuts)
- D-Ring anchor points (if included in your specific kit)

Figure 2.1: Various bolts, washers, and nuts included for installation.

Figure 2.2: Quick-release D-ring anchor points and quick-release mechanisms.
3. Setup and Installation
Proper installation of the Lock N Load BK1000 is crucial for the safe transport of your motorcycle. This system is designed for secure mounting to a trailer floor or garage floor.
3.1. Mounting Plate Installation
- Select Location: Choose a flat, sturdy surface on your trailer or garage floor where the motorcycle will be positioned. Ensure there is adequate space for the motorcycle and for securing the tie-downs.
- Position Mounting Plate: Place the BK100-1 Mounting Plate in the desired location. The plate should be oriented to allow the wheel chock to face the direction of the motorcycle's entry.
- Mark Drilling Points: Use the mounting plate as a template to mark the drilling points on your floor. Ensure the marks are accurate.
- Drill Holes: Drill appropriate size holes through the marked points. Use drill bits suitable for your floor material (e.g., wood, metal).
- Secure Mounting Plate: Attach the mounting plate using the provided bolts, washers, and nuts. Ensure all fasteners are tightened securely.

Figure 3.1: Underside view of the wheel chock attached to its mounting plate, illustrating how it connects to the floor.

Figure 3.2: The wheel chock showing the quick-release thumb nuts used to secure it to the mounting plate.
3.2. Attaching the Wheel Chock
- Align Chock: Align the BK100 Deluxe Wheel Chock with the installed mounting plate.
- Engage Quick-Release: The wheel chock features quick-release anchoring. Slide the chock onto the mounting plate until it locks into place.
- Secure with Thumb Nuts: Use the provided quick-release thumb nuts to further secure the wheel chock to the mounting plate. Ensure they are hand-tightened firmly.

Figure 3.3: Detail of the quick-release mechanism, allowing for rapid attachment and removal of the wheel chock.
3.3. Installing D-Ring Anchor Points (if applicable)
If your trailer or floor does not have existing D-ring anchor points, you may need to install them for the ratcheting tie-downs. Use the provided D-rings and appropriate hardware to secure them to a strong structural point on your trailer or floor.
4. Operating Instructions
Follow these steps to safely load and secure your motorcycle using the Lock N Load BK1000 system.
- Position Motorcycle: Carefully drive or push your motorcycle into the wheel chock. The chock is designed to automatically close and secure the front wheel as the motorcycle rolls into it.
- Verify Front Wheel Security: Ensure the front wheel is firmly seated and held upright by the wheel chock. The motorcycle should be stable enough to stand on its own without assistance.
- Attach Front Tire Tie-Down: Connect the BK100-2 Front Tire Tie-Down to the front wheel of your motorcycle and secure it to appropriate anchor points on your trailer. Tighten this strap to provide forward stability and prevent movement.
- Attach Rear Ratcheting Tie-Downs: Connect the two BK200 Auto-Ratchet Tie-Downs to the rear of your motorcycle (e.g., frame, swingarm, or sturdy luggage rack) and to the D-ring anchor points on your trailer floor.
- Tighten Rear Tie-Downs: Operate the ratcheting mechanism on the BK200 tie-downs to apply tension. Tighten them evenly until the rear tire is firmly secured and the motorcycle shows no lateral movement. Avoid over-tightening, which can damage suspension components.
- Final Check: Before transport, double-check all connections and straps to ensure they are tight and secure. Gently push and pull on the motorcycle to confirm it is stable.

Figure 4.1: A motorcycle's front wheel securely held in the wheel chock, with a front tie-down strap in place.
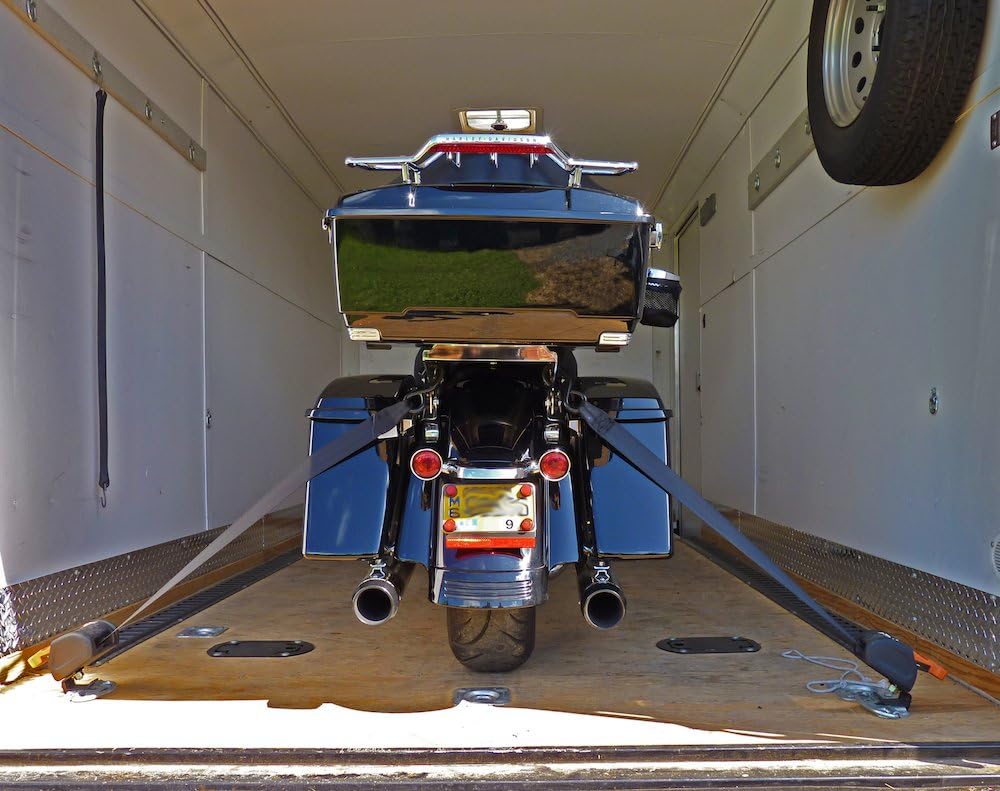
Figure 4.2: Rear view of a motorcycle fully secured within a trailer using the Lock N Load system, showing the rear tie-downs.
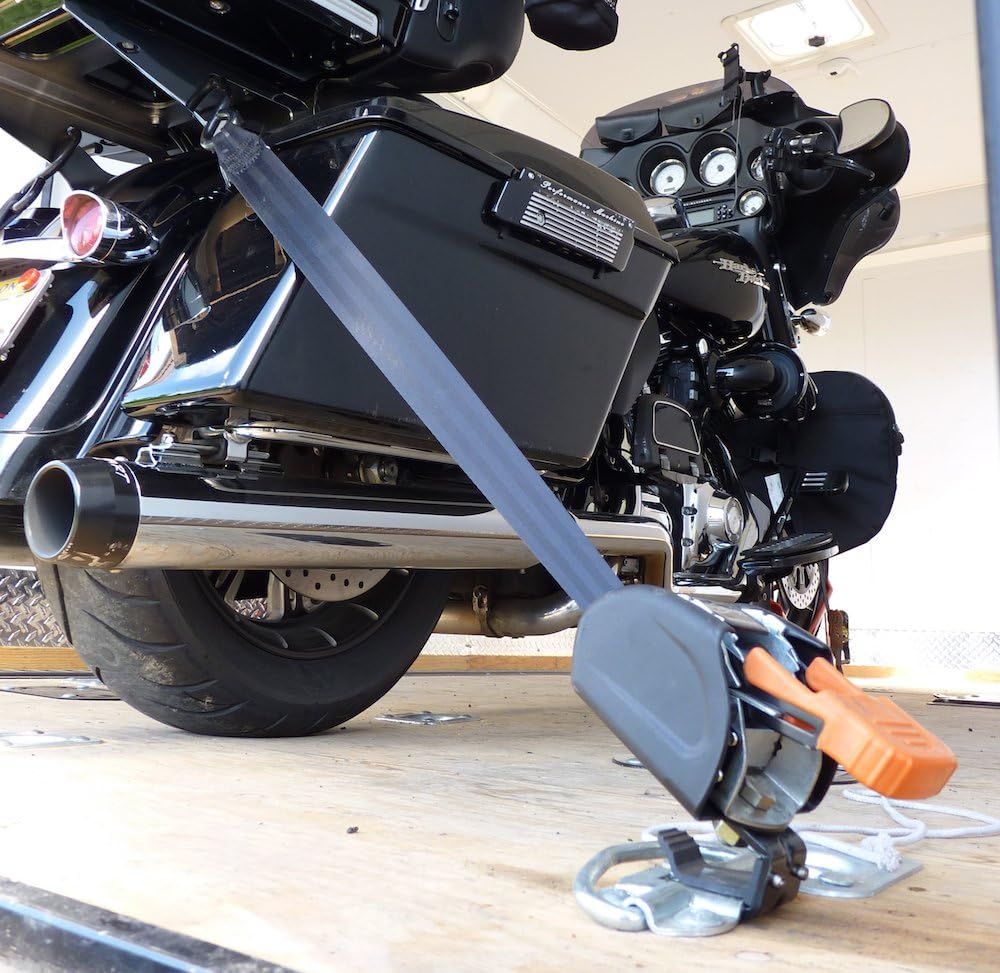
Figure 4.3: Close-up of the rear ratcheting tie-down mechanism attached to the motorcycle and a D-ring anchor.
4.1. Unloading the Motorcycle
- Release Rear Tie-Downs: Carefully release the tension on the BK200 Auto-Ratchet Tie-Downs. Disconnect them from the motorcycle and anchor points.
- Release Front Tire Tie-Down: Release and disconnect the BK100-2 Front Tire Tie-Down.
- Remove Motorcycle: Gently roll the motorcycle backward out of the wheel chock. The chock will release the front wheel as it exits.
5. Maintenance
Regular maintenance ensures the longevity and safe operation of your Lock N Load BK1000 system.
- Inspection: Before each use, inspect all components for signs of wear, damage, or corrosion. Check the steel frame of the wheel chock, the ratcheting mechanisms of the tie-downs, and the integrity of all straps.
- Cleaning: Clean the wheel chock and tie-downs periodically with a damp cloth to remove dirt, grime, and road debris. Avoid harsh chemicals that could damage the finish or materials.
- Lubrication: Lightly lubricate moving parts of the ratcheting mechanisms as needed to ensure smooth operation.
- Hardware Check: Periodically check all mounting bolts and quick-release thumb nuts for tightness. Re-tighten if necessary.
- Storage: When not in use, store the components in a clean, dry place to prevent rust and degradation. The quick-release design allows for easy removal and storage of the wheel chock.
6. Troubleshooting
- Motorcycle Not Secure in Chock:
- Ensure the motorcycle's front wheel is fully seated in the chock. It should engage the automatic closing mechanism.
- Verify the wheel chock is securely attached to the mounting plate and the mounting plate is firmly bolted to the floor.
- Ratcheting Tie-Downs Slip:
- Inspect the strap for fraying or damage. Replace if necessary.
- Ensure the strap is correctly threaded through the ratchet mechanism. Refer to the tie-down's specific instructions if available.
- Check the ratchet mechanism for debris or malfunction. Clean or lubricate as needed. If the mechanism is damaged, replace the tie-down.
- Difficulty Releasing Quick-Release Thumb Nuts:
- Ensure the nuts are not cross-threaded.
- If they are excessively tight, a wrench may be used carefully, but they are designed for hand-tightening.
- Check for corrosion or debris in the threads.
- Excessive Movement During Transport:
- Re-check the tension on all tie-downs (front and rear). They should be taut but not over-tightened.
- Ensure the motorcycle is centered and balanced in the chock.
- Verify that the D-ring anchor points are securely fastened to the trailer's structural elements.
7. Specifications
| Feature | Detail |
|---|---|
| Model | BK1000 |
| Brand | Lock N Load |
| Item Weight | 11.5 pounds |
| Product Dimensions | 19 x 11.5 x 15.4 inches |
| Special Features | All Components use Quick-Release Anchoring for Complete Removal in Seconds |
| Manufacturer Part Number | BK1000 |
8. Warranty Information
Specific warranty details for the Lock N Load BK1000 Deluxe Motorcycle Wheel Chock are not provided in this manual. For comprehensive warranty information, including terms, conditions, and duration, please refer to the official Lock N Load website or contact their customer service directly. Keep your proof of purchase for any warranty claims.
9. Support and Contact
For further assistance, technical support, or inquiries regarding your Lock N Load BK1000 system, please visit the official Lock N Load website or contact their customer support team.
Official Lock N Load Store: Visit Lock N Load Store on Amazon
Always refer to the manufacturer's official resources for the most up-to-date information and support.