Introduction
This manual provides comprehensive instructions for the installation, operation, maintenance, and troubleshooting of your Excalibur K-9 Eclipse2 Car Alarm System. Please read this manual thoroughly before using your system to ensure proper function and to maximize its security features. This system is designed to provide advanced vehicle security and convenience features, including remote start capabilities and two-way communication via LCD remotes.
Product Overview
The Excalibur K-9 Eclipse2 system includes a main control unit, a siren, a sensor module, and two 2-way LCD remote controls. These components work together to provide robust security and convenient remote access to your vehicle's functions.

Figure 1: Overview of the Excalibur K-9 Eclipse2 Car Alarm System components, including the main control unit, siren, sensor, and two 2-way LCD remotes.
Setup and Installation
Installation of the Excalibur K-9 Eclipse2 Car Alarm System requires specialized knowledge of automotive electrical systems. It is strongly recommended that this system be installed by a certified professional installer. Improper installation can lead to vehicle damage, system malfunction, or safety hazards.
Key Components for Installation:
- Main Control Unit: This central module processes all system commands and sensor inputs. It should be mounted securely in a hidden, dry location within the vehicle's interior.
- Siren: The siren provides audible alerts for alarm triggers. It should be mounted in the engine bay, away from heat sources and moving parts, with the horn facing downwards to prevent water accumulation.
- Sensor Module (e.g., Shock Sensor): This module detects impacts or disturbances to the vehicle. It should be mounted securely to a solid surface within the vehicle's interior, typically near the center, to ensure optimal sensitivity.
- Antenna/Transceiver: For optimal range and two-way communication, the antenna should be mounted high on the windshield or dashboard, away from metal obstructions.
- Wiring Harnesses: Connect all components to the main control unit and integrate with the vehicle's electrical system according to the detailed wiring diagrams provided with the full installation manual.
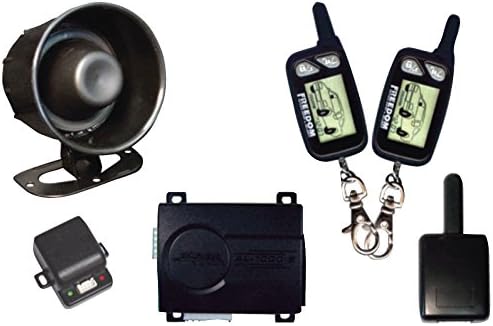
Figure 2: The main control unit of the Excalibur K-9 Eclipse2 system.

Figure 3: The siren component of the Excalibur K-9 Eclipse2 car alarm system.

Figure 4: An example sensor module (AU-64TM) for the Excalibur K-9 Eclipse2 system.
After physical installation, the system will require programming and configuration, which typically involves pairing the remote controls and setting sensor sensitivities. Refer to the detailed installation guide for specific wiring diagrams and programming steps.
Operating Instructions
Your Excalibur K-9 Eclipse2 system comes with two 2-way LCD remote controls, providing visual and audible feedback on your vehicle's status. Familiarize yourself with the buttons and display icons on your remote.

Figure 5: The two 2-way LCD remote controls for the Excalibur K-9 Eclipse2 system.
Basic Remote Functions:
- Arming the System: Press the LOCK button once. The vehicle lights will flash, the siren will chirp, and the remote will confirm arming.
- Disarming the System: Press the UNLOCK button once. The vehicle lights will flash twice, the siren will chirp twice, and the remote will confirm disarming.
- Remote Start: Press and hold the START button (often indicated by a key or engine icon) for approximately 3 seconds. The vehicle will start, and the remote will confirm. Press the same button again to turn off the engine remotely.
- Panic Mode: Press and hold the PANIC button (often indicated by a horn or siren icon) for 3 seconds. The alarm will sound, and the vehicle lights will flash. Press any button to stop.
- Trunk Release: Press and hold the TRUNK button (often indicated by a trunk icon) for 3 seconds to open the vehicle's trunk (if connected and configured).
- Valet Mode: This mode temporarily disables the alarm functions, allowing the vehicle to be serviced without triggering the alarm. Typically activated by a combination of remote buttons or a hidden valet switch. Consult your full installation guide for specific instructions on entering and exiting Valet Mode.
2-Way LCD Remote Feedback:
The LCD screen on your remote provides real-time status updates from your vehicle. Icons will illuminate to indicate:
- Armed/Disarmed Status: Visual confirmation of the alarm's state.
- Door Open/Closed: Alerts if a door is ajar.
- Trunk Open/Closed: Alerts if the trunk is ajar.
- Hood Open/Closed: Alerts if the hood is ajar.
- Remote Start Confirmation: Indicates when the engine has successfully started or stopped.
- Alarm Trigger: Notifies you if the alarm has been triggered and which zone (e.g., shock sensor, door) caused it.
- Battery Level: Displays the remote's battery status.
Refer to your remote's specific user guide for a complete list of icons and their meanings.
Maintenance
Regular maintenance ensures the longevity and optimal performance of your Excalibur K-9 Eclipse2 Car Alarm System.
Remote Control Battery Replacement:
- When the remote's LCD indicates a low battery, or if the range decreases significantly, it's time to replace the battery.
- Typically, these remotes use a small coin-cell battery (e.g., CR2032).
- Carefully open the remote casing (usually by prying gently with a small flat-head screwdriver).
- Note the orientation of the old battery and replace it with a new one, ensuring correct polarity.
- Close the remote casing securely.
General Care:
- Keep remote controls dry and away from extreme temperatures.
- Avoid dropping the remote controls.
- Do not attempt to open or repair the main control unit or siren yourself; contact a professional.
Troubleshooting
If you experience issues with your Excalibur K-9 Eclipse2 system, refer to the following common problems and solutions:
| Problem | Possible Cause | Solution |
|---|---|---|
| Remote control not working or poor range. | Low battery in remote, interference, remote out of range. | Replace remote battery. Move closer to the vehicle. Check for strong radio interference. |
| Alarm triggers randomly. | Sensor sensitivity too high, faulty sensor, loose wiring. | Adjust sensor sensitivity (consult installer). Inspect wiring for loose connections. Contact a professional for diagnosis. |
| Remote start fails. | Vehicle not in proper remote start readiness mode, low fuel, hood open, brake pedal pressed. | Ensure vehicle is in neutral (manual transmission) or park (automatic) with parking brake engaged. Check fuel level. Ensure hood is closed. Do not press brake pedal during remote start attempt. |
| Siren does not sound. | Siren disconnected, faulty siren, wiring issue. | Check siren connection. Contact a professional for inspection and repair. |
For complex issues or if the above solutions do not resolve the problem, please contact a certified Excalibur installer or technical support.
Specifications
| Feature | Detail |
|---|---|
| Brand | Excalibur |
| Model Number | K9ECLIPSE2 |
| Mfr Part Number | K-9 ECLIPSE2 |
| Remote Control Type | (2) 2-Way LCD Remotes (Replacement remote-65101) |
| Maximum Range | 0.25 Miles (approximately 400 meters) |
| Includes Remote | Yes |
| Item Weight | 2.1 Pounds (approximately 0.95 kg) |
| UPC | 100010773779, 289538968444 |
Warranty and Support
For specific warranty information regarding your Excalibur K-9 Eclipse2 Car Alarm System, please refer to the warranty card included with your product packaging or visit the official Excalibur website. Technical support is typically provided through authorized dealers and installers. Do not attempt to service the main unit yourself, as this may void your warranty.
For further assistance, please contact your authorized Excalibur dealer or the manufacturer's customer support channels.