Introduction
This manual provides detailed instructions for the installation, operation, and maintenance of your Vermont Castings 50000816 Grill Ignitor Assembly. Please read all instructions carefully before proceeding to ensure safe and correct usage.
Compatibility
The Vermont Castings 50000816 Grill Ignitor Assembly is a direct replacement part compatible with numerous Vermont Castings grill models, including but not limited to:
- CF9050, CF9056
- VCS3006, VCS3506, VCS4106, VCS5006BI
- VM448, VM456, VM400, VM406, VM450, VM45055P, VM450SSP, VM400XBP
- CF9055-3A, CF9055-3B
- VC30, VCS3000, VCS3505, VCS3505BI, VCS3507, VCS3507BI, VCS3517, VCS4005, VCS6005, VCS6006
It also fits Jennair gas grill models JA460, JA461, JA461P, and the GP450 Great Outdoor Barbecue Grill. Verify that this ignitor model is correct for your specific grill before installation.
Safety Information
Always prioritize safety when working with gas appliances. Follow these general safety guidelines:
- Ensure the grill is completely turned off and disconnected from its gas supply before beginning any installation or maintenance.
- Allow the grill to cool down completely before handling any components.
- Wear appropriate personal protective equipment, such as gloves, to prevent injury.
- If you are unsure about any step, consult a qualified technician.
Package Contents
Your Vermont Castings 50000816 Grill Ignitor Assembly package should include:
- 1 x Vermont Castings 50000816 Ignitor Assembly
- Mounting nut (pre-installed or separate)
- Spring (pre-installed or separate)
Note: An AA battery is typically required for operation and may not be included.
Setup and Installation
Follow these steps to install your new ignitor assembly:
- Preparation: Ensure your grill is off and the gas supply is disconnected. Allow the grill to cool.
- Remove Old Ignitor: Locate the existing ignitor button on your grill's control panel. Unscrew the retaining nut from the ignitor button. Carefully pull the old ignitor assembly out from the back of the control panel. Disconnect any wires attached to the old ignitor.
- Install New Ignitor: Feed the new ignitor assembly through the opening in the control panel from the back. Secure it in place by screwing on the retaining nut from the front. Ensure it is snug but do not overtighten.
- Connect Wires: Reconnect the ignitor wires to the terminals on the back of the new ignitor assembly. Ensure each wire is securely attached to its corresponding terminal.
- Battery Installation: The ignitor requires one AA battery. Unscrew the ignitor button to reveal the battery compartment. Insert the AA battery with the positive (+) end facing outwards. Replace the ignitor button and screw it back on securely.

Figure 1: Vermont Castings 50000816 Ignitor Assembly. This image shows the complete ignitor assembly with its push button and threaded body.
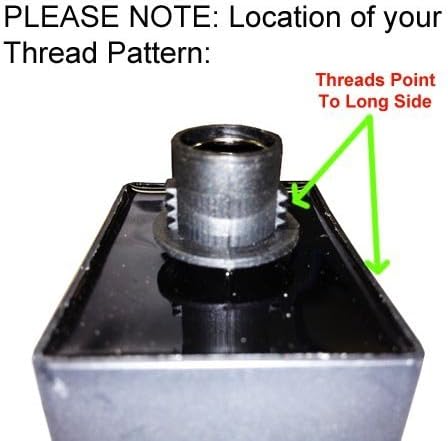
Figure 2: Close-up view of the ignitor's threaded body. Note that the threads point towards the long side of the ignitor body, which is important for correct orientation during installation.
Video 1: This video demonstrates the battery installation process for a similar push-button electric igniter. While the igniter shown may have a different number of outlets, the battery insertion method is generally applicable.
Operating Instructions
To ignite your grill using the new ignitor assembly:
- Ensure the gas supply to your grill is connected and turned on.
- Open the grill lid.
- Turn the control knob for the desired burner to the HIGH position.
- Immediately press and hold the ignitor button. You should hear a clicking sound and see a spark at the burner.
- Once the burner ignites, release the ignitor button.
- If the burner does not ignite within 5 seconds, turn the burner control knob to OFF, wait 5 minutes for gas to dissipate, and then repeat the ignition process.
Maintenance
Regular maintenance helps ensure the longevity and reliable operation of your ignitor assembly:
- Clean Electrodes: Periodically inspect the ignitor electrodes (located near the burners) for grease or food debris. Clean them gently with a wire brush if necessary.
- Check Wiring: Ensure all wiring connections to the ignitor assembly are secure and free from damage.
- Battery Replacement: If the ignitor produces a weak spark or no spark, replace the AA battery.
- Storage: If storing the grill for an extended period, consider removing the battery from the ignitor to prevent corrosion.
Troubleshooting
If your ignitor assembly is not functioning correctly, try the following solutions:
- No Spark:
- Check the battery: Ensure it is correctly installed and has sufficient charge. Replace if needed.
- Inspect wiring: Verify all wires are securely connected to the ignitor module and electrodes.
- Clean electrodes: Remove any debris or corrosion from the ignitor electrodes.
- Check electrode gap: Ensure the gap between the electrode and the burner is correct (refer to your grill's manual for specific measurements).
- Weak Spark:
- Replace the battery.
- Clean electrodes.
- Burner Not Igniting:
- Ensure gas supply is on and flowing to the burner.
- Check for blockages in the burner ports.
- Confirm the ignitor is sparking correctly.
Specifications
| Feature | Detail |
|---|---|
| Product Dimensions | 2 x 2.5 x 2.25 inches |
| Item Weight | 0.639 ounces |
| Manufacturer | Vermont Castings |
| Item Model Number | 50000816 |
| Power Source | 1 x AA Battery (not included) |
Warranty and Support
For warranty information or technical support, please refer to the documentation provided with your original Vermont Castings grill or contact Vermont Castings customer service directly. Keep your purchase receipt for warranty claims.