ACTi B61
ACTi B Series B61 Video Camera User Manual
Model: B61
1. Introduction
This manual provides comprehensive instructions for the installation, operation, and maintenance of the ACTi B Series B61 Video Camera. Please read this manual thoroughly before using the product to ensure proper and safe operation.
The ACTi B61 is a 5MP Indoor Zoom Dome camera designed for surveillance applications. It features a 3x zoom lens, adaptive IR illumination, and supports H.264 video compression at 1080p/30fps. Key features include:
- 5MP Indoor Zoom Dome with Day/Night functionality
- Adaptive IR for enhanced low-light performance
- Basic Wide Dynamic Range (WDR)
- 3x Zoom Lens (3-9mm / F1.2-2.1) with DC Iris Auto Focus
- 30 frames per second at 1920 x 1080 resolution
- Digital Noise Reduction (DNR)
- Audio input/output
- Micro SD HC/Micro SDXC card slot for local storage
- Power over Ethernet (PoE) or DC12V power input
- IK09 vandal resistance rating
- Digital Input/Output (DI/DO)
2. Package Contents
Please verify that all items are present and in good condition upon opening the package. If any items are missing or damaged, contact your vendor immediately.
- ACTi B Series B61 Video Camera
- Mounting Template/Hardware (screws, anchors)
- Quick Start Guide
- Software CD (if applicable)

Figure 1: Front view of the ACTi B Series B61 Video Camera. The camera is a white dome-shaped unit with a dark lens assembly visible through the clear dome cover.
3. Camera Components and Connections
Familiarize yourself with the various components and connection ports of the ACTi B61 camera.
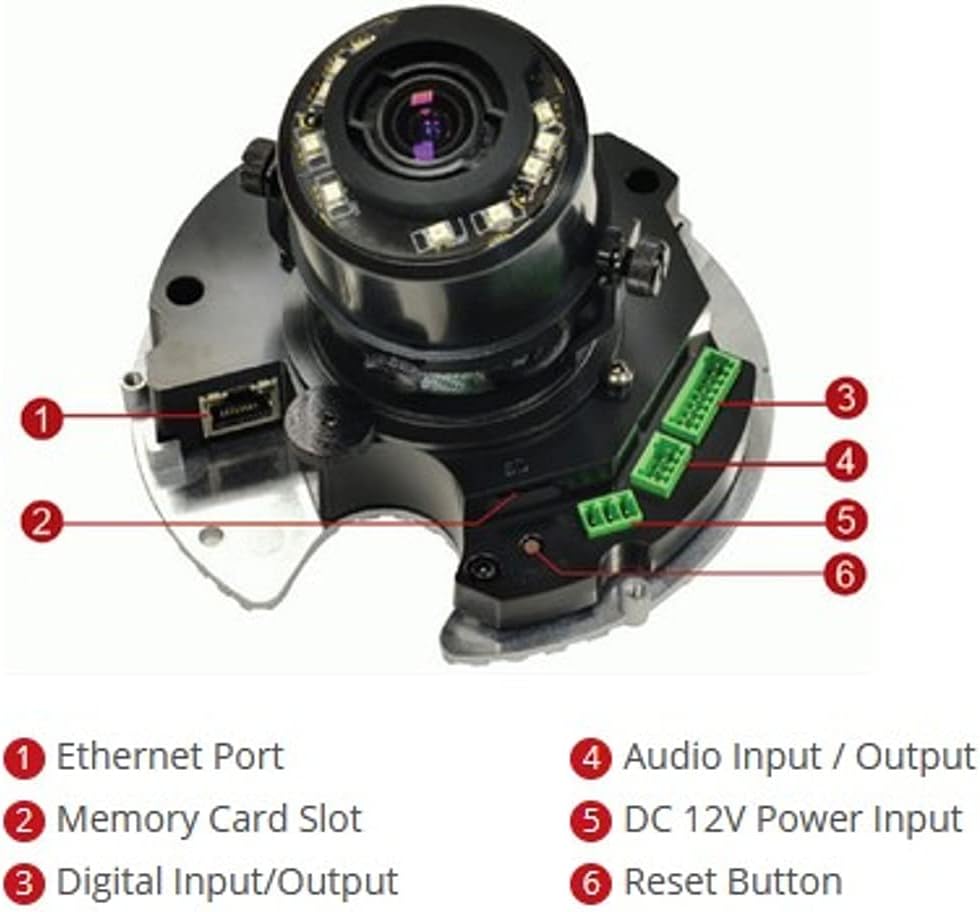
Figure 2: Internal view of the ACTi B61 camera with key components labeled.
- 1. Ethernet Port: For network connection and Power over Ethernet (PoE).
- 2. Memory Card Slot: For inserting a Micro SD HC/Micro SDXC card for local storage.
- 3. Digital Input/Output: For connecting external sensors or alarms.
- 4. Audio Input / Output: For connecting an external microphone and speaker.
- 5. DC 12V Power Input: Alternative power input if PoE is not used.
- 6. Reset Button: Used to restore factory default settings.
4. Setup and Installation
4.1 Mounting the Camera
The ACTi B61 is designed for indoor ceiling mount installation. Ensure the mounting surface is strong enough to support the camera's weight (approximately 1.58 pounds).
- Choose a suitable location on the ceiling for optimal surveillance coverage.
- Use the provided mounting template to mark the drill holes on the ceiling.
- Drill pilot holes and insert wall anchors if necessary.
- Secure the camera's mounting base to the ceiling using the provided screws.
- Connect necessary cables (Ethernet, power, audio, DI/DO) before fully securing the camera body.
- Adjust the camera's lens angle and zoom as needed.
4.2 Powering the Camera
The camera can be powered via Power over Ethernet (PoE) or a 12V DC power adapter.
- PoE: Connect an Ethernet cable from a PoE-enabled switch or injector to the camera's Ethernet port (1).
- DC 12V: Connect a 12V DC power adapter (not included) to the DC 12V Power Input port (5).
Note: Do not connect both PoE and DC 12V power simultaneously.
4.3 Network Connection
Connect the camera to your network using an Ethernet cable plugged into the Ethernet Port (1). The camera will obtain an IP address automatically via DHCP by default. For initial setup, it is recommended to connect the camera to a network segment where a DHCP server is active.
While the specifications mention Wi-Fi, the primary connection method for this type of surveillance camera is typically wired Ethernet for stability and power (PoE). Refer to the camera's software manual for detailed Wi-Fi configuration if applicable.
4.4 Initial Access and Configuration
After connecting the camera to the network and powering it on, you can access its web interface for configuration.
- Use the ACTi IP Utility software (typically found on the included CD or ACTi's website) to discover the camera's IP address on your network.
- Open a web browser (e.g., Chrome, Firefox) and enter the camera's IP address in the address bar.
- Log in using the default username and password (refer to the Quick Start Guide or ACTi documentation for default credentials).
- Change the default password immediately for security purposes.
- Configure network settings, video streaming parameters, recording options, and other features through the web interface.
5. Operating the Camera
5.1 Live View and Recording
Once configured, you can view the live video feed and manage recordings through the camera's web interface or compatible Network Video Recorder (NVR) software.
- Live View: Access the "Live View" section in the web interface to see the real-time video feed.
- Recording: Configure recording schedules, motion detection triggers, and storage locations (Micro SD card, NVR, NAS) via the "Recording" or "Event" settings.
5.2 Video Settings
Adjust video quality, resolution, frame rate, and image settings to suit your surveillance needs.
- Resolution: Supports up to 5MP effective still resolution and 1080p video capture resolution at 30 fps.
- Zoom and Focus: Utilize the 3x optical zoom and auto-focus features to capture detailed images. These settings are typically adjusted via the web interface.
- Day/Night Mode: The camera automatically switches between day (color) and night (black and white with IR illumination) modes based on ambient light.
5.3 Audio and I/O
If external audio devices or sensors are connected, configure their settings in the camera's web interface.
- Audio: Enable audio input for listening and audio output for two-way communication if supported by external devices.
- Digital I/O: Configure digital inputs to trigger events (e.g., recording, alarm notification) from external sensors, and digital outputs to control external devices.
6. Maintenance
6.1 Cleaning
Regular cleaning helps maintain optimal image quality and extends the camera's lifespan.
- Gently wipe the camera's dome cover with a soft, damp cloth. Avoid abrasive cleaners or solvents.
- For stubborn dirt, use a mild soap solution. Ensure no liquid enters the camera body.
- Clean the lens with a lens cleaning cloth and solution designed for optical surfaces.
6.2 Firmware Updates
Periodically check the ACTi official website for firmware updates. Firmware updates can provide new features, improve performance, and address security vulnerabilities.
- Download the latest firmware for your B61 model from the ACTi support website.
- Follow the instructions provided with the firmware update package for a safe upgrade process.
- Warning: Do not power off the camera during a firmware update.
7. Troubleshooting
This section addresses common issues you might encounter with your ACTi B61 camera.
| Problem | Possible Cause | Solution |
|---|---|---|
| No video feed |
|
|
| Poor image quality |
|
|
| Cannot log in to web interface |
|
|
For more detailed troubleshooting, refer to the comprehensive user manual available on the ACTi support website or contact ACTi technical support.
8. Specifications
| Feature | Description |
|---|---|
| Model | B61 |
| Effective Still Resolution | 5 MP |
| Video Capture Resolution | 1080p |
| Frame Rate | 30 fps |
| Lens | 3x Zoom Lens (3-9mm / F1.2-2.1), DC Iris Auto Focus |
| Zoom Type | Optical Zoom |
| Low Light Technology | Night Color, Adaptive IR |
| Connectivity Technology | Wireless (Wi-Fi), Wired (Ethernet) |
| Power Source | Corded Electric (PoE/DC12V) |
| Form Factor | Dome |
| Mounting Type | Ceiling Mount |
| Indoor/Outdoor Usage | Indoor |
| International Protection Rating | IK09 (Vandal Resistance), IP54 |
| Dimensions (L x W x H) | 5.7 x 2 x 4.2 inches |
| Item Weight | 1.58 pounds |
| Flash Memory Type | Micro SD HC/Micro SDXC |
| Video Capture Format | H.264, MPEG-4 |
| Manufacturer | ACTi CORPORATION INC. |
| Color | White |
| UPC | 187441266124, 888034003507 |
9. Warranty and Support
For detailed warranty information, technical support, and additional resources, please visit the official ACTi website or contact their customer service department.
ACTi Official Website: www.acti.com
Please have your product model (B61) and serial number ready when contacting support.
Ask a question about this manual
Ask about setup, troubleshooting, compatibility, parts, safety, or missing instructions. Manuals+ will review the question and use this page’s manual context to help answer it.