BANDAI SPIRITS BAN189430
Bandai Hobby Mecha Collection #1 Chopper Robot Tank Model Kit Instruction Manual
Model: BAN189430
1. Product Overview
The Bandai Hobby Mecha Collection #1 Chopper Robot Tank Model Kit is a snap-together plastic model kit featuring Tony Chopper from the popular series One Piece. This kit allows for the assembly of a robot vehicle designed as a tank, with Tony Chopper as the pilot. It is part of a series where individual robot models can combine to form larger configurations, culminating in a mighty giant bi-pedal robot when all five models are collected.
This model kit requires no tools for assembly, making it accessible for various skill levels. The parts are designed to snap together securely.

Image 1.1: Front view of the fully assembled Chopper Robot Tank, showcasing its blue tank body, large brown antlers, and Tony Chopper figure seated in the cockpit.
2. Assembly Instructions
Follow these steps carefully to assemble your Chopper Robot Tank model kit. Refer to the included pictorial instructions for detailed diagrams.
- Unpack Components: Carefully remove all plastic runners (sprues) and sticker sheets from the packaging. Verify that all parts are present according to the parts list in your manual.
- Identify Parts: Each part is labeled with a letter and number (e.g., A1, B2). Locate the corresponding parts on the runners.
- Snap-Fit Assembly: This kit uses a snap-fit system. Align the pegs on one part with the corresponding holes on another part and gently press them together until they click into place. Do not force parts.
- Assemble Main Body: Begin by assembling the core tank body sections. Pay attention to the orientation of each piece.
- Attach Limbs/Accessories: Connect the tank treads, cannon, and antlers to the main body. Ensure they are securely attached.
- Assemble Chopper Figure: Assemble the small Tony Chopper figure. The kit includes both sitting and standing versions of the figure.
- Place Chopper Figure: Insert the assembled Tony Chopper figure into the tank's cockpit.
- Apply Stickers: Carefully apply the included stickers to the designated areas on the model. Use tweezers for small stickers to ensure precise placement. Some stickers are very small and require patience.

Image 2.1: A close-up of hands assembling a plastic model kit, illustrating the snap-fit mechanism where parts are pressed together.

Image 2.2: A view of plastic runners (sprues) containing the unassembled parts of a model kit, ready for detachment and assembly.
3. Operating and Display
Once assembled, the Chopper Robot Tank is primarily a display model. Its tank treads are static, but the Chopper figure can be removed and re-inserted. The model is designed to be combined with other kits in the Mecha Collection series (sold separately) to form a larger, combined robot. Refer to the instructions included with the other kits for combination details.
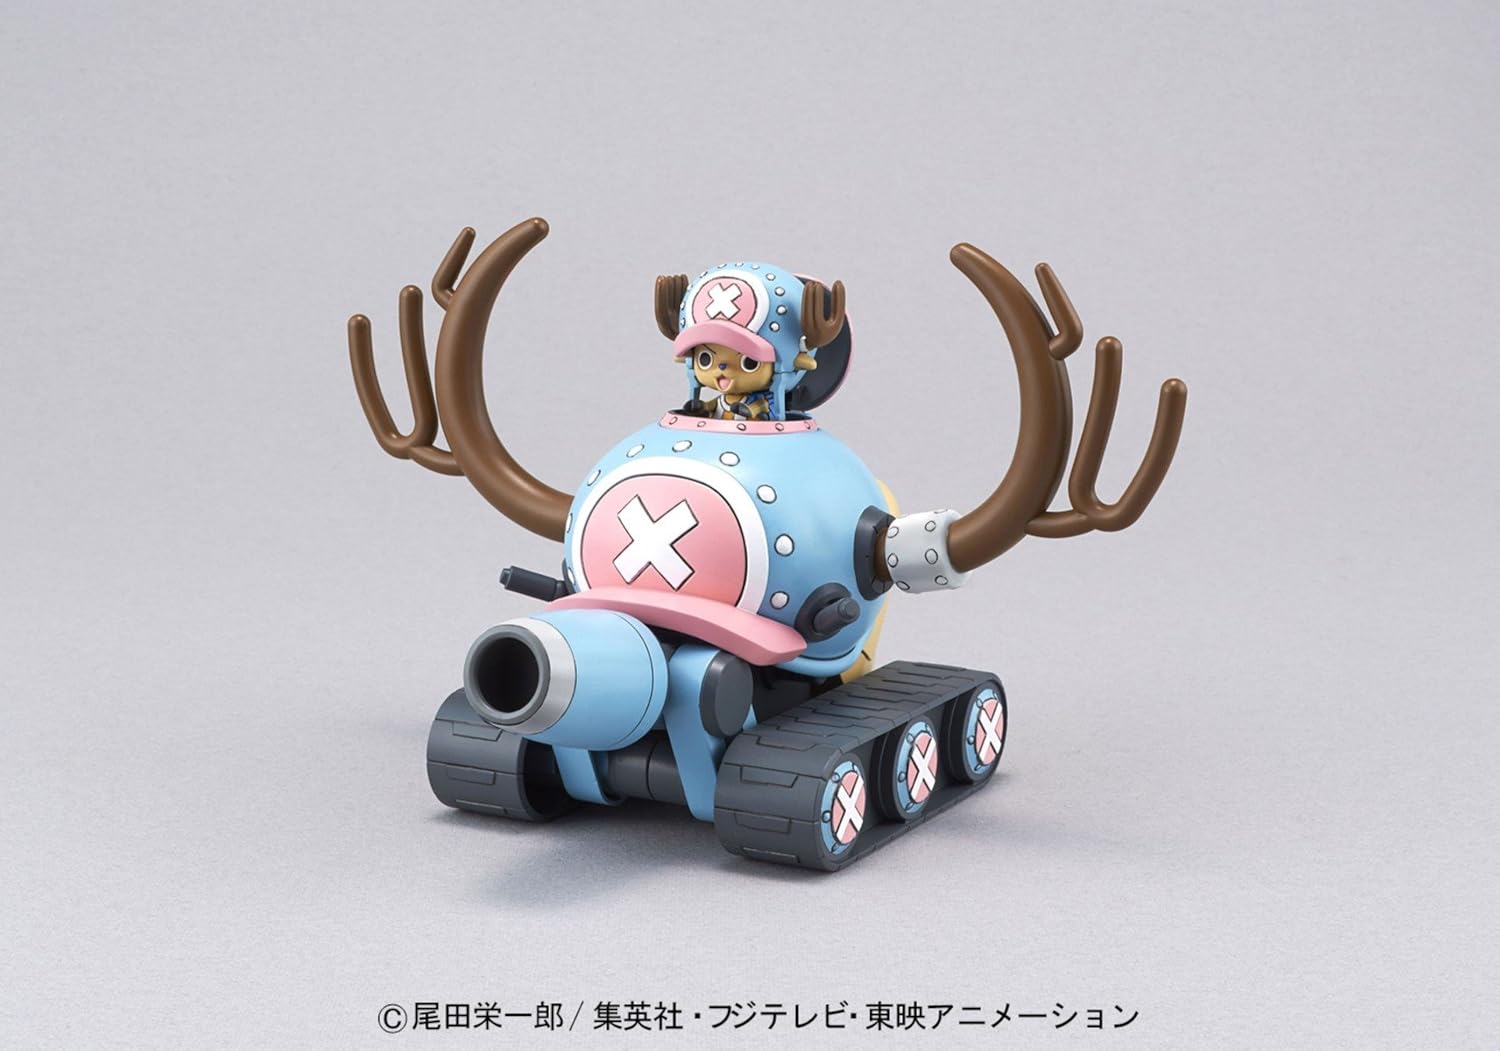
Image 3.1: Side view of the assembled Chopper Robot Tank, highlighting its profile and the details of the tank treads and cannon.

Image 3.2: Rear view of the assembled Chopper Robot Tank, showing the back of the tank and the large antlers.
4. Maintenance
To ensure the longevity and appearance of your model kit, follow these simple maintenance guidelines:
- Cleaning: Dust the model regularly with a soft, dry brush or a microfiber cloth. Avoid using harsh chemicals or abrasive materials, as they can damage the plastic and paint.
- Storage: Store the model in a cool, dry place away from direct sunlight and extreme temperatures. Prolonged exposure to sunlight can cause discoloration and material degradation.
- Handling: Handle the model by its sturdy parts to avoid putting stress on delicate joints or small components.
5. Troubleshooting
If you encounter any issues during assembly or with the finished model, consider the following common solutions:
- Parts Not Fitting: Ensure you are using the correct parts as indicated in the instructions. Check for any excess plastic (flash) on the pegs or holes that might prevent a proper fit. Gently trim any flash with a hobby knife if necessary.
- Loose Joints: If a joint feels too loose, a small amount of clear hobby cement or a thin layer of clear nail polish applied to the peg and allowed to dry can create a tighter fit.
- Stickers Not Adhering: Ensure the surface is clean and dry before applying stickers. Press firmly to remove air bubbles.
- Missing Parts: Double-check the runners and packaging. If a part is genuinely missing, contact the manufacturer's customer support.
6. Specifications
| Feature | Detail |
|---|---|
| Product Name | Bandai Hobby Mecha Collection #1 Chopper Robot Tank Model Kit |
| Model Number | BAN189430 |
| Brand | BANDAI SPIRITS |
| Product Dimensions (Assembled) | Approximately 6 x 2 x 3 inches (Length x Width x Height) |
| Item Weight | 6.6 ounces |
| Recommended Age | 15 - 16 years |
| Release Date | May 1, 2014 |
| Manufacturer | Bluefin Distribution Toys |

Image 6.1: Visual representation of the assembled model's dimensions, indicating its approximate length, width, and height.
7. Warranty and Support
For information regarding product warranty, returns, or replacement parts, please refer to the official Bandai Spirits website or contact the retailer from whom the product was purchased. Keep your proof of purchase for any warranty claims.
For additional support or inquiries, you may visit the BANDAI SPIRITS Store on Amazon or the manufacturer's official channels.
Ask a question about this manual
Ask about setup, troubleshooting, compatibility, parts, safety, or missing instructions. Manuals+ will review the question and use this page’s manual context to help answer it.