1. Overview
The Snow Peak Tortue Pro. is an all-in-one shelter designed compactly, based on the popular Land Lock model. Developed for families of up to 4 people, it inherits the multi-mesh panel style released in 2011. This tent is suitable for all seasons, providing warmth in cooler autumn/winter months and excellent ventilation for hot seasons, ensuring a comfortable sleeping environment in the inner tent. Standard features include upright poles for panel lift-up, a shield roof with blackout properties, a ground sheet for the inner tent, and side walls to cover the panel sides when lifted. The Pro. series features a unified all-gray color scheme, offering a sophisticated aesthetic suitable for adult camping.
Key Features:
- All-Season Comfort: Designed for both cool and warm weather with excellent ventilation.
- Spacious Design: Accommodates up to 4 people comfortably with dedicated living and sleeping areas.
- Advanced Materials: Features blackout pigment PU coating for superior light blocking and UV protection, along with high water pressure resistance.
- Integrated Shelter: Combines sleeping and living spaces into a single, compact unit.
- Versatile Configuration: Multiple mesh panels and lift-up options for customizable airflow and shade.
2. Components
Verify that all components are present before proceeding with setup.
- Main Body (Flysheet)
- Inner Tent
- Ridge Pole
- A Frame (x2)
- Center Frame (x2)
- C Frame (x2)
- Tent Frame (x1)
- Upright Poles (190cm x2)
- Duralumin Pegs (21cm x30)
- Guy Ropes (3.0m x4, 2.5m x10, 1.5m x2)
- Seam Grip Agent
- Peg Case
- Frame Case
- Main Body Carry Bag
- Instruction Manual
3. Setup Instructions
Follow these steps for proper tent setup. It is recommended to practice setup in a familiar environment before your first trip.
- Choose a Site: Select a flat, clear area free from sharp objects. Lay out the main body (flysheet) on the ground.
- Assemble Poles: Connect the sections of each frame pole (A, Center, C, Tent, Ridge) according to their color coding or markings.
- Insert Frames: Slide the assembled frame poles into their corresponding sleeves on the flysheet. Ensure they are fully inserted.
- Raise the Tent: Gradually raise the tent by securing the poles. Attach the pole clips to the frame for stability.
- Peg Down: Secure the tent corners and guy ropes with the duralumin pegs. Ensure all ropes are taut to maximize stability.
- Install Inner Tent: Attach the inner tent to the designated hooks inside the main body. Lay out the ground sheet inside the inner tent.
- Optional Upright Poles: Use the upright poles to lift the front or side panels, creating an extended canopy for shade or ventilation.

Image: The Snow Peak Tortue Pro. tent fully set up by a lake, demonstrating its spacious design and natural integration.

Image: The Tortue Pro. tent pitched in a grassy area, showcasing its overall structure and multiple entry points.

Image: A close-up view of one of the tent's entrances, showing the mesh panel and zippered door.

Image: Technical diagram illustrating the dimensions of the Tortue Pro. tent, including length, width, and height.

Image: A person laying out the ground sheet inside the tent, preparing for the inner tent setup.

Image: Close-up showing the attachment of a tent pole to a peg, illustrating the secure anchoring system.

Image: Detail of a pole clip, used to secure the tent fabric to the frame poles.
4. Operating Instructions
Maximize your comfort and the tent's functionality with these operating tips.
- Ventilation: Utilize the multiple mesh panels and roof vents to control airflow. Open panels during warm weather to prevent condensation and ensure comfort.
- Panel Lift-Up: Use the included upright poles to lift the front or side panels. This creates a shaded living area and improves air circulation.
- Privacy and Weather Protection: Close all panels and zippers during rain or strong winds, or for privacy. The blackout pigment coating on the roof provides excellent shade and reduces internal temperature.
- Interior Storage: Use the mesh pockets inside the inner tent for organizing small personal items.
- Lighting: Hang a lantern from the designated hook inside the inner tent for nighttime illumination.

Image: The tent with a side panel lifted, creating an open living space and demonstrating ventilation.

Image: Interior shot of the tent's living area, furnished with a table and chairs, illustrating the comfortable space.

Image: A person adjusting a window flap on the tent, showing the mesh and fabric options for ventilation and privacy.

Image: Interior view of the inner tent, showing convenient mesh storage pockets for small items.

Image: An interior hook for hanging a lantern or other lighting, providing illumination inside the tent.
5. Maintenance
Proper care and maintenance will extend the life of your tent.
- Cleaning: After each use, gently brush off dirt and debris. For stubborn stains, use a mild soap and water solution with a soft cloth. Do not use harsh detergents or abrasive cleaners.
- Drying: Always ensure the tent is completely dry before packing it away. Packing a damp tent can lead to mold, mildew, and fabric degradation. Air dry in a shaded, well-ventilated area.
- Storage: Store the tent in its carry bag in a cool, dry place away from direct sunlight and extreme temperatures.
- Seam Sealing: Periodically inspect seams for wear. Use the included seam grip agent or a suitable seam sealer to re-seal any areas showing signs of leakage.
- Pole Care: Keep poles clean and free of dirt. If poles become bent or damaged, replace them promptly to maintain tent structure.

Image: Close-up image demonstrating the water-repellent properties of the tent fabric, with water beading on the surface.
6. Troubleshooting
Refer to this section for solutions to common issues.
| Problem | Possible Cause | Solution |
|---|---|---|
| Condensation inside tent | Insufficient ventilation, high humidity, temperature difference. | Increase ventilation by opening mesh panels and roof vents. Ensure proper airflow. |
| Tent unstable in wind | Improper pegging, loose guy ropes, incorrect pole setup. | Ensure all pegs are fully driven into the ground. Tighten all guy ropes evenly. Verify poles are correctly seated. |
| Water leakage | Damaged fabric, worn seam sealing, improper flysheet tension. | Inspect fabric for tears; repair if necessary. Re-seal seams with seam grip agent. Adjust flysheet tension to shed water effectively. |
| Zippers sticking | Dirt/debris in zipper teeth, fabric caught in zipper. | Clean zipper teeth with a brush. Apply a silicone-based zipper lubricant. Carefully free any caught fabric. |
7. Specifications
Detailed technical specifications for the Snow Peak Tortue Pro. TP-770R tent.
| Feature | Detail |
|---|---|
| Brand | Snow Peak |
| Model Number | TP-770R |
| Recommended Use | Camping & Hiking |
| Capacity | 4 people |
| Seasons | 4 Season |
| Weight | 28.0 kg (44.09 pounds) |
| Main Body (Fly) Material | 150D Polyester Oxford, Blackout Pigment PU Coating (Roof), PU Coating (Wall), Teflon Water Repellent, UV Cut |
| Fly Water Pressure Resistance | 3,000mm minimum (Roof), 1,800mm minimum (Wall) |
| Inner Tent Material | 68D Polyester Ripstop |
| Bottom Material | 300D Polyester Oxford PU Coating |
| Bottom Water Pressure Resistance | 10,000mm minimum |
| Frame Material | A6061 (φ16mm, 17.5mm, 19mm) |
| Storage Case Size (Main Body) | W78 x D30 x H34cm |
| Storage Case Size (Frame) | W80 x D20 x H20cm |
| Color | Gray / Brown |
| Assembly Type | Freestanding |
| Closure Type | Zipper |
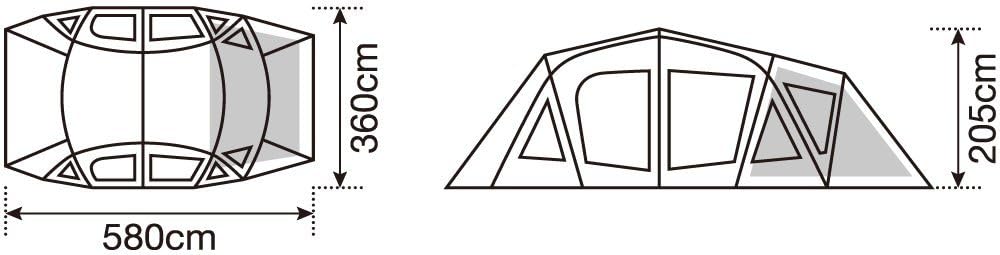
Image: Another diagram showing the tent's dimensions from a different perspective, including height and footprint.

Image: Diagram comparing standard PU processing with blackout pigment PU processing (Shield type) for light blocking.

Image: Image comparing the amount of light passing through standard fabric versus Shield fabric, demonstrating superior light blocking.

Image: Chart illustrating the temperature difference on a table surface under direct sunlight, normal fabric, and Shield fabric, showing the cooling effect of Shield.
8. Warranty & Support
Warranty Information:
Snow Peak products are designed for durability and performance. This product is covered by a limited warranty against manufacturing defects in materials and workmanship. The warranty period and terms may vary by region. Please retain your proof of purchase for warranty claims.
Customer Support:
For technical assistance, spare parts, or warranty service, please contact Snow Peak customer support through their official website or your local distributor. Provide your product model number (TP-770R) and a detailed description of the issue when contacting support.
Official Snow Peak Website: www.snowpeak.com