
Newco KB-3
Newco KB-3 Bottled Water Coffee Brewer User Manual
Model: KB-3
1. Introduction
Thank you for choosing the Newco KB-3 Bottled Water Coffee Brewer. This manual provides essential information for the safe and efficient operation, maintenance, and troubleshooting of your new coffee machine. The Newco KB-3 is designed to provide a high-quality hot beverage experience, utilizing a plumbing-free design with a refillable water tank.
Key features of your Newco KB-3 Coffee Brewer include:
- Plumbing-free design, utilizing refillable water bottles or pour-over method.
- Ensures coffee is made with your preferred water source.
- Dimensions (D x W x H): 18" x 16.5" x 22.1".
- Capacity: 12 cups.
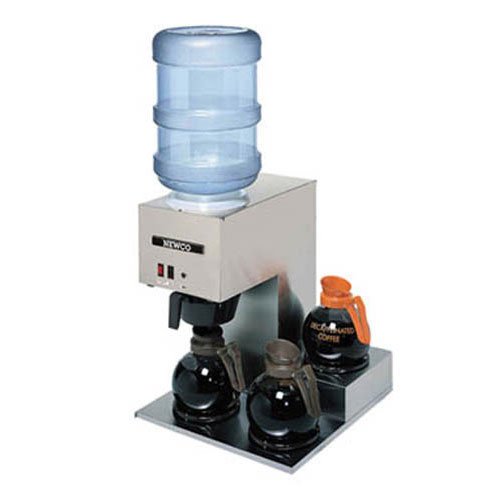
Figure 1: Front view of the Newco KB-3 Bottled Water Coffee Brewer. This image shows the compact design suitable for various settings.
2. Important Safety Instructions
Please read all instructions carefully before operating the appliance. Failure to follow these safety guidelines may result in fire, electric shock, or personal injury.
- Electrical Safety: Ensure the brewer is connected to a properly grounded 120 Volt AC outlet. Do not use extension cords unless absolutely necessary and ensure they are rated for the appliance's power requirements.
- Hot Surfaces: The brewing basket, carafe, and warming plate become very hot during and after operation. Avoid contact with hot surfaces. Use handles or oven mitts.
- Water Safety: Only fill the water reservoir with cold, fresh drinking water. Do not overfill. Never immerse the appliance, cord, or plug in water or other liquids.
- Children and Pets: Keep the appliance out of reach of children and pets. Close supervision is necessary when any appliance is used by or near children.
- Placement: Place the brewer on a stable, level, heat-resistant surface, away from the edge of the countertop. Ensure adequate ventilation around the unit.
- Maintenance: Unplug the brewer from the outlet before cleaning and when not in use. Allow it to cool completely before cleaning or storing.
- Damage: Do not operate any appliance with a damaged cord or plug, or after the appliance malfunctions or has been damaged in any manner. Contact customer service for examination, repair, or adjustment.
3. Setup and First Use
3.1 Unpacking
- Carefully remove the coffee brewer and all packaging materials from the box.
- Retain packaging for future transport or storage.
- Inspect the brewer for any signs of damage. If damaged, do not operate and contact your supplier.
3.2 Placement
- Place the brewer on a flat, stable, and heat-resistant surface.
- Ensure there is sufficient clearance around the unit for proper ventilation, especially above the water tank access.
- Keep the brewer away from walls, cabinets, and other appliances that could be damaged by heat or steam.
3.3 Initial Cleaning (Before First Use)
Before brewing coffee for the first time, it is recommended to run two full cycles with only water to clean the internal components.
- Fill the water reservoir with fresh, cold water (up to the 12-cup mark).
- Place an empty carafe on the warming plate.
- Close the brew basket lid (without coffee or filter).
- Turn on the brewer and allow a full cycle to complete.
- Discard the hot water from the carafe.
- Repeat steps 1-5 once more.
4. Operating Instructions
4.1 Brewing Coffee
- Prepare the Filter Basket: Open the brew basket and insert a standard basket-style paper filter.
- Add Coffee Grounds: Add your desired amount of ground coffee into the filter. A general guideline is one tablespoon of coffee per cup, but adjust to personal preference.
- Fill Water Reservoir: Open the lid to the water reservoir. Carefully pour fresh, cold water into the reservoir, up to the desired number of cups (maximum 12 cups). Close the reservoir lid securely.
- Place Carafe: Ensure the empty carafe is properly positioned on the warming plate.
- Start Brewing: Plug the brewer into a grounded 120V AC outlet. Press the ON/OFF switch to the "ON" position. The brewing process will begin.
- Serving: Once brewing is complete, the warming plate will keep the coffee hot. Carefully remove the carafe to pour.
- After Brewing: Turn off the brewer by pressing the ON/OFF switch to the "OFF" position when the carafe is empty or when you are finished serving.
Note: The KB-3 is a pour-over type brewer, meaning you manually add water to the reservoir for each brew cycle. It does not connect to a direct water line.
5. Maintenance and Cleaning
Regular cleaning ensures optimal performance and extends the life of your Newco KB-3 Coffee Brewer. Always unplug the brewer and allow it to cool completely before cleaning.
5.1 Daily Cleaning
- Wash the carafe and brew basket in warm, soapy water. Rinse thoroughly and dry. These parts are typically top-rack dishwasher safe, but hand washing is recommended to preserve their finish.
- Wipe the exterior of the brewer with a soft, damp cloth. Do not use abrasive cleaners or scouring pads.
- Wipe the warming plate with a damp cloth. Do not use abrasive materials.
5.2 Descaling (Monthly or as Needed)
Mineral deposits from water can build up in your brewer, affecting performance and coffee taste. Descale your brewer regularly, especially if you have hard water.
- Prepare a descaling solution: Mix white vinegar and water in equal parts, or use a commercial descaling solution designed for coffee makers.
- Fill the water reservoir with the descaling solution up to the 12-cup mark.
- Place an empty carafe on the warming plate.
- Run a full brew cycle with the descaling solution.
- After the cycle, turn off the brewer and let the solution sit in the carafe for 15-30 minutes.
- Discard the solution and rinse the carafe thoroughly.
- Run two to three full cycles with fresh, cold water to rinse out any remaining descaling solution.
6. Troubleshooting
Before contacting customer service, please refer to the following troubleshooting guide for common issues.
| Problem | Possible Cause | Solution |
|---|---|---|
| Brewer does not turn on. | Not plugged in; power switch off; no power at outlet. | Ensure plug is securely in a working outlet; check power switch is ON; test outlet with another appliance. |
| Coffee is not brewing. | No water in reservoir; brew basket clogged; brewer needs descaling. | Fill water reservoir; check brew basket for clogs and clean; perform descaling procedure. |
| Coffee tastes weak or watery. | Not enough coffee grounds; coffee too coarsely ground; brewer needs descaling. | Increase coffee grounds; use finer grind; perform descaling procedure. |
| Coffee overflows from brew basket. | Too much coffee grounds; filter not seated correctly; brew basket clogged. | Reduce coffee grounds; ensure filter is properly seated; clean brew basket. |
| Water leaks from the brewer. | Water reservoir overfilled; carafe not positioned correctly; internal component issue. | Do not overfill reservoir; ensure carafe is centered on warming plate; if problem persists, contact customer support. |
7. Product Specifications
| Feature | Detail |
|---|---|
| Brand | Newco |
| Model | KB-3 |
| Color | Silver |
| Product Dimensions (D x W x H) | 18"D x 16.5"W x 22.1"H |
| Special Feature | Portable |
| Coffee Maker Type | Pour Over |
| Operation Mode | Fully Automatic |
| Voltage | 120 Volts |
| Capacity | 12 Cups |
8. Warranty and Support
Specific warranty information for the Newco KB-3 Bottled Water Coffee Brewer is typically provided with the product packaging or can be obtained directly from the manufacturer or your authorized dealer. Please retain your proof of purchase for warranty claims.
For technical support, service, or to inquire about replacement parts, please contact Newco customer service. Refer to the contact information provided in your product documentation or visit the official Newco website.
Note: Protection plans mentioned on the product page are third-party offerings and are separate from the manufacturer's warranty.
Related documentsKB-3


Ask a question about this manual
Ask about setup, troubleshooting, compatibility, parts, safety, or missing instructions. Manuals+ will review the question and use this page’s manual context to help answer it.