1. Product Overview
The HP ProDisplay P17A is a 17-inch LED-backlit LCD monitor designed for general computing tasks. It features a 5:4 aspect ratio with a maximum resolution of 1280 x 1024 pixels, providing clear and consistent visuals. This monitor is equipped with both VGA and HDMI connectivity options, offering versatility for various system configurations. Its compact design and energy-efficient LED backlighting make it suitable for a range of environments.

Figure 1: Front view of the HP ProDisplay P17A monitor, showcasing its display and stand.
2. Setup Instructions
2.1 Unpacking the Monitor
Carefully remove all components from the packaging. Ensure the following items are present:
- HP ProDisplay P17A Monitor
- Monitor Stand (base and neck)
- Power Cable
- VGA Cable (may vary by region/package)
- HDMI Cable (may vary by region/package)
2.2 Assembling the Stand
- Place the monitor face down on a soft, clean surface to prevent scratches.
- Attach the stand neck to the back of the monitor, aligning the tabs and pushing until it clicks into place.
- Attach the stand base to the bottom of the stand neck, securing it with the captive screw if present.
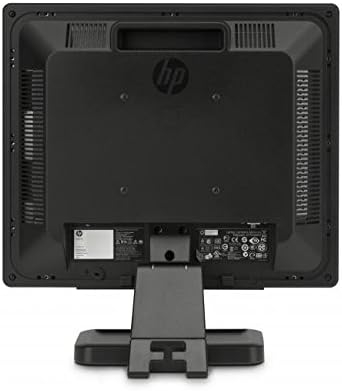
Figure 2: Rear view of the monitor, illustrating the stand attachment point and various connectivity ports.
2.3 Connecting Cables
- Power Connection: Connect the power cable to the monitor's power input and then to a grounded electrical outlet.
- Video Connection:
- For VGA: Connect one end of the VGA cable to the VGA port on the monitor and the other end to the VGA port on your computer. Tighten the screws on the VGA connector.
- For HDMI: Connect one end of the HDMI cable to the HDMI port on the monitor and the other end to the HDMI port on your computer.
- Ensure all connections are secure.
3. Operating Instructions
3.1 Powering On/Off
Press the power button located on the front bezel of the monitor to turn it on or off. The power indicator light will illuminate when the monitor is on.
3.2 Adjusting Display Settings (OSD Menu)
The On-Screen Display (OSD) menu allows you to adjust various monitor settings. Use the buttons on the front bezel to navigate and select options.
- Menu Button: Opens the OSD menu.
- Navigation Buttons (+ / - or Up/Down): Move through menu options and adjust values.
- Select/OK Button: Confirms a selection or enters a sub-menu.
- Exit Button: Exits the current menu or OSD.
Common adjustable settings include:
- Brightness/Contrast: Adjusts the overall luminance and difference between light and dark areas.
- Color Control: Allows adjustment of color temperature, RGB levels, or preset color modes.
- Input Select: Manually switches between VGA and HDMI input sources.
- Image Control: Adjusts sharpness, aspect ratio, and auto-adjustment for analog signals.
- Management: Power-saving options, OSD timeout, language selection.
4. Maintenance
4.1 Cleaning the Monitor
- Always turn off the monitor and unplug the power cord before cleaning.
- Use a soft, lint-free cloth lightly dampened with water or a non-abrasive screen cleaner.
- Do not spray cleaner directly onto the screen or monitor casing.
- Avoid using benzene, thinner, ammonia-based cleaners, or abrasive materials, as these can damage the surface.
4.2 General Care
- Avoid placing the monitor in direct sunlight or near heat sources.
- Ensure adequate ventilation around the monitor.
- Do not block ventilation openings.
- Protect the screen from sharp objects or excessive pressure.
5. Troubleshooting
Before contacting support, try the following basic troubleshooting steps:
5.1 No Image on Screen
- Ensure the monitor's power cable is securely connected to both the monitor and a working electrical outlet.
- Verify the power indicator light on the monitor is on. If not, press the power button.
- Check that the video cable (VGA or HDMI) is securely connected to both the monitor and the computer.
- Ensure the correct input source is selected on the monitor (use the OSD menu to switch inputs).
- Restart your computer.
5.2 Poor Image Quality
- Fuzzy or Blurry Image: Ensure the display resolution on your computer is set to the monitor's native resolution (1280 x 1024).
- Incorrect Colors: Adjust color settings through the OSD menu or your computer's display settings.
- Image Off-Center/Incorrect Size (VGA only): Use the "Auto Adjust" function in the OSD menu.
- Flickering: Check the refresh rate setting on your computer; ensure it is set to 60 Hz.
5.3 Monitor Not Responding to Buttons
- Unplug the monitor's power cable, wait 10 seconds, then plug it back in and try again.
- Ensure no buttons are stuck.
6. Technical Specifications
| Feature | Specification |
|---|---|
| Brand | HEWLETT PACKARD |
| Model Name | HP P17A |
| Model Number | F4M97AAABA |
| Screen Size | 17 Inches |
| Display Type | LED Backlit LCD |
| Native Resolution | 1280 x 1024 (SXGA) |
| Aspect Ratio | 5:4 |
| Contrast Ratio | 1000:1 |
| Refresh Rate | 60 Hz |
| Response Time | 5 Milliseconds |
| Viewing Angle | 170 Degrees |
| Connectivity | 1x VGA, 1x HDMI |
| Power Consumption | 25 Watts (Maximum) |
| Item Dimensions (D x W x H) | 8.12"D x 14.85"W x 15.24"H |
| Item Weight | 8.2 Pounds |
| Mounting Type | Wall Mount (VESA compatible) |
| Additional Features | Anti Glare Screen |

Figure 3: Dimensions of the HP ProDisplay P17A monitor.
7. Warranty and Support
7.1 Warranty Information
This product is often sold as a refurbished item. Refurbished products typically come with a limited warranty provided by the refurbisher or seller. Please refer to your purchase documentation for specific warranty terms and conditions, including duration and coverage details.
7.2 Technical Support
For technical assistance, troubleshooting beyond this manual, or warranty claims, please contact the vendor or HP customer support. Have your monitor's model number (F4M97AAABA) and serial number ready when contacting support.
You can find additional support resources, drivers, and documentation on the official HP support website.