1. Introduction
Thank you for choosing the hofstein LED Floor Lamp Rom. This instruction manual provides important information regarding the safe assembly, operation, and maintenance of your new floor lamp. Please read this manual thoroughly before installation and keep it for future reference.
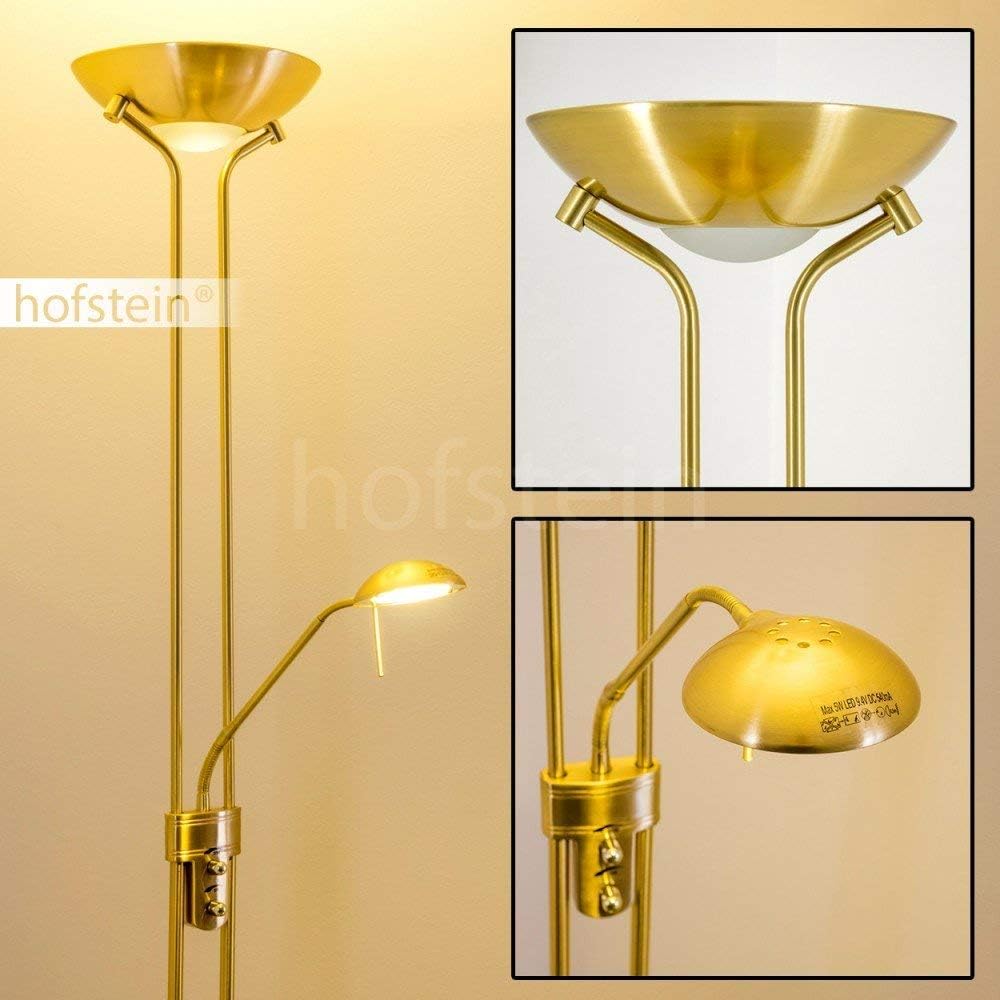
This elegant floor lamp features a brass finish, an integrated dimmer, and two light sources: a main uplighter and an adjustable reading light. It is designed for indoor use in areas such as living rooms and offices.
2. Safety Instructions
- Electrical Safety: Always disconnect the power supply before installation, maintenance, or cleaning. Ensure the lamp is connected to a properly grounded electrical outlet.
- Indoor Use Only: This lamp is designed for indoor environments (IP20). Do not expose it to moisture or use it in damp locations.
- Stable Placement: Place the lamp on a flat, stable surface to prevent tipping.
- Ventilation: Ensure adequate air circulation around the lamp. Do not cover the light sources.
- Integrated LEDs: The LED light sources are integrated and not user-replaceable. Do not attempt to open or modify the LED modules.
- Cleaning: Use a soft, dry cloth for cleaning. Do not use abrasive cleaners or solvents.
- Children and Pets: Keep the lamp out of reach of children and pets to prevent accidents.
3. Package Contents
Carefully unpack the box and ensure all components are present and undamaged. If any parts are missing or damaged, contact customer support immediately.
- Floor lamp base
- Main pole sections
- Main uplighter head with integrated LED
- Adjustable reading light arm with integrated LED
- Power cord with integrated dimmer switch
- Assembly hardware (if applicable)
4. Setup and Assembly
Follow these steps to assemble your hofstein LED Floor Lamp Rom:
- Prepare the Area: Choose a clear, flat surface for assembly. Lay out all components.
- Attach the Base: Securely attach the main pole to the lamp base. Ensure it is tightened firmly to prevent wobbling.
- Assemble Pole Sections: If the main pole comes in multiple sections, carefully screw them together, ensuring the internal wiring is not pinched.
- Attach Light Heads: Connect the main uplighter head and the adjustable reading light arm to the main pole as indicated in the diagrams. Ensure all electrical connections are secure.
- Position the Lamp: Place the assembled lamp in its desired location, ensuring the power cord can reach an outlet without being strained or creating a tripping hazard.
- Connect to Power: Plug the power cord into a standard 230V electrical outlet.


5. Operating Instructions
The hofstein LED Floor Lamp Rom features two independent light sources and an integrated touch dimmer.
- Main Uplighter: The primary light source provides ambient illumination. It is controlled by a touch switch on the lamp pole.
- Adjustable Reading Light: The secondary light source is an adjustable arm, ideal for task lighting. It is also controlled by a separate touch switch.
- Dimmer Function: Both light sources are dimmable. To adjust brightness, touch and hold the respective switch until the desired light intensity is reached. A quick touch will turn the light on/off.

6. Maintenance
To ensure the longevity and optimal performance of your lamp, follow these maintenance guidelines:
- Cleaning: Before cleaning, always unplug the lamp from the power outlet. Use a soft, dry, lint-free cloth to wipe down the metal surfaces. Do not use liquid cleaners, sprays, or abrasive materials, as these can damage the finish or electrical components.
- Inspection: Periodically inspect the power cord and plug for any signs of damage. If damage is found, discontinue use and contact a qualified electrician or customer support.
- LEDs: The integrated LED light sources are designed for long life and do not require replacement.
7. Troubleshooting
If you encounter issues with your lamp, refer to the following troubleshooting guide:
| Problem | Possible Cause | Solution |
|---|---|---|
| Lamp does not turn on | No power supply | Check if the power cord is securely plugged into a working outlet. Test the outlet with another device. |
| Light flickers or dims unexpectedly | Loose connection or power fluctuation | Ensure all connections are tight. Try plugging into a different outlet. |
| Dimmer not responding | Incorrect operation or electrical issue | Ensure you are using the touch-and-hold method for dimming. Disconnect and reconnect power to reset. |
| Reading light not working | Separate switch issue | Ensure the reading light's individual touch switch is activated. |
If the problem persists after attempting these solutions, please contact customer support.
8. Specifications
| Feature | Detail |
|---|---|
| Model Number | 8501 |
| Dimensions (H x D) | 181 cm x 25.5 cm (Base) |
| Weight | 5.65 kg |
| Material | Metal (Brass finish) |
| Main Light Power | 18 Watt LED |
| Main Light Lumens | 1600 lm |
| Reading Light Power | 5 Watt LED |
| Reading Light Lumens | 480 lm |
| Color Temperature | 3000 Kelvin (Warm White) |
| Voltage | 230 Volt |
| Switch Type | Touch switch with integrated dimmer |
| IP Rating | IP20 (Indoor use only) |
| Protection Class | II |
9. Warranty and Support
For warranty information or technical support, please refer to the documentation provided at the point of purchase or contact your retailer. You may also visit the official hofstein website for further assistance.
Manufacturer: HOFSTEIN