
1. Introduction
This manual provides detailed instructions for the proper installation and use of the SANTECH INDUSTRIES MT4031 R134A Retrofit Kit. This kit is designed to convert automotive air conditioning systems originally charged with R12 refrigerant to operate with R134a refrigerant. Please read this manual thoroughly before beginning any work to ensure safe and effective operation.
2. Safety Information
WARNING: Automotive air conditioning systems contain refrigerants under pressure. Improper handling can cause serious injury, including frostbite, chemical burns, and eye damage. Always wear appropriate personal protective equipment (PPE), including safety glasses and gloves, when working with refrigerants.
- Ensure the vehicle's engine is off and cool before starting any work.
- Work in a well-ventilated area.
- Do not expose refrigerant containers to direct sunlight or temperatures above 120°F (49°C).
- Never discharge refrigerants directly into the atmosphere. Always use proper recovery equipment.
- Consult a qualified automotive technician if you are unsure about any step.
- Keep out of reach of children.
3. Package Contents
Verify that all components are present and undamaged before proceeding with installation.
- MT4031 R134A Retrofit Fitting (3/8 Inch Brass)
- Instruction Manual (this document)
- Note: Additional components such as service ports, O-rings, or adapters may be required depending on your specific vehicle and are not included in this kit.
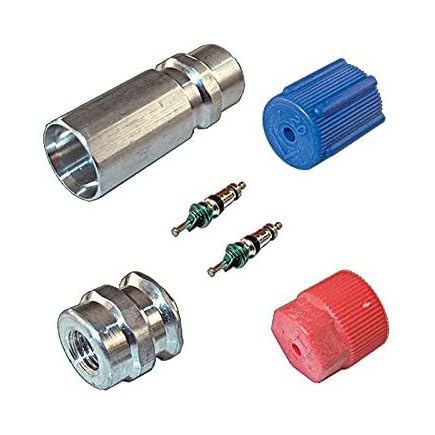
Figure 1: SANTECH INDUSTRIES MT4031 R134A Retrofit Fitting. This image shows the brass coupling designed for converting R12 automotive AC systems to R134a.
4. Setup and Installation
This section outlines the general procedure for installing the R134a retrofit fitting. Specific steps may vary based on vehicle make and model. It is recommended to consult a vehicle-specific service manual.
4.1. Pre-Installation Checks
- Identify R12 System: Confirm your vehicle's AC system uses R12 refrigerant. R12 systems typically have threaded service ports.
- System Condition: Ensure the AC system is otherwise functional (compressor, condenser, evaporator, etc.) and free of leaks. Repair any leaks before retrofitting.
- Refrigerant Recovery: The existing R12 refrigerant MUST be properly recovered by a certified technician using approved equipment. Do NOT vent R12 into the atmosphere.
- Oil Compatibility: R134a systems use PAG oil, while R12 systems typically use mineral oil. It is crucial to flush the system and replace the compressor oil with R134a compatible PAG oil. Failure to do so can lead to compressor failure.
- Receiver/Drier or Accumulator: Replace the receiver/drier or accumulator, as these components absorb moisture and are designed for specific refrigerants.
- O-Rings and Seals: Replace all O-rings and seals with R134a compatible versions.
4.2. Installation Steps
- After ensuring the system is empty of R12 and properly flushed, locate the R12 service ports (typically one high-side and one low-side).
- The MT4031 fitting is designed to convert a specific R12 port to an R134a quick-connect port. Identify the correct R12 port for this fitting (e.g., the low-side port).
- Clean the threads of the R12 service port thoroughly.
- Apply a small amount of R134a compatible refrigerant oil to the O-ring of the MT4031 fitting.
- Carefully thread the MT4031 retrofit fitting onto the R12 service port. Hand-tighten first to prevent cross-threading.
- Using an appropriate wrench, tighten the fitting securely. Do not overtighten, as this can damage the threads or the fitting. Refer to vehicle service manual for torque specifications if available.
- Repeat for any other R12 ports requiring conversion using appropriate retrofit fittings (if not included in this specific kit).
- Once all fittings are installed, evacuate the AC system using a vacuum pump to remove air and moisture. Maintain a vacuum for at least 30 minutes.
- Charge the system with R134a refrigerant according to the vehicle manufacturer's specifications. Note that R134a charge amounts are typically 80-90% of the original R12 charge.
5. Operating Instructions (Post-Retrofit)
Once the R134a retrofit is complete and the system is properly charged, operate the AC system as follows:
- Start the vehicle engine and allow it to reach normal operating temperature.
- Turn on the air conditioning system to its maximum cooling setting and fan speed.
- Monitor the system pressures using a manifold gauge set connected to the newly installed R134a service ports. Compare readings to manufacturer specifications for R134a systems.
- Check for proper cooling at the vents.
- Visually inspect all connections for any signs of leaks using a leak detector or UV dye.
6. Maintenance
Regular maintenance of your retrofitted R134a AC system will help ensure its longevity and performance.
- Annual Inspection: Have your AC system inspected annually by a qualified technician.
- Leak Checks: Periodically check for refrigerant leaks, especially around service ports and connections.
- Refrigerant Level: If cooling performance degrades, have the refrigerant level checked and recharged if necessary. Address any leaks before recharging.
- Component Replacement: Replace the receiver/drier or accumulator every 3-5 years, or whenever the system is opened for major repairs.
7. Troubleshooting
If you encounter issues after retrofitting, consider the following common problems and solutions:
| Problem | Possible Cause | Solution |
|---|---|---|
| Poor Cooling Performance | Low refrigerant charge; incompatible oil; clogged expansion valve/orifice tube; compressor issue. | Check for leaks and recharge; ensure proper oil type; inspect and replace components; consult technician. |
| System Leaks | Improperly tightened fittings; old O-rings/seals; damaged components. | Retighten fittings; replace O-rings with R134a compatible ones; inspect and replace damaged parts. |
| Compressor Failure | Incompatible oil; incorrect refrigerant charge; system contamination. | Ensure proper oil and charge; flush system thoroughly; replace compressor. |
If troubleshooting steps do not resolve the issue, it is recommended to seek assistance from a certified automotive AC technician.
8. Specifications
- Model: MT4031
- Brand: SANTECH INDUSTRIES
- Size: 3/8 Inch
- Material: Brass
- Connector Type: Coupling
- Thread Type: NPT
- UPC: 780250040314
9. Warranty and Support
For specific warranty information regarding the SANTECH INDUSTRIES MT4031 R134A Retrofit Kit, please refer to the product packaging or contact SANTECH INDUSTRIES directly. General product support and technical assistance can be obtained through the manufacturer's official channels.
Manufacturer: OMEGA ENVIRONMENTAL TECHNOLOGIES
Please retain your proof of purchase for warranty claims.