1. Introduction
The Yongnuo RF-603 II is a versatile wireless flash trigger and remote shutter release system designed for photographers. This device operates on a global free FSK 2.4GHz wireless channel, ensuring reliable communication over distances up to 100 meters. It functions as both a transmitter (TX) and a transceiver (TRX), allowing for flexible control of external flashes and camera shutters.
This manual provides detailed instructions for the proper setup, operation, and maintenance of your RF-603 II unit to ensure optimal performance and longevity.
2. Product Overview
2.1 Key Features
- FSK 2.4GHz Wireless System: Ensures stable and reliable signal transmission.
- 100m Transmission Distance: Effective range for various shooting environments.
- TX and TRX Modes: Each unit can function as a dedicated transmitter or an auto-switching transceiver.
- Two-Lever Button Design: Facilitates awakening, flash testing, focus, and shutter functions.
- Wireless Flash Triggering: Supports single contact triggering and wireless awakening of flashes via camera hot shoe.
- Studio Light Compatibility: Can trigger studio lights using an optional PC sync cable.
- Wired/Wireless Shutter Release: Connects to the camera via a dedicated shutter cable (C3 type for compatible Canon cameras) for remote control.
- Multi-Camera/Flash Control: Capable of controlling multiple cameras and flashes simultaneously.
- High Flash Sync Speed: Up to 1/320 second (actual speed may vary depending on camera and flash model).
- Improved Design: Features a locking ring and side-mounted ON/OFF/Mode switch for enhanced usability compared to previous models.
2.2 Package Contents
- RF-603C II Transceivers x 2
- LS-2.5 Shutter Connecting Cable (C3 type) x 1
- Instruction Manual x 1
- Note: AAA batteries are not included and must be purchased separately.
2.3 Component Identification
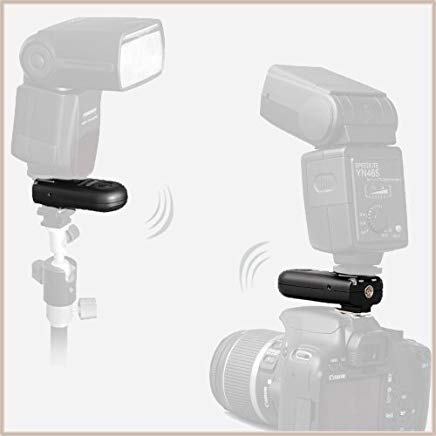
Figure 1: Yongnuo RF-603 II Transceiver. This image displays the compact design of the RF-603 II unit, highlighting its hot shoe mount, mode switch, and trigger button. The unit is shown from a perspective that illustrates its overall form factor and key external controls.
Each RF-603 II unit features a hot shoe mount at the bottom for attachment to a camera or flash, a hot shoe on top for mounting a flash, a 2.5mm shutter release port, a PC sync port, and a side-mounted switch for power and mode selection (OFF/TX/TRX).
3. Setup
3.1 Battery Installation
- Locate the battery compartment cover on the back of the RF-603 II unit.
- Slide the cover open.
- Insert two AAA batteries, ensuring correct polarity (+/-).
- Close the battery compartment cover securely.
3.2 Attaching to Camera and Flash
- For Transmitter (on camera): Slide one RF-603 II unit onto your camera's hot shoe. Tighten the locking ring clockwise until it is secure.
- For Receiver (on flash): Slide the second RF-603 II unit onto the hot shoe of your external flash. Tighten the locking ring clockwise until it is secure. Then, mount the flash onto the hot shoe of the RF-603 II receiver.
- For Remote Shutter Release: Connect one end of the LS-2.5 shutter connecting cable (C3 type) to the 2.5mm port on an RF-603 II unit and the other end to your camera's remote control port.
Important: Ensure the locking ring is tightened firmly to prevent accidental dislodgement, but do not overtighten.
4. Operating Instructions
4.1 Powering On and Mode Selection
Each RF-603 II unit has a three-position switch on its side:
- OFF: Powers off the unit.
- TX (Transmitter): The unit functions as a dedicated transmitter. Use this mode when the unit is mounted on your camera and you are triggering off-camera flashes. In TX mode, the unit can also be used for testing flashes.
- TRX (Transceiver): The unit automatically switches between transmitting and receiving. Use this mode for both on-camera and off-camera units, especially when using one unit as a remote shutter release or when you want the on-camera unit to also receive a signal from another RF-603 II.
For most flash triggering scenarios, set the on-camera unit to TX and the off-camera unit(s) to TRX. For remote shutter release, set the unit connected to the camera to TRX and the handheld unit to TRX.
4.2 Wireless Flash Triggering
- Mount one RF-603 II unit on your camera's hot shoe and set its switch to TX.
- Mount your external flash onto the hot shoe of a second RF-603 II unit, then set this unit's switch to TRX.
- Ensure both units are on the same channel (no manual channel selection is needed for RF-603 II as it uses a global FSK system, but ensure no other 2.4GHz devices are causing interference).
- Power on your camera and external flash.
- Press the shutter button on your camera. The on-camera RF-603 II will transmit a signal, triggering the off-camera flash.
- To test the flash manually, press the trigger button on the RF-603 II unit set to TX or TRX.
4.3 Wireless Shutter Release
- Connect one RF-603 II unit to your camera's remote control port using the LS-2.5 C3 cable. Set this unit's switch to TRX.
- Take the second RF-603 II unit (the handheld remote) and set its switch to TRX.
- Press the trigger button on the handheld unit halfway to focus (if your camera supports it).
- Press the trigger button fully to release the shutter.
Note: The C3 cable is specifically for Canon cameras with a 3-pin remote port. Ensure you have the correct cable type for your camera model.
4.4 Using with Studio Lights
To trigger studio lights, connect an optional PC sync cable from the PC sync port of an RF-603 II unit (set to TX or TRX on your camera) to the PC sync input of your studio strobe. The RF-603 II will then act as a trigger for the studio light.
5. Maintenance
5.1 Cleaning
- Wipe the unit with a soft, dry cloth.
- Do not use liquid cleaners or solvents, as they may damage the electronics.
- Keep the hot shoe contacts clean and free of dust or debris.
5.2 Battery Care
- Remove batteries if the unit will not be used for an extended period to prevent leakage.
- Replace batteries when the indicator light dims or performance degrades.
- Dispose of used batteries responsibly according to local regulations.
5.3 Storage
Store the RF-603 II in a cool, dry place, away from direct sunlight and extreme temperatures. Protect it from dust and moisture.
6. Troubleshooting
| Problem | Possible Cause | Solution |
|---|---|---|
| Flash not triggering wirelessly. |
|
|
| Remote shutter release not working. |
|
|
| Unit not securely locking onto hot shoe. | Locking ring mechanism issue or overtightening. | Ensure the locking ring is tightened clockwise until snug. Avoid excessive force. If the mechanism is faulty, contact support. |
| Inconsistent triggering or misfires. |
|
|
7. Specifications
| Feature | Detail |
|---|---|
| Type | FSK 2.4GHz wireless remote control system |
| Transmission Distance | 100 meters (approx. 328 feet) |
| Channels | 16 channels |
| Shutter Release | Half-press, Full-press |
| Shutter Interface | 2.5mm socket (C3 type cable included) |
| Studio Flash Light Interface | Standard PC socket |
| Max Sync Speed | 1/320 second (varies by camera/flash) |
| Battery | AAA x 2 (3V) |
| Product Dimensions | 6.2 x 3.6 x 1.8 inches |
| Item Weight | 4 ounces |
| Model Number | 4332012403 |
| Manufacturer | YONGNUO |
8. Warranty and Support
YONGNUO products are covered by a manufacturer's warranty. For specific warranty terms and conditions, please refer to the warranty card included with your product or visit the official YONGNUO website. If you encounter any issues or require technical assistance, please contact YONGNUO customer support or your authorized dealer.
For additional information and resources, you may visit the YONGNUO Store on Amazon.