1. Safety Instructions
Always prioritize safety when operating power tools. Failure to follow these instructions may result in serious injury or damage to the machine.
1.1 General Safety
- Read and understand the entire manual before operation.
- Wear appropriate personal protective equipment (PPE), including safety glasses, hearing protection, and dust mask.
- Ensure the work area is clean, well-lit, and free from obstructions.
- Keep children and bystanders at a safe distance.
- Never operate the saw under the influence of drugs, alcohol, or medication.
- Disconnect power before making adjustments, changing blades, or performing maintenance.
1.2 Table Saw Specific Safety
- Always use the blade guard and splitter/riving knife.
- Ensure the blade is sharp and correctly installed.
- Use push sticks or push blocks for narrow cuts.
- Never reach over or behind the rotating blade.
- Avoid kickback by using the parallel guide correctly and maintaining proper feed pressure.
- Do not cut freehand; always use the parallel guide or miter gauge.
1.3 Electrical Safety
- The machine operates on 400V. Ensure proper electrical installation and grounding.
- Do not expose the machine to rain or wet conditions.
- Inspect power cords for damage before each use.
2. Setup and Assembly
Carefully unpack all components and inspect for any shipping damage. Assembly typically requires two people due to the machine's weight and size.
2.1 Unpacking and Component Check
- Remove all packaging materials.
- Verify all parts listed in the packing list are present.
- Report any missing or damaged parts to your supplier immediately.
2.2 Assembly Steps
- Base Assembly: Securely attach the machine base components according to the diagrams provided in the separate assembly guide.
- Table Installation: Mount the main cast iron table onto the base. Ensure it is level and securely fastened.
- Sliding Carriage Attachment: Install the 2600mm sliding carriage system. Ensure smooth movement and proper alignment with the main table.
- Parallel Guide Assembly: Attach the parallel guide rail and fence mechanism. Verify it slides freely and locks securely.
- Blade Guard and Dust Extraction: Install the blade guard and connect the dust extraction hose to the 100mm port.
- Electrical Connection: Connect the machine to a suitable 400V power supply. Consult a qualified electrician if unsure.
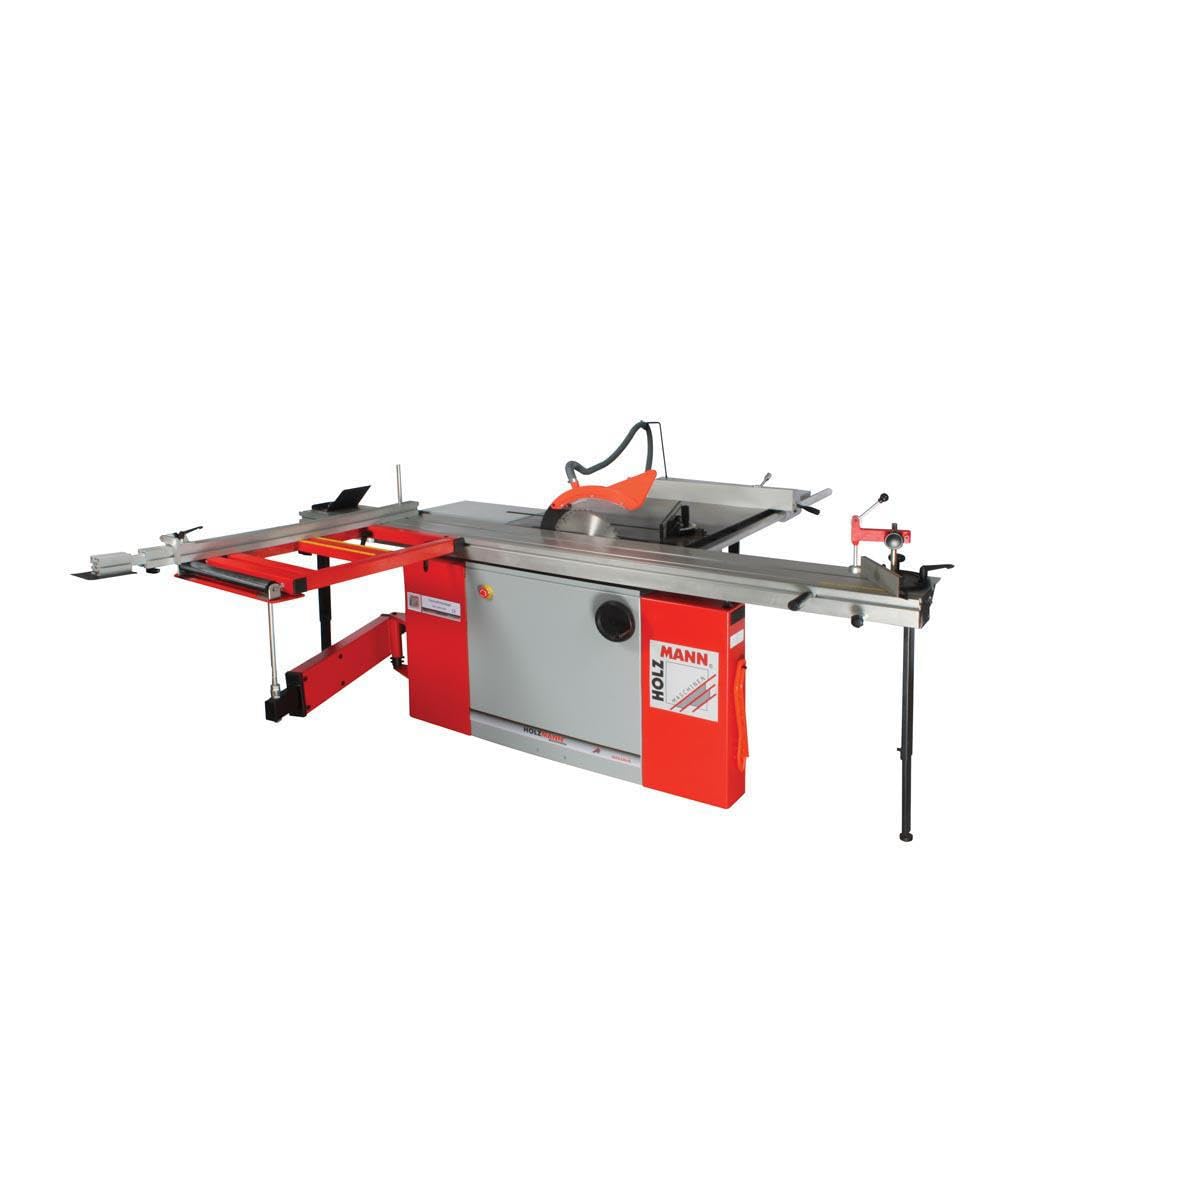
Figure 1: Overall view of the Holzmann TS315VF-2600-400V Table Saw, showing the main table and sliding carriage.
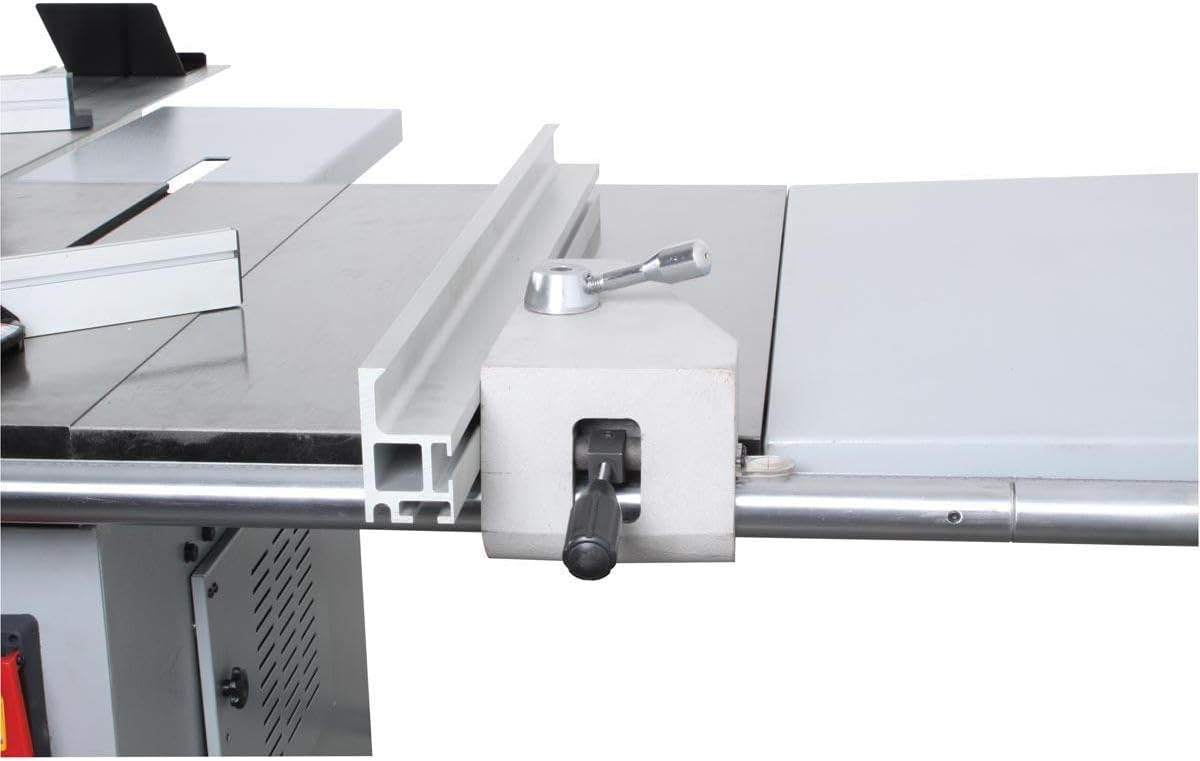
Figure 2: Detail of the sliding carriage system, highlighting its robust construction for precise panel sizing.
3. Operating Instructions
Familiarize yourself with all controls before starting the machine. Always perform a test cut on scrap material.
3.1 Power On/Off
- Ensure the emergency stop button is disengaged.
- Press the green 'ON' button to start the motor.
- Press the red 'OFF' button or the emergency stop button to turn off the machine.
3.2 Blade Installation and Adjustment
The saw is equipped with a main blade (315 x 30 mm) and a scoring blade (100 x 20 mm).
- Main Blade: Ensure the blade is clean, sharp, and correctly oriented. Secure it with the appropriate flange and nut.
- Scoring Blade (Incisor): Adjust the scoring blade height and alignment to score the underside of the workpiece, preventing tear-out on laminated materials.
3.3 Height and Tilt Adjustment
Two independent handwheels control the blade height and tilt:
- Height Adjustment: Rotate the designated handwheel to raise or lower the blade. For optimal cutting, the blade should extend slightly above the workpiece.
- Tilt Adjustment: Rotate the other handwheel to tilt the blade from 90° to 45° for bevel cuts. Lock the tilt mechanism after adjustment.
3.4 Using the Parallel Guide (Rip Fence)
The robust parallel guide is used for accurate rip cuts up to 1220 mm wide.

Figure 3: Close-up of the parallel guide, showing its locking mechanism and measurement scale.
- Unlock the parallel guide.
- Slide it to the desired width using the measurement scale.
- Lock the guide securely in place before cutting.
- Ensure the guide is parallel to the blade.
3.5 Using the Sliding Carriage
The 2600 mm sliding carriage is designed for precise cross-cutting and panel sizing.
- Place the workpiece firmly against the cross-cut fence on the sliding carriage.
- Adjust the cross-cut fence for the desired angle or length.
- Maintain firm pressure on the workpiece against the fence and the carriage.
- Smoothly push the carriage through the blade.
3.6 Dust Extraction
Connect a suitable dust extractor to the 100 mm dust port to maintain a clean and safe working environment.
4. Maintenance
Regular maintenance ensures optimal performance and extends the lifespan of your table saw. Always disconnect power before performing any maintenance.
4.1 Cleaning
- After each use, clean sawdust and debris from the table, guides, and blade guard.
- Remove resin buildup from blades and machine surfaces using appropriate cleaning agents.
- Keep the dust extraction system clear.
4.2 Blade Care
- Inspect blades regularly for sharpness, cracks, or missing teeth.
- Replace dull or damaged blades immediately.
- Ensure blades are correctly tensioned and aligned.
4.3 Lubrication
- Lubricate sliding mechanisms (e.g., sliding carriage rails, height/tilt adjustment threads) periodically with a dry lubricant or light machine oil.
- Avoid over-lubrication, which can attract dust.
4.4 Electrical Components
- Periodically check electrical connections and cables for wear or damage.
- Any electrical repairs should be performed by a qualified technician.
5. Troubleshooting
This section addresses common issues you might encounter. For problems not listed here, contact customer support.
| Problem | Possible Cause | Solution |
|---|---|---|
| Saw does not start | No power supply Emergency stop engaged Motor overload protection tripped | Check power connection and circuit breaker Disengage emergency stop Reset motor overload (allow to cool) |
| Poor cut quality (rough, burning) | Dull or dirty blade Incorrect blade type Improper feed rate Blade misalignment | Replace or clean blade Use appropriate blade for material Adjust feed rate Check and adjust blade alignment |
| Excessive vibration | Loose blade or arbor nut Damaged blade Unbalanced motor | Tighten blade/arbor nut Replace damaged blade Contact service technician |
| Sliding carriage not smooth | Accumulated dust/debris Lack of lubrication Misalignment | Clean rails thoroughly Apply dry lubricant Check and adjust carriage alignment |
6. Specifications
Detailed technical specifications for the Holzmann TS315VF-2600-400V Table Saw.
| Feature | Specification |
|---|---|
| Model | TS315VF-2600 |
| Motor Power | 3800 W |
| Voltage | 400 V |
| Main Blade Diameter | 315 mm |
| Main Blade Bore | 30 mm |
| Main Blade Speed | 4500 rpm |
| Scoring Blade Diameter | 100 mm |
| Scoring Blade Bore | 20 mm |
| Scoring Blade Speed | 8500 rpm |
| Max. Cutting Height (90°) | 100 mm |
| Max. Cutting Height (45°) | 75 mm |
| Sliding Carriage Travel | 2500 mm |
| Sliding Carriage Dimensions | 2600 x 270 mm |
| Rip Capacity (against guide) | 1220 mm |
| Work Table Height | 850 mm |
| Main Table Dimensions | 1260 x 800 mm |
| Dust Port Diameter | 1 x 100 mm |
| Net Weight | 370 kg |
| Blade Material | Alloy Steel |
7. Warranty and Support
7.1 Warranty Information
This Holzmann TS315VF-2600-400V Table Saw comes with a 2-year warranty from the date of purchase. This warranty covers manufacturing defects and material faults under normal use. Please note that wear parts (e.g., blades, belts) are typically excluded from this warranty.
Keep your proof of purchase for any warranty claims.
7.2 Customer Support
For technical assistance, spare parts, or warranty claims, please contact your authorized Holzmann dealer or customer service.
- Website: www.holzmann-maschinen.at (Please refer to the official Holzmann website for the most current contact information.)
- Model Number: TS315VF-2600
- Serial Number: (Located on the machine's rating plate)
When contacting support, please have your model and serial number ready to ensure efficient service.