1. Introduction
This manual provides comprehensive instructions for the safe and effective use of your Mitsubishi Electric Mr Slim E12C29426 Replacement Remote (KM07M). Please read this manual thoroughly before operating the remote control and retain it for future reference. This remote is designed to operate compatible Mitsubishi Electric Mr Slim air conditioning units.
2. Safety Information
- Do not expose the remote control to direct sunlight, high temperatures, or moisture.
- Avoid dropping or subjecting the remote control to strong impacts.
- Do not attempt to disassemble or modify the remote control. This may cause damage and void any warranty.
- Keep batteries out of reach of children. If swallowed, seek medical attention immediately.
- Dispose of used batteries according to local regulations.
3. Product Overview
The Mitsubishi Electric Mr Slim E12C29426 Replacement Remote (KM07M) provides intuitive control over your air conditioning unit. Familiarize yourself with the remote's layout and button functions.
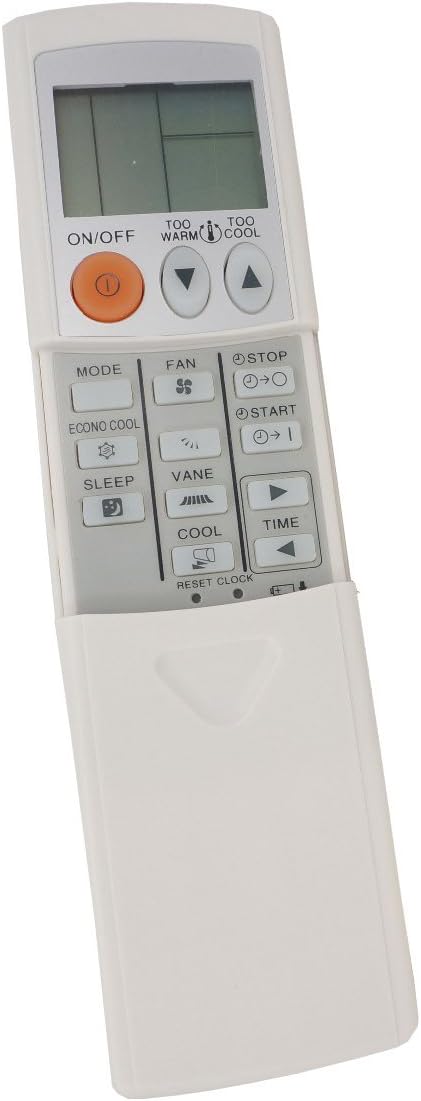
Figure 1: Front view of the Mitsubishi Electric Mr Slim E12C29426 Replacement Remote (KM07M). The remote is white with a grey control panel. It features an LCD screen at the top, an orange ON/OFF button, and various function buttons for mode, fan, sleep, vane, cool, and time settings. A sliding cover protects the lower buttons.
Button Functions:
| Button | Function |
|---|---|
| ON/OFF | Powers the air conditioning unit on or off. |
| TOO WARM / TOO COOL | Adjusts the temperature setting up or down. |
| MODE | Cycles through operating modes (e.g., Cool, Heat, Dry, Fan, Auto). |
| FAN | Adjusts the fan speed (e.g., Low, Medium, High, Auto). |
| ECONO COOL | Activates or deactivates the Econo Cool energy-saving function. |
| SLEEP | Activates or deactivates the Sleep mode for comfortable nighttime operation. |
| VANE | Adjusts the direction of the airflow vanes. |
| COOL | Directly sets the unit to Cool mode. |
| STOP / START (Timer) | Used for setting and canceling timer operations. |
| TIME (Arrow buttons) | Used to adjust time settings for the timer function. |
| RESET CLOCK | Resets the internal clock of the remote control. |
4. Setup
4.1 Battery Installation
- Slide open the battery compartment cover on the back of the remote control.
- Insert two (2) AAA batteries, ensuring the positive (+) and negative (-) terminals are aligned correctly according to the diagram inside the compartment.
- Close the battery compartment cover securely.
- The remote control is now ready for use. If the display does not light up, check battery orientation or replace with new batteries.
Note: The product specifications indicate that 2 AAA batteries are required.
5. Operating Instructions
5.1 Power On/Off
Press the ON/OFF button once to turn the air conditioning unit on. Press it again to turn the unit off.
5.2 Selecting Operating Mode
Press the MODE button repeatedly to cycle through the available operating modes (e.g., Auto, Cool, Dry, Fan, Heat). The selected mode will be displayed on the LCD screen.
5.3 Adjusting Temperature
Use the TOO WARM (up arrow) and TOO COOL (down arrow) buttons to increase or decrease the desired temperature setting. The temperature range will vary depending on the unit and mode.
5.4 Adjusting Fan Speed
Press the FAN button repeatedly to select the desired fan speed (e.g., Auto, Low, Medium, High). The current fan speed setting will be indicated on the display.
5.5 Adjusting Airflow Vane Direction
Press the VANE button to adjust the vertical direction of the airflow vanes. Repeated presses will cycle through available swing patterns or fixed positions.
5.6 Econo Cool Function
Press the ECONO COOL button to activate the energy-saving Econo Cool operation. This function automatically adjusts the airflow and temperature to maintain comfort while reducing power consumption. Press again to deactivate.
5.7 Sleep Mode
Press the SLEEP button to activate Sleep mode. This mode typically adjusts the temperature gradually and reduces fan noise for comfortable sleep. Press again to deactivate.
5.8 Timer Operations
To set the timer for unit ON or OFF:
- Press the START or STOP timer button. The timer indicator will flash.
- Use the TIME arrow buttons (left/right) to adjust the desired ON/OFF time.
- Press the START or STOP timer button again to confirm the setting.
- To cancel a timer, press the corresponding timer button until the timer indicator disappears.
To reset the internal clock, use the RESET CLOCK button, typically located under the sliding cover or requiring a pointed object to press.
6. Maintenance
6.1 Cleaning the Remote Control
- Wipe the surface of the remote control with a soft, dry cloth.
- For stubborn dirt, lightly dampen the cloth with water and a mild detergent, then wipe dry immediately.
- Do not use volatile liquids such as benzene, thinner, polishing powder, or chemical-treated dusters.
6.2 Battery Replacement
Replace batteries when the remote control's display becomes dim or the unit no longer responds reliably. Follow the steps in Section 4.1 for battery installation. Always replace both batteries at the same time with new ones of the same type (AAA).
7. Troubleshooting
| Problem | Possible Cause | Solution |
|---|---|---|
| Remote control does not operate the unit. |
|
|
| LCD display is dim or blank. | Batteries are low or dead. | Replace batteries with new AAA batteries. |
| Unit responds intermittently. |
|
|
8. Specifications
- Model: E12C29426 (KM07M)
- Brand: MITSUBISHI ELECTRIC
- Compatible Devices: Mitsubishi Electric Mr Slim Air Conditioners
- Power Source: 2 x AAA Batteries (not included)
- Product Dimensions: 6.31 x 2.31 x 0.75 inches
- Item Weight: 0.353 ounces
- Special Feature: Ergonomic design
- Color: White
9. Warranty and Support
For warranty information or technical support, please refer to the documentation provided with your original air conditioning unit or contact Mitsubishi Electric customer service. Keep your purchase receipt as proof of purchase.