1. Introduction
The HP UltraSlim Docking Station is designed to quickly and easily expand your display, network, and device connectivity, transforming your HP EliteBook Notebook PC into a fully functional desktop workstation. This manual provides essential information for setting up, operating, maintaining, and troubleshooting your docking station.
This docking station is compatible with select ultraslim HP EliteBook Notebook PCs, including EliteBook 720 G1-G2, 725 G2-G4, 740 G1-G2, 745 G2-G4, 750 G1-G2, 755 G2-G4, 820 G1-G4, 840 G1-G4, 850 G1-G4, 1020 G1, 1040 G1-G3; EliteBook Folio 9480m, 9470m; EliteBook Revolve 810 G1, 810 G3; Pro x2 612 G1; ProBook 640 G2-G3; ZBook 14; ZBook 14u G4; ZBook 15U G3-G4 Mobile Workstation.
2. Product Overview
2.1 Key Features
- 4 x USB 3.0 ports for high-speed data transfer and peripheral connectivity.
- 2 x DisplayPort and 1 x VGA port for multi-monitor setups.
- 1 x LAN/Ethernet port for wired network connectivity.
- 1 x Line-in and 1 x Line-out audio jacks.
- Integrated lock slot for security (lock not included).
- Simple one-click, slide-in side docking mechanism.
2.2 Product Views and Components

Figure 2.2.1: Top view of the HP UltraSlim Docking Station, showcasing its sleek, black design and the HP logo.

Figure 2.2.2: Rear view of the HP UltraSlim Docking Station, displaying all available ports including USB, DisplayPort, VGA, Ethernet, and audio jacks, along with the power adapter connection.

Figure 2.2.3: An HP EliteBook Folio laptop connected to the HP UltraSlim Docking Station, demonstrating how the laptop integrates seamlessly with the dock.

Figure 2.2.4: Diagram illustrating the front side components of the docking station, including docking posts, locking mechanism, docking station cable lock slot, connection button, and power on/off button.
- Docking posts
- Locking mechanism
- Docking station cable lock slot (lock not included)
- Connection button
- Power on/off button

Figure 2.2.5: Diagram detailing the rear side ports of the HP UltraSlim Docking Station, showing the layout of various connectivity options.
- Lock slot (lock not included)
- Docking station cable lock slot (lock not included)
- Side docking connector
- VGA port
- LAN/Ethernet port
- DisplayPort 1.2 (2)
- USB 3.0 ports (3)
- USB 3.0 charging port (1)
- Power connector
- Line in jack
- Line out jack

Figure 2.2.6: Comprehensive diagram of the HP UltraSlim Docking Station, labeling all ports and features for easy identification.
- Docking station cable lock slot (lock not included)
- Connection button
- Power on/off
- Lock slot (lock not included)
- Docking station cable lock slot (lock not included)
- VGA port
- LAN/Ethernet port
- DisplayPort 1.2 (2)
- USB 3.0 ports (3)
- USB 3.0 charging port (1)
- Power connector
- Line in jack
- Line out jack
3. Setup
Follow these steps to set up your HP UltraSlim Docking Station:
- Connect Power: Connect the power adapter (not included with all units) to the docking station's power connector (refer to Figure 2.2.5, item 9 or Figure 2.2.6, item 11). Plug the power adapter into a wall outlet.
- Connect Peripherals: Connect your external monitor(s) to the DisplayPort (Figure 2.2.5, item 6 or Figure 2.2.6, item 8) or VGA port (Figure 2.2.5, item 4 or Figure 2.2.6, item 6) on the docking station. Connect your keyboard, mouse, and other USB devices to the USB 3.0 ports (Figure 2.2.5, items 7 & 8 or Figure 2.2.6, items 9 & 10).
- Connect Network: If desired, connect an Ethernet cable to the LAN/Ethernet port (Figure 2.2.5, item 5 or Figure 2.2.6, item 7) for wired network access.
- Connect Audio: Connect external speakers or headphones to the Line out jack (Figure 2.2.5, item 11 or Figure 2.2.6, item 13) and a microphone to the Line in jack (Figure 2.2.5, item 10 or Figure 2.2.6, item 12), if applicable.
- Dock Your Laptop: Align your compatible HP EliteBook Notebook PC with the docking station's side docking connector (Figure 2.2.5, item 3) and gently slide it into place until it clicks securely. Ensure the laptop is firmly seated on the docking posts (Figure 2.2.4, item 1).
4. Operating Instructions
4.1 Docking and Undocking Your Laptop
- To Dock: With the docking station powered on, align your laptop with the side docking connector and gently push it onto the docking station until it locks into place. The laptop should automatically recognize the connected peripherals and external displays.
- To Undock: Press the connection button (Figure 2.2.4, item 4 or Figure 2.2.6, item 2) on the docking station. This will release the laptop from the docking mechanism. Gently slide the laptop away from the docking station.
4.2 Power Management
- The docking station provides power to the docked laptop, allowing you to charge your laptop while connected.
- The power on/off button (Figure 2.2.4, item 5 or Figure 2.2.6, item 3) on the docking station can be used to power on or off the docked laptop, or to put it into sleep mode, depending on your laptop's power settings.
4.3 Display Configuration
Once your laptop is docked and external monitors are connected, you can configure your display settings through your operating system. Common options include:
- Duplicate Displays: Shows the same content on both your laptop screen and external monitor(s).
- Extend Displays: Expands your desktop across multiple screens, allowing for more workspace.
- Second Screen Only: Displays content only on the external monitor(s), turning off the laptop screen.
5. Maintenance
To ensure the longevity and optimal performance of your HP UltraSlim Docking Station, follow these maintenance guidelines:
- Cleaning: Use a soft, dry, lint-free cloth to clean the exterior of the docking station. For stubborn marks, slightly dampen the cloth with water. Avoid using harsh chemicals, solvents, or abrasive cleaners.
- Port Care: Keep all ports free of dust and debris. Avoid inserting foreign objects into the ports.
- Storage: When not in use for extended periods, store the docking station in a cool, dry place away from direct sunlight and extreme temperatures.
- Handling: Handle the docking station with care. Avoid dropping it or subjecting it to strong impacts.
6. Troubleshooting
If you encounter issues with your HP UltraSlim Docking Station, refer to the following common troubleshooting steps:
| Problem | Possible Solution |
|---|---|
| Laptop does not dock securely or connect. | Ensure the laptop is compatible with the docking station. Verify that the laptop is correctly aligned with the side docking connector and pushed firmly until it clicks. Check for any obstructions in the docking mechanism. |
| No display on external monitor(s). | Verify that the external monitor is powered on and the video cable is securely connected to both the monitor and the docking station. Ensure the correct input source is selected on the monitor. Update your laptop's display drivers. Try restarting the laptop while docked. |
| USB devices are not recognized or function intermittently. | Ensure the USB device is properly connected to a USB port on the docking station. Try connecting the device to a different USB port. Restart your laptop. Ensure the docking station has sufficient power. |
| Network connection issues. | Verify the Ethernet cable is securely connected to both the docking station and your network router/switch. Check network settings on your laptop. Restart your router/modem. |
| Audio issues (no sound or distorted sound). | Ensure speakers/headphones are properly connected to the Line out jack. Check audio settings on your laptop to ensure the correct output device is selected. Verify volume levels. |
| Docking station frequently connects and disconnects. | Ensure the power adapter is securely connected to the docking station and the wall outlet. Verify that the laptop is fully seated and locked into the docking station. Check for any physical damage to the docking connector on either the laptop or the dock. Update laptop drivers and firmware. |
7. Specifications
| Feature | Specification |
|---|---|
| Brand | HP |
| Model Number | D9Y32UT#ABA |
| Color | Black |
| Product Dimensions (L x W x H) | 41.91 x 20.07 x 10.16 cm (16.5 x 7.9 x 4.0 inches) |
| Item Weight | 454 g (1 lb) |
| USB Ports | 4 x USB 3.0 (including 1 charging port) |
| Video Ports | 2 x DisplayPort 1.2, 1 x VGA |
| Network Port | 1 x LAN/Ethernet |
| Audio Ports | 1 x Line-in, 1 x Line-out |
| Security | Lock Slot (lock not included) |
| Compatible Devices | HP EliteBook 720 G1-G2, 725 G2-G4, 740 G1-G2, 745 G2-G4, 750 G1-G2, 755 G2-G4, 820 G1-G4, 840 G1-G4, 850 G1-G4, 1020 G1, 1040 G1-G3; EliteBook Folio 9480m, 9470m; EliteBook Revolve 810 G1, 810 G3; Pro x2 612 G1; ProBook 640 G2-G3; ZBook 14; ZBook 14u G4; ZBook 15U G3-G4 Mobile Workstation. |
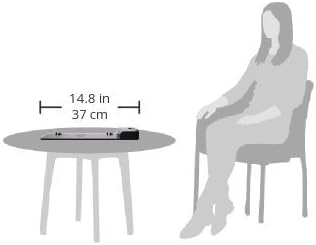
Figure 7.1: Size comparison of the HP UltraSlim Docking Station on a table next to a seated person, indicating its compact footprint.
8. Safety Information
Please read and follow these safety precautions to prevent damage to the product or injury to yourself:
- Do not expose the docking station to water, moisture, or extreme temperatures.
- Do not attempt to disassemble or modify the docking station. Refer all servicing to qualified service personnel.
- Use only the power adapter specified for this device. Using an incorrect power adapter may cause damage or fire.
- Ensure proper ventilation around the docking station to prevent overheating.
- Keep the docking station away from strong magnetic fields.
9. Warranty and Support
For information regarding the warranty coverage for your HP UltraSlim Docking Station, please refer to the warranty documentation included with your purchase or visit the official HP support website. HP provides various support resources, including drivers, software updates, and troubleshooting guides.
To access support, visit www.hp.com/support and search for your product model (D9Y32UT#ABA).