1. Introduction
This manual provides essential information for the proper installation, operation, and maintenance of the HN67ZZ001 OEM Replacement Time Delay Relay for Carrier HVAC systems. This component is designed to replace original Carrier part number HN67ZZ001, ensuring compatibility and reliable performance. Please read this manual thoroughly before proceeding with installation or operation.
A time delay relay is a critical component in HVAC systems, controlling the timing of various functions to ensure efficient and safe operation. Proper handling and installation are crucial for its longevity and the overall system's performance.
2. Product Overview
The HN67ZZ001 is an OEM replacement time delay relay designed for Carrier HVAC applications. It is a circuit board assembly that manages timed electrical functions within the system. This component is engineered to meet the specifications of the original part, providing a reliable solution for system repair or maintenance.
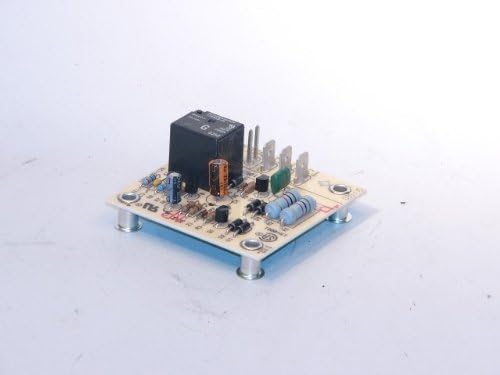
Figure 1: HN67ZZ001 Time Delay Relay Circuit Board. This image displays the HN67ZZ001 Time Delay Relay, which is a circuit board featuring a black relay component, various resistors, capacitors, and terminal pins. The board is mounted on four standoffs.
3. Specifications
| Feature | Detail |
|---|---|
| Model Number | HN67ZZ001 (Replaces Carrier # HN67ZZ001) |
| Brand | OEM Replm for Carrier |
| Connector Type | Screw Terminals |
| Contact Type | Normally Open |
| Mounting Type | DIN Rail Mount |
| Operation Mode | Automatic |
| Item Weight | Approximately 4 ounces |
| Product Dimensions | Approximately 6 x 6 x 6 inches |
| Manufacturer | Carrier |
| Date First Available | June 4, 2010 |
4. Installation and Setup
Safety Warning: Before attempting any installation or replacement, ensure that the power supply to the HVAC unit is completely disconnected at the circuit breaker or fuse box. Failure to do so can result in electrical shock, injury, or damage to the equipment.
- Power Disconnection: Turn off all power to the HVAC system at the main electrical panel. Verify power is off using a voltage tester.
- Access the Existing Relay: Locate the existing time delay relay within your Carrier HVAC unit. This may require removing access panels.
- Document Connections: Before disconnecting any wires, take clear photographs or make a detailed diagram of all wire connections to the old relay. Note wire colors and their corresponding terminal locations.
- Remove Old Relay: Carefully disconnect all wires from the old relay. If the relay is mounted on a DIN rail, release its clips. If it's screw-mounted, remove the screws.
- Install New Relay: Position the new HN67ZZ001 relay in the same location as the old one. Secure it using the appropriate mounting method (DIN rail clips or screws).
- Connect Wiring: Refer to your photographs or diagram and connect the wires to the new HN67ZZ001 relay's screw terminals. Ensure each wire is securely fastened to its correct terminal. Double-check all connections for tightness and accuracy.
- Secure Access Panels: Once all connections are verified, replace any access panels removed earlier.
- Restore Power: Turn the power back on to the HVAC system at the main electrical panel.
- Test System: Initiate a cycle of your HVAC system to confirm the new time delay relay is functioning correctly. Observe for proper timing and system response.
If you are unsure about any step, it is recommended to consult a qualified HVAC technician.
5. Operation
The HN67ZZ001 Time Delay Relay operates automatically within your Carrier HVAC system. Its primary function is to introduce a controlled delay in the activation or deactivation of specific components, such as fan motors, compressors, or heating elements. This timed operation is crucial for:
- Preventing Short Cycling: Ensuring that components like compressors have sufficient off-time between cycles to prevent damage.
- Optimizing Airflow: Allowing fan motors to run for a set period after heating or cooling cycles to maximize efficiency and distribute conditioned air.
- System Protection: Providing delays that protect electrical components from rapid on/off cycles or power surges.
As an automatic component, the relay requires no direct user interaction during normal system operation. Its timing functions are pre-set according to the HVAC system's design specifications.
6. Maintenance
The HN67ZZ001 Time Delay Relay is a solid-state electronic component and typically requires minimal maintenance. However, periodic inspection can help ensure its continued reliable operation:
- Visual Inspection: During routine HVAC system maintenance, visually inspect the relay for any signs of physical damage, discoloration (indicating overheating), or loose connections.
- Cleanliness: Ensure the area around the relay is free from dust, dirt, and debris, which can impede heat dissipation or cause electrical issues. Use a soft brush or compressed air for cleaning, ensuring power is off.
- Connection Integrity: Periodically check that all screw terminal connections are secure. Loose connections can lead to intermittent operation or overheating.
Do not attempt to disassemble or repair the relay. If the component is suspected to be faulty, it should be replaced with a new OEM replacement part.
7. Troubleshooting
If your HVAC system is exhibiting unusual behavior related to timing or component activation, the time delay relay might be a factor. Here are some common troubleshooting steps:
- No Component Activation: If a component (e.g., fan, compressor) that relies on the time delay relay does not activate, first check the power supply to the HVAC unit and the component itself. Then, inspect the relay's connections for looseness or corrosion.
- Incorrect Timing: If a component activates too early, too late, or not at all, and other electrical components are functioning, the time delay relay may be faulty.
- Intermittent Operation: Loose wiring or a failing relay can cause components to operate intermittently. Check all connections thoroughly.
- Visual Damage: Look for burnt marks, swollen components, or other visible damage on the relay board. Such signs indicate a failure.
Important: Troubleshooting electrical components requires knowledge of electrical systems and safety procedures. If you are not comfortable performing these checks, contact a certified HVAC technician. Always disconnect power before inspecting or working on electrical components.
If the relay is determined to be faulty after troubleshooting, it should be replaced.
8. Warranty and Support
For information regarding the warranty period, terms, and conditions for the HN67ZZ001 OEM Replacement Time Delay Relay, please refer to the documentation provided at the point of purchase or contact the seller directly. As an OEM replacement part, warranty coverage typically aligns with the seller's or manufacturer's policies for such components.
For technical support or assistance with installation and troubleshooting beyond the scope of this manual, it is recommended to contact a qualified HVAC professional or the product supplier.