
1. Introduction
This instruction manual provides essential information for the safe and effective operation of your ProMedix PR-9200 Arm Blood Pressure Monitor. Please read this manual thoroughly before using the device and retain it for future reference. This device is designed for non-invasive measurement of systolic and diastolic blood pressure and pulse rate in adults using the oscillometric method.
2. Safety Information
- Consult your physician before using this device if you have any medical conditions. This device is not intended for self-diagnosis or treatment.
- Do not use this device on infants, children, or individuals unable to express consent.
- Keep the device and its components out of reach of children and pets.
- Do not use the device in a moving vehicle or on an airplane.
- Ensure batteries are inserted with correct polarity. Do not mix old and new batteries or different types of batteries. Remove batteries if the device will not be used for an extended period.
- Only use the specified power adapter (6VDC 600mA) if not using batteries.
3. Package Contents
Verify that all items are present and in good condition upon unpacking:
- ProMedix PR-9200 Main Unit
- Arm Cuff (22-32 cm circumference)
- Instruction Manual
- Storage Bag (if included)
4. Product Overview
Familiarize yourself with the components of your blood pressure monitor.
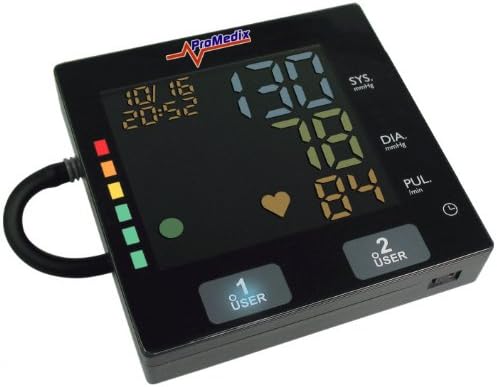
Figure 4.1: Front view of the ProMedix PR-9200 main unit. The large LCD screen displays systolic (SYS), diastolic (DIA), and pulse (PUL) readings. Below the screen are two user selection buttons, '1 USER' and '2 USER'. A series of colored indicator lights are visible on the left side, and a heart icon indicates pulse detection.

Figure 4.2: The ProMedix PR-9200 main unit shown alongside the arm cuff. The cuff features an 'INDEX' line and an illustration indicating proper placement 2-3 cm above the elbow, suitable for arm circumferences of 22-32 cm.

Figure 4.3: The bottom of the ProMedix PR-9200 unit with the battery compartment cover removed, revealing the slots for four AA batteries. This view also shows the power input port and a switch.
5. Setup
5.1 Battery Installation
- Turn the main unit over.
- Slide open the battery compartment cover (refer to Figure 4.3).
- Insert four (4) AA batteries (R-06) according to the polarity indicators (+/-) inside the compartment.
- Close the battery compartment cover securely.
- Alternatively, connect a 6VDC 600mA power adapter to the designated port on the side of the unit.
5.2 Cuff Connection
- Locate the air tube connector on the arm cuff.
- Insert the air tube connector firmly into the air jack on the left side of the main unit. Ensure a snug fit to prevent air leakage during measurement.
6. Operating Instructions
6.1 Preparing for Measurement
- Sit in a comfortable position with your back supported and feet flat on the floor.
- Rest your arm on a table so the cuff is at heart level.
- Avoid talking, moving, or eating for at least 5 minutes before and during the measurement.
- Ensure your clothing does not constrict your arm. Roll up sleeves if necessary.
6.2 Applying the Arm Cuff

Figure 6.1: Detail of the arm cuff with instructions for proper application. The cuff should be placed 2-3 cm above the elbow, with the 'INDEX' line aligning correctly on the arm.
- Slide your left arm through the cuff loop. The air tube should run down the inside of your arm.
- Position the cuff so its lower edge is approximately 2-3 cm above your elbow joint (refer to Figure 6.1).
- Wrap the cuff snugly around your upper arm. The 'INDEX' line on the cuff should fall within the range indicated on the cuff. Ensure it is not too tight or too loose.
6.3 Taking a Measurement
- With the cuff correctly applied and the unit connected, select your user profile by pressing either the '1 USER' or '2 USER' button.
- Press the 'START/STOP' button (usually integrated with the user selection buttons or a separate button, not explicitly detailed in JSON but standard). The cuff will begin to inflate.
- Remain still and silent during the measurement.
- Once the measurement is complete, the cuff will deflate, and your systolic pressure (SYS), diastolic pressure (DIA), and pulse rate (PUL) will be displayed on the LCD screen.
- The device will automatically store the reading under the selected user profile.
6.4 Memory Function
To review previous measurements, press the 'M' (Memory) button (if available, or the user selection button again after a measurement). The device will display stored readings in reverse chronological order for the selected user.
7. Maintenance
7.1 Cleaning
- Wipe the main unit and cuff with a soft, dry cloth.
- If necessary, use a cloth lightly dampened with water or a mild detergent. Do not use abrasive cleaners or immerse the device in water.
- Ensure no liquid enters the device casing or air tube.
7.2 Storage

Figure 7.1: A black zippered storage bag, suitable for protecting the ProMedix PR-9200 blood pressure monitor and its cuff when not in use.
- Store the device and cuff in the provided storage bag (Figure 7.1) or a clean, dry place.
- Avoid extreme temperatures, direct sunlight, and high humidity.
- Do not store the cuff tightly folded or creased for extended periods.
8. Troubleshooting
If you encounter issues with your device, refer to the following common problems and solutions:
- No display/Device does not turn on: Check battery polarity. Replace batteries if depleted. Ensure power adapter is securely connected if used.
- Error message during measurement: Ensure the cuff is applied correctly and snugly. Remain still and silent during measurement. If the error persists, consult the manufacturer.
- Inconsistent readings: Ensure proper measurement technique (correct cuff placement, relaxed posture, no talking). Take multiple readings at different times of day. Consult your physician if readings remain consistently abnormal.
- Cuff does not inflate: Check that the air tube is securely connected to both the cuff and the main unit. Ensure there are no leaks in the cuff or tube.
9. Specifications
| Feature | Specification |
|---|---|
| Model | PR-9200 |
| Display Type | LCD |
| Measurement Method | Oscillometric |
| Pressure Measurement Range | 30 to 250 mmHg |
| Pulse Measurement Range | 40 to 180 beats/minute |
| Arm Cuff Circumference | 22-32 cm |
| Power Source | 4 x AA batteries (R-06) or 6VDC 600mA adapter |
| Item Weight | Approximately 1.98 lbs (0.9 kg) |
| Cuff Length | 32 cm |
10. Warranty and Support
For warranty information, technical support, or service inquiries, please contact your retailer or the manufacturer directly. Keep your purchase receipt as proof of purchase.