Optoma W307UST
Optoma W307UST DLP Projector User Manual
Model: W307UST
1. Introduction
Thank you for purchasing the Optoma W307UST Ultra Short Throw DLP Projector. This manual provides detailed instructions for the safe and efficient operation of your projector. Please read this manual thoroughly before using the projector and keep it for future reference.
The Optoma W307UST is a high-performance, 3D-ready projector designed for educational and business environments, offering a large image from a very short distance.
2. Safety Information
Always observe the following safety precautions to prevent fire, electric shock, or injury:
- Do not block ventilation openings. Ensure adequate airflow around the projector.
- Do not look directly into the projector lens when the lamp is on. The bright light can damage your eyes.
- Do not place the projector on an unstable cart, stand, or table.
- Use only the power cord supplied with the projector.
- Disconnect the power cord from the wall outlet if the projector is not to be used for an extended period.
- Refer all servicing to qualified service personnel.
3. Product Overview
Familiarize yourself with the components and connections of your Optoma W307UST projector.

Figure 3.1: Optoma W307UST Projector showing its compact design and ultra-short throw lens housing.

Figure 3.2: Top view of the projector, highlighting the integrated control panel and focus ring for easy adjustments.
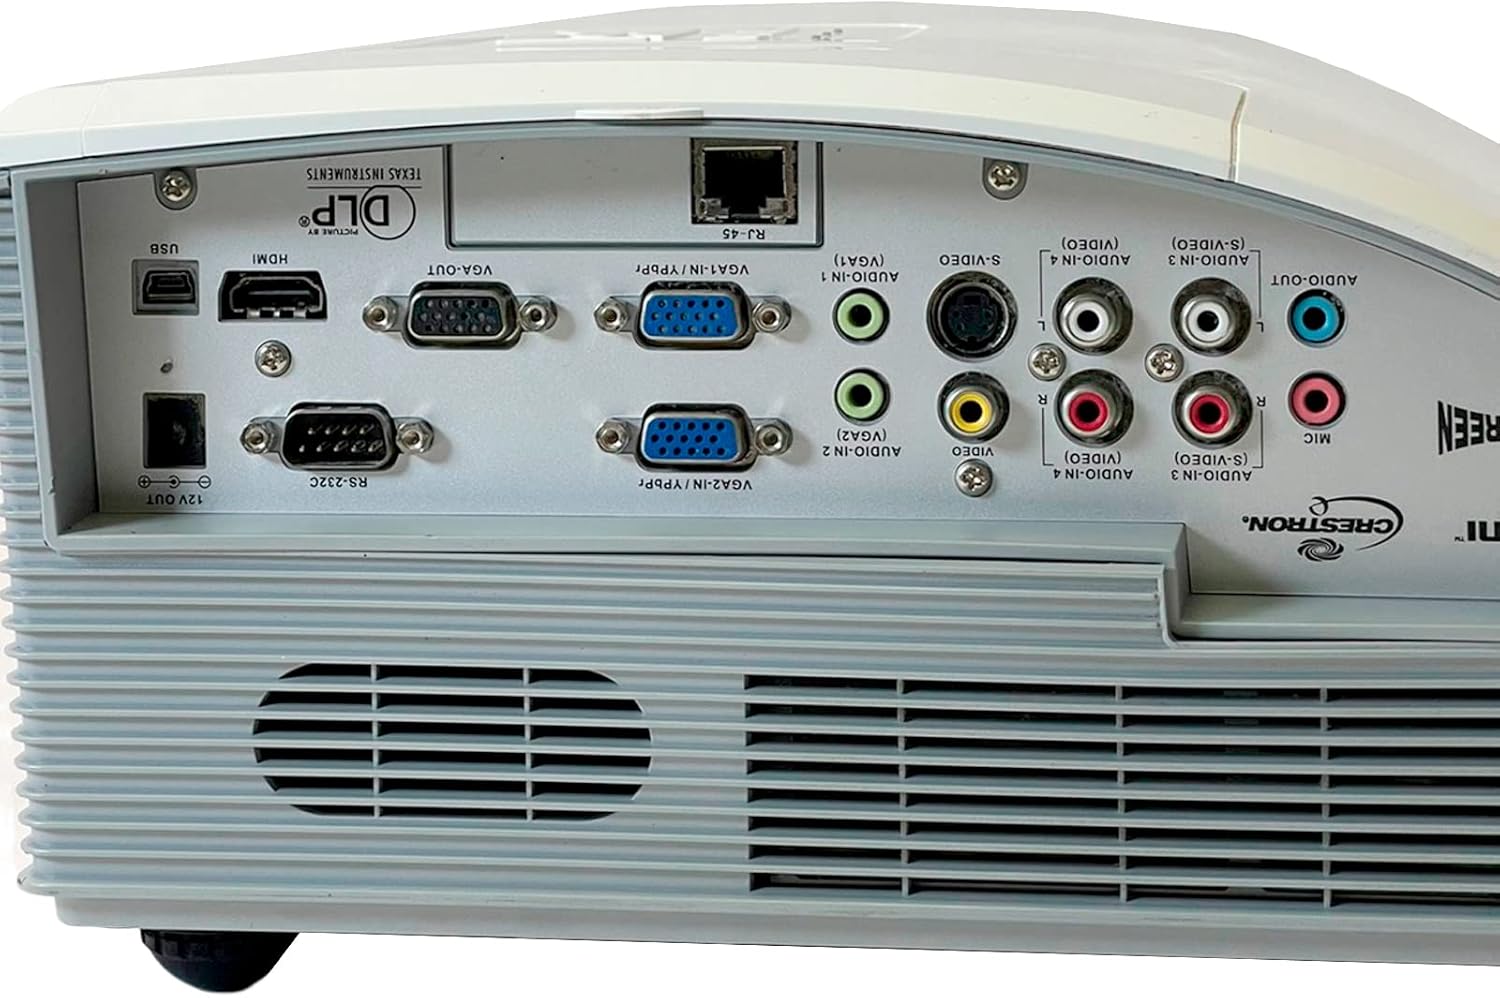
Figure 3.3: Detailed view of the rear connectivity panel, showcasing various input and output ports including HDMI, VGA, S-Video, Composite, and audio connections.

Figure 3.4: Bottom view of the projector, showing the adjustable feet, mounting points for ceiling installation, and the product information label.
4. Setup
4.1 Placement
Due to its ultra-short throw design, the W307UST can be placed very close to the projection surface. Ensure the surface is flat and free of obstructions. For optimal image quality, position the projector directly in front of the screen.
4.2 Connecting Power
- Connect the power cord to the AC power inlet on the projector.
- Plug the other end of the power cord into a grounded electrical outlet.
4.3 Connecting Input Sources
The projector supports various input sources:
- HDMI: Connect an HDMI cable from your source device (e.g., laptop, Blu-ray player) to the HDMI port on the projector.
- VGA: Connect a VGA cable from your computer to one of the VGA IN ports (VGA1 or VGA2).
- S-Video/Composite: Use the S-Video or Composite video ports for older devices.
- Audio: Connect audio cables to the corresponding Audio In ports (3.5mm or RCA) for each video input.
- USB (Interactive): For interactive features, connect a USB cable from your computer to the USB port.
4.4 Initial Power On and Adjustment
- Press the Power button on the control panel or remote control to turn on the projector.
- Adjust the image focus using the focus ring located near the lens.
- If the image is trapezoidal, use the keystone correction feature in the OSD menu to square the image.
5. Operating the Projector
5.1 Powering On/Off
- To Power On: Press the Power button once. The power LED will turn solid blue.
- To Power Off: Press the Power button twice. The projector will enter a cooling down cycle before shutting off completely. Do not unplug the power cord until the cooling cycle is complete.
5.2 Source Selection
Press the Source button on the control panel or remote control to cycle through available input sources (HDMI, VGA1, VGA2, S-Video, Composite). Alternatively, use the dedicated source buttons on the remote control.
5.3 Menu Navigation (OSD)
Press the Menu button to display the On-Screen Display (OSD). Use the arrow buttons to navigate through menu options and the Enter button to select. Press Menu again to exit.
5.4 Picture Adjustments
Within the OSD, you can adjust various picture settings:
- Brightness: Adjusts the overall lightness or darkness of the image.
- Contrast: Controls the difference between the light and dark areas of the image.
- Display Mode: Select from preset modes (e.g., Presentation, Bright, Movie, sRGB) or customize your own.
- Aspect Ratio: Change the image aspect ratio (e.g., 4:3, 16:9, Auto).
5.5 3D Functionality
The Optoma W307UST is 3D Ready. To view 3D content, you will need compatible 3D glasses and a 3D source device. Refer to your 3D source device's manual for specific setup instructions.
5.6 Audio Settings
Adjust the volume using the volume buttons on the remote control. The projector features a built-in 10W speaker. For external audio, connect speakers to the Audio Out port.
6. Maintenance
6.1 Cleaning the Lens
Use a soft, lint-free cloth specifically designed for optical lenses. Do not use abrasive cleaners or solvents.
6.2 Cleaning Air Filters and Vents
Regularly clean the air filters and ventilation grilles to ensure proper airflow and prevent overheating. Use a soft brush or a vacuum cleaner with a brush attachment. Refer to the manual for filter location.
6.3 Lamp Replacement
The lamp has a limited lifespan. When the lamp life is nearing its end, a warning message may appear on the screen. Replace the lamp with an authorized Optoma replacement lamp. Refer to the service manual or Optoma support for detailed lamp replacement instructions.
6.4 General Care
Keep the projector in a clean, dust-free environment. Avoid exposing it to extreme temperatures or humidity.
7. Troubleshooting
If you encounter problems with your projector, refer to the following common issues and solutions:
| Problem | Possible Cause | Solution |
|---|---|---|
| No image on screen | Power cord disconnected Incorrect input source selected Source device not powered on | Check power connections Press the Source button to select correct input Ensure source device is on and outputting signal |
| Image is blurry | Lens out of focus Projector too close/far from screen | Adjust the focus ring Reposition the projector within recommended throw distance |
| No audio | Volume too low Audio cable not connected Incorrect audio input selected | Increase volume Ensure audio cable is securely connected Select correct audio input in OSD |
| Projector overheats and shuts down | Blocked ventilation Dirty air filter | Ensure clear space around vents Clean air filter and vents |
8. Specifications
| Feature | Description |
|---|---|
| Model Number | W307UST |
| Native Resolution | WXGA 1280 x 800 |
| Contrast Ratio | 15,000:1 |
| I/O Connectors | HDMI (1.4a 3D support), 2 x VGA (YPbPr/RGB), S Video, Composite, 4 x Audio In (RCA/3.5mm), Audio Out 3.5mm, VGA Out, RJ45, RS232, USB (interactive), 12V trigger, Mic In |
| Product Dimensions | 14.41 x 14.02 x 9.09 inches |
| Item Weight | 16.53 pounds |
| Special Feature | 3D-Ready |
| Connectivity Technology | HDMI |
| Manufacturer | OPTOMA TECHNOLOGY |
9. Warranty and Support
9.1 Warranty Information
The Optoma W307UST projector comes with a 3-year limited warranty. The lamp is covered by a 1-year limited warranty. Please retain your proof of purchase for warranty claims. For full warranty terms and conditions, refer to the warranty card included with your product or visit the official Optoma website.
9.2 Customer Support
For technical assistance, troubleshooting beyond this manual, or warranty service, please contact Optoma customer support. Visit the official Optoma website for contact information, FAQs, and driver downloads.
Ask a question about this manual
Ask about setup, troubleshooting, compatibility, parts, safety, or missing instructions. Manuals+ will review the question and use this page’s manual context to help answer it.