Product Overview
The Galcon 61562 DC-6S is a dependable battery-operated irrigation controller designed for remote locations without an electrical power source. It can be utilized for various irrigation needs, including sprinkler, drip, and plant propagation systems. Its robust, waterproof (IP-68) and UV-resistant construction ensures durability in harsh indoor and outdoor environments, even when installed inside a valve box.
This controller features an easy-to-operate LCD screen and four large buttons for simple programming. It supports daily or cyclic programs with flexible scheduling options, allowing irrigation durations as short as ten seconds or as long as 30 days, with up to four daily start times. The unit is designed to operate up to 6 irrigation control valves plus a master valve.
Key features include:
- Battery-operated for remote locations (uses two 9V batteries, typically lasting a full season).
- IP-68 waterproof grade and UV-resistant materials for durability.
- Supports up to 6 irrigation control valves + master valve.
- Highly programmable with flexible duration (10 seconds to 30 days) and up to 4 start times.
- Large LCD screen and intuitive buttons for easy operation.
- Mounts to valve's solenoid or to a wall.
- Rain sensor connection wire for water conservation (rain sensor NOT INCLUDED).

Figure 1: Galcon 61562 DC-6S Battery Operated Irrigation Timer.
Setup and Installation
1. Parts Identification
Familiarize yourself with the main components of the irrigation controller.

Figure 2: Diagram showing the cover, push buttons, controller display, battery compartment cover, adaptor, mechanical operation lever, solenoid, and hydraulic valve.
2. Battery Installation
The unit requires two 9V batteries for operation. These typically last a full season.
- Open the battery compartment cover. This is typically a round cover on the side of the unit.
- Insert the two 9V batteries, ensuring correct polarity.
- Replace the battery compartment cover. Ensure the pins are in place and rotate the cover approximately 1/8 of a turn to the right to secure it. Be careful not to break the battery cover pins.
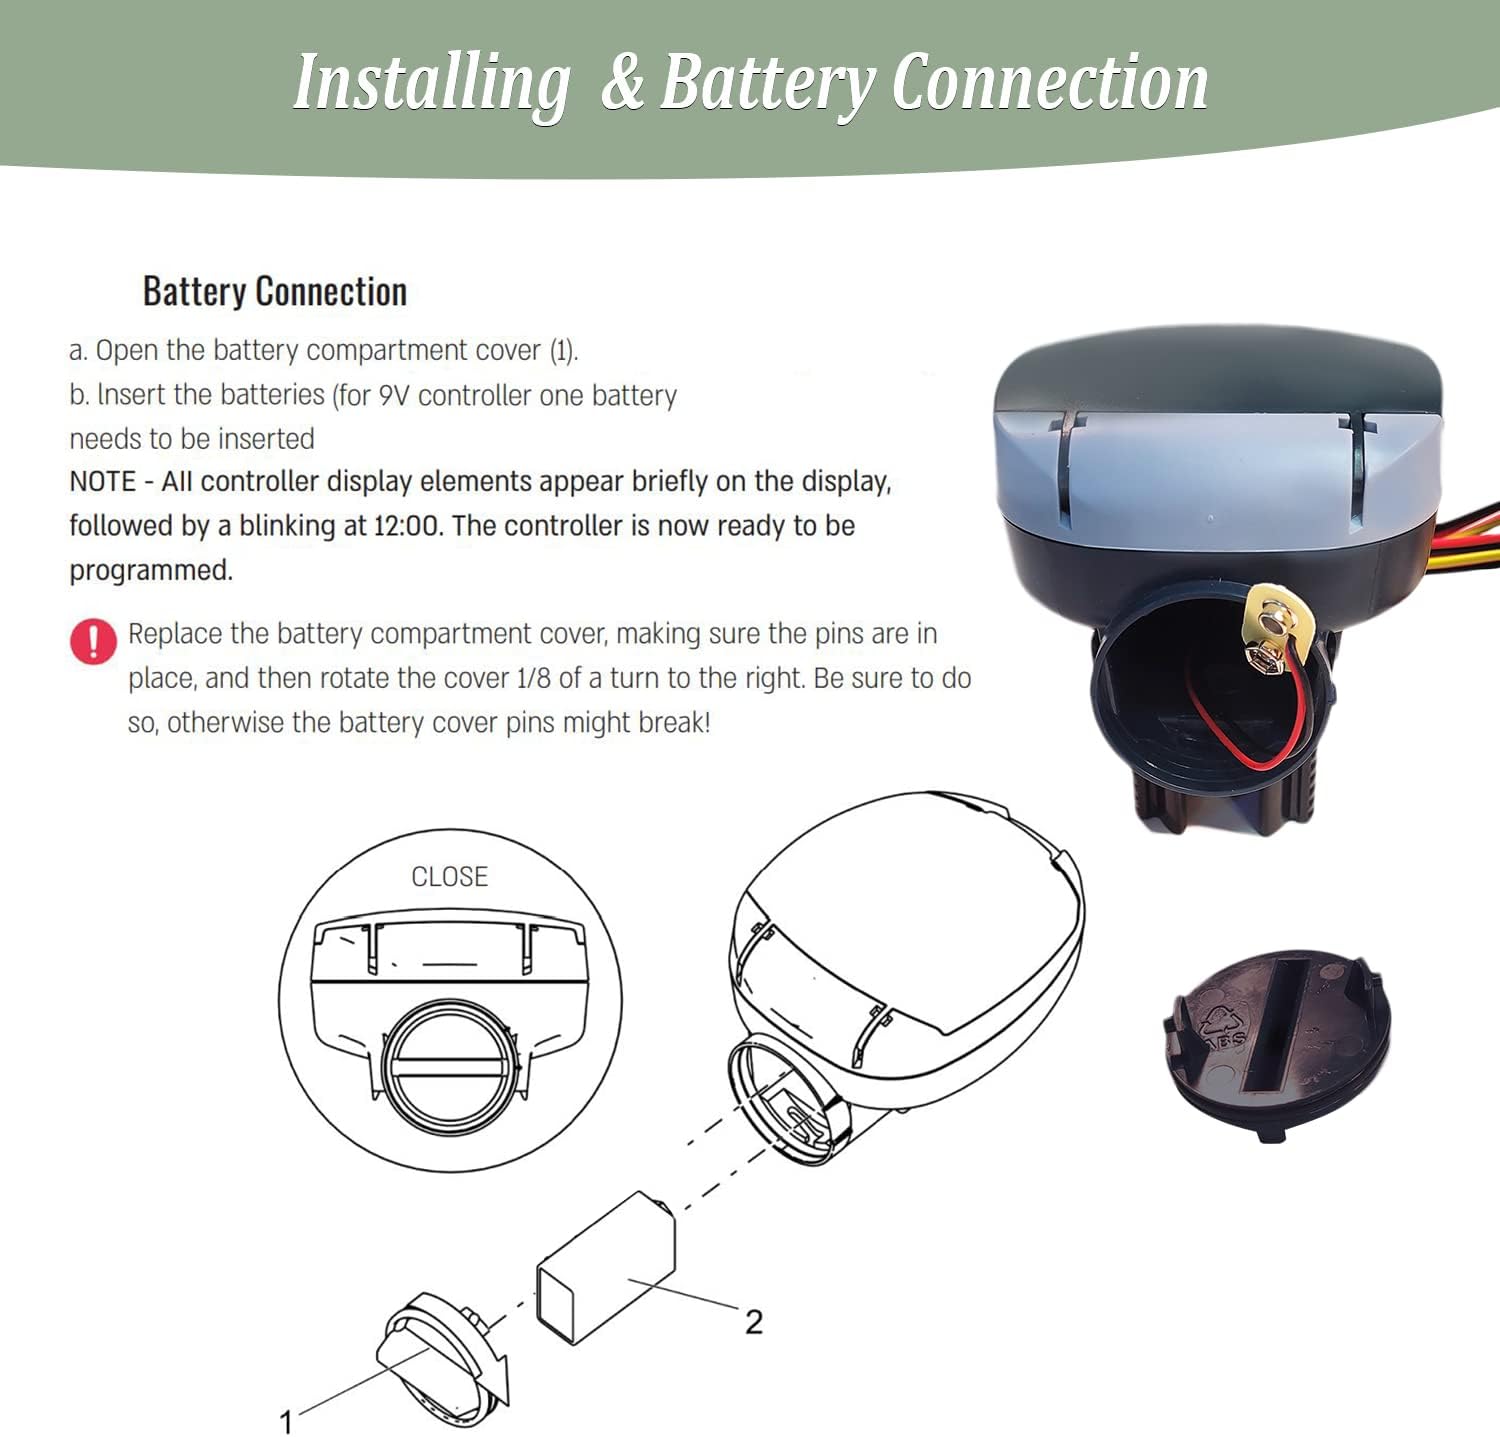
Figure 3: Visual guide for opening the battery compartment and inserting the 9V battery.
3. Mounting Options
The controller offers two primary mounting methods:
- Solenoid Mount: The unit can slide directly onto a valve's solenoid that is already installed in your piping.
- Wall Mount: A separate wall-mount bracket is included. This bracket can be screwed to a wall, and the controller unit then clips securely onto it.

Figure 4: The Galcon DC-6S controller showing its wiring and the detachable mounting base, which can be used for solenoid or wall mounting.
4. Wiring the Unit
The controller comes with pre-wired leads for connecting to your irrigation valves. Each pair of red and black wires is marked for specific valves (e.g., Valve 1, Valve 2, etc.). There is also a yellow loop for a rain sensor connection.
- Connect the red and black wires from the controller to the corresponding valve solenoids.
- The yellow loop is for an optional rain sensor. If a rain sensor is used, it can be programmed to shut off irrigation for a set amount of time when rain is detected.

Figure 5: Close-up of the Galcon DC-6S showing the labeled wiring for different valves and the rain sensor loop.
Operating Instructions
The Galcon 61562 DC-6S is programmed using four main buttons: Enter, Right Arrow, Plus (+), and Minus (-).

Figure 6: The controller's interface with buttons for programming irrigation schedules.
1. Setting Current Time and Day
- Open the controller's cover to reveal the LCD screen and buttons. The time display will be flashing.
- Use the Right Arrow button to navigate to the hour setting. Use the Plus (+) or Minus (-) buttons to adjust the hour.
- Press Right Arrow again to navigate to the minute setting and adjust as needed.
- Press Right Arrow to navigate to the day of the week. Use Plus (+) or Minus (-) to select the current day (M, Tu, W, Th, F, Sa, Su).
- Press Enter to confirm the time and day settings.
2. Programming Irrigation Schedules (Valve-Specific)
You can program individual schedules for each valve (1-6) and the master valve.
- Use the Right Arrow button to select the desired valve (1, 2, 3, 4, or Master). The selected valve number will flash.
- Press Enter to begin programming for that valve.
- Set Duration: Use Plus (+) or Minus (-) to set the irrigation duration in hours, minutes, or seconds. Press Right Arrow to move between hours, minutes, and seconds. Durations can be as short as 10 seconds.
- Set Days/Cycle: Press Right Arrow to move to the 'days' setting.
- To set specific days of the week: Use Plus (+) to select the desired days (e.g., M, W, F). The cursor will appear under the selected days.
- To set a cyclical schedule (e.g., every X days): Use Plus (+) or Minus (-) to set the number of days in the cycle (e.g., '2' for every other day).
- Set Start Times: Press Right Arrow to move to 'Start 1'. Use Plus (+) or Minus (-) to set the first start time. You can set up to four start times (Start 1, Start 2, Start 3, Start 4). Navigate between them with the Right Arrow.
- Press Enter to save the settings for the current valve.
Example Programming from Video:
- Valve 1 (Misting/Propagation): 10 seconds duration, runs every 5 minutes on a cycle, starting at 8:10 AM. Irrigation window open from 8:00 AM to 5:00 PM.
- Valve 2 (Cyclical): 20 minutes duration, runs every 2 days, starting at 8:30 AM.
- Valve 3 (Specific Days): 30 minutes duration, runs on Monday, Wednesday, Friday. Two start times: 8:30 AM and 5:00 PM.

Figure 7: The controller's display showing various programming parameters like valve duration, days, and start times.
3. Rain Sensor Integration (Optional)
The controller has a dedicated connection for a rain sensor (not included). When a rain sensor is attached and activated, it can temporarily suspend irrigation to conserve water.
- Connect the rain sensor to the yellow loop wires on the controller.
- The controller can be programmed to shut off irrigation for a specified period (e.g., 24, 48, 72 hours) when the rain sensor is triggered.

Figure 8: The Galcon 6100 Series controller, highlighting its battery-powered nature and suitability for various applications including residential gardening and greenhouses.
Maintenance
Battery Replacement
The two 9V batteries typically last a full season. Replace them when the low battery indicator appears on the LCD screen or if the unit stops functioning as expected.
- Gently open the battery compartment cover (refer to Setup section).
- Remove the old batteries and insert new 9V batteries, ensuring correct polarity.
- Securely close the battery compartment cover.

Figure 9: The IP68 rating ensures the controller can withstand indoor or outdoor weather conditions, contributing to its low maintenance needs.
Troubleshooting
While the Galcon 61562 DC-6S is designed for reliable operation, here are some common issues and their potential solutions:
- Unit Not Powering On / Display Blank: Check the 9V batteries. Ensure they are new and correctly installed. Replace if necessary.
- Irrigation Not Starting:
- Verify that the current time and day are correctly set on the controller.
- Check the programmed start times and durations for the specific valves.
- Ensure the irrigation window (open/close times) allows for watering at the scheduled time.
- If a rain sensor is connected, check if it's active and preventing irrigation.
- Confirm that the valve solenoids are properly connected and functioning.
- Watering Duration Incorrect: Re-check the programmed duration for the affected valve in the settings.
- Watering on Wrong Days: Review the 'days' or 'cycle' settings for the specific valve to ensure they match your desired schedule.
For more complex issues, refer to the official user manual PDF linked in the Support section or contact Galcon customer support.
Product Specifications
| Feature | Specification |
|---|---|
| Brand | Galcon |
| Model Number | GAJFSI002P0 (61562 DC-6S) |
| Color | 6 Station Battery Operated Irrigation Timer With Smart Sprinkler Controller |
| Material | Plastic |
| Item Weight | 7.7 ounces |
| Product Dimensions | 3.7 x 5.1 x 5.1 inches |
| Number of Settings | 5 |
| Batteries Required | 2 x 9V batteries |
| Waterproof Rating | IP-68 |
| Country of Origin | Israel |
Official Product Video
Watch this official video from the seller for a detailed overview and demonstration of the Galcon DC-6S irrigation timer, including setup and programming tips.
Video: Water timer for irrigation with irrigation tips (Duration: 10:31)
This video provides a comprehensive guide to the DC-6100 / 6150 'S' series battery-operated controller, demonstrating unboxing, component identification (solenoid mount, wall mount), battery installation, and detailed programming steps for setting time, day, valve durations (including seconds for misting/propagation), cyclical schedules, and multiple start times. It also highlights the rain sensor loop functionality.
Warranty and Support
For detailed warranty information, please refer to the official product documentation or contact Galcon customer support directly.
Additional resources:
This product is designed for use only in the USA and Canada.