Rowenta CT3801
Rowenta CT3801 Adagio Milano Filter Coffee Maker User Manual
Model: CT3801 | Brand: Rowenta
1. Important Safety Instructions
Please read all instructions carefully before using the appliance. Retain this manual for future reference.
- Do not immerse the appliance, power cord, or plug in water or any other liquid.
- Ensure the voltage indicated on the appliance corresponds to your mains voltage.
- Always unplug the appliance from the power outlet before cleaning and when not in use.
- Do not operate any appliance with a damaged cord or plug, or after the appliance malfunctions or has been damaged in any manner.
- Keep the appliance out of reach of children.
- Avoid contact with hot surfaces. Use handles or knobs.
- Use the appliance only for its intended household purpose.
- Do not place the appliance on or near a hot gas or electric burner, or in a heated oven.
- Exercise extreme caution when disposing of hot steam.
2. Product Overview
The Rowenta CT3801 Adagio Milano is a filter coffee maker designed for ease of use and consistent coffee quality. It features a durable thermal carafe to keep your coffee warm.
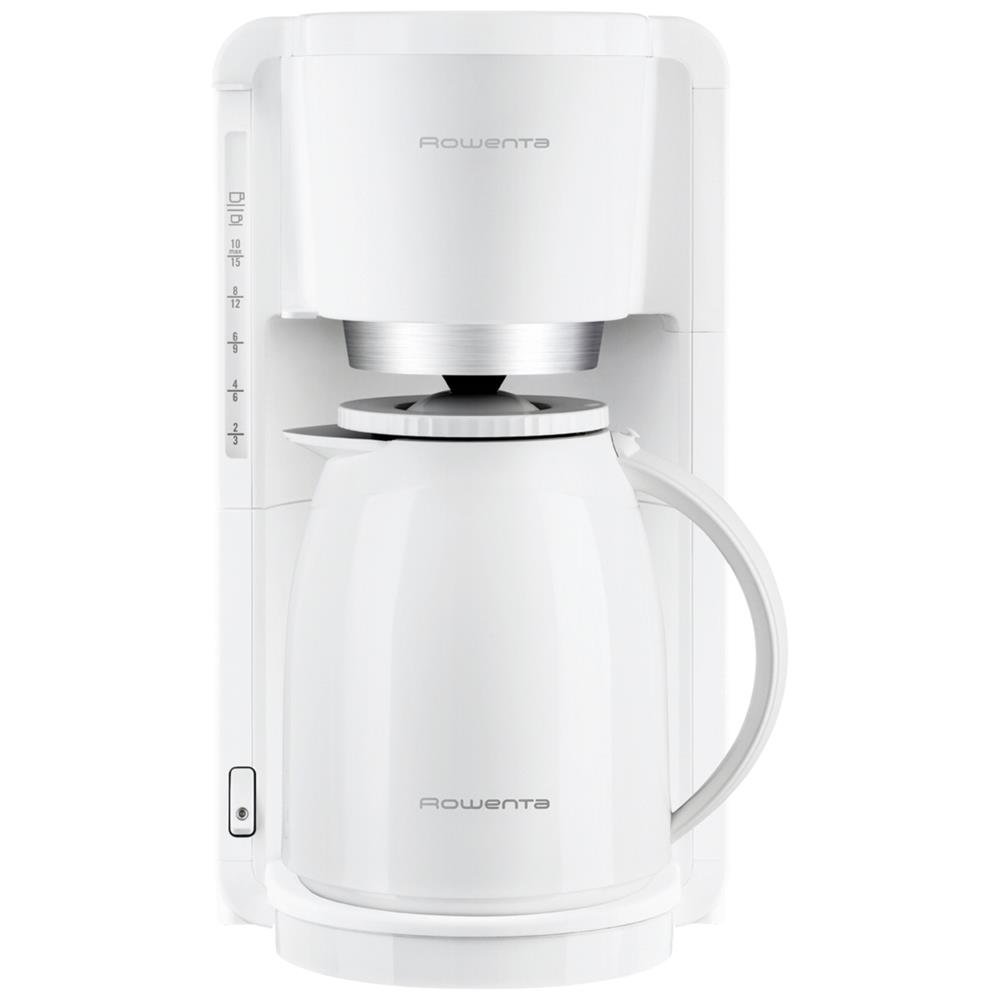
Figure 1: Rowenta CT3801 Adagio Milano Filter Coffee Maker. This image shows the complete coffee maker with its white body and black thermal carafe.
Key Components:
- Water Reservoir: With a visible water level indicator for accurate filling.
- Swivel and Removable Filter Holder: For easy placement and removal of coffee filters and grounds.
- Thermal Carafe: Shock-resistant plastic carafe with a 1-liter capacity, designed to keep coffee warm for up to 4 hours.
- On/Off Switch: Illuminated switch for clear indication of operation, featuring automatic shut-off after brewing.
3. Setup and First Use
Before using your coffee maker for the first time, follow these steps:
- Unpack: Remove all packaging materials and labels from the appliance.
- Clean: Wash the thermal carafe and the removable filter holder with warm, soapy water. Rinse thoroughly and dry.
- Initial Rinse: Fill the water reservoir with cold water up to the maximum level. Do not add coffee. Place the empty filter holder and carafe in position. Run a full brewing cycle to clean the internal components. Discard the water.
- Position: Place the coffee maker on a flat, stable, heat-resistant surface, away from water sources.
4. Operating Instructions
Follow these steps to brew coffee:
- Fill Water Reservoir: Open the lid of the water reservoir and fill it with fresh, cold water to the desired level, using the visible water level indicator. The capacity is 1 liter, suitable for 8-12 cups.
- Add Coffee Grounds: Swivel out the filter holder. Place a paper filter (size 1x4 or similar, depending on model specifics) into the filter holder, or use the reusable filter if provided. Add the desired amount of ground coffee. A general guideline is one tablespoon of coffee per cup.
- Close Filter Holder: Swivel the filter holder back into its closed position.
- Position Carafe: Ensure the thermal carafe is correctly placed under the coffee outlet.
- Start Brewing: Plug the appliance into a power outlet. Press the illuminated On/Off switch. The light will indicate that the brewing process has started.
- Automatic Shut-off: The coffee maker will automatically switch off after the brewing process is complete. The illuminated switch will turn off.
- Serve: Your coffee is ready. The thermal carafe will keep it warm for up to 4 hours.
5. Maintenance and Cleaning
Regular cleaning ensures optimal performance and extends the lifespan of your coffee maker.
- Daily Cleaning: After each use, unplug the appliance. Remove the filter holder and discard the used coffee grounds and filter. Wash the filter holder and thermal carafe with warm, soapy water. Rinse thoroughly and dry. Wipe the exterior of the coffee maker with a damp cloth.
- Descaling: Mineral deposits from water can build up over time, affecting performance. Descale your coffee maker every 2-3 months, or more frequently if you have hard water.
- Descaling Procedure:
- Prepare a descaling solution according to the manufacturer's instructions (e.g., white vinegar and water, or a commercial descaling agent).
- Pour the solution into the water reservoir.
- Place the empty carafe under the coffee outlet.
- Run a brewing cycle. Turn off the appliance halfway through the cycle and let it sit for 15-30 minutes to allow the solution to work.
- Complete the brewing cycle.
- Run 2-3 cycles with fresh, clean water to rinse out any remaining descaling solution.
- Do Not Dishwash: The product specifications indicate the item is not dishwasher safe. Hand wash components only.
6. Troubleshooting
| Problem | Possible Cause | Solution |
|---|---|---|
| Coffee does not brew. | Appliance not plugged in; power switch off; no water in reservoir. | Ensure appliance is plugged in and power switch is on. Fill water reservoir. |
| Coffee is too weak. | Not enough coffee grounds; coffee too coarsely ground; carafe not properly placed. | Add more coffee grounds. Use finer ground coffee. Ensure carafe is correctly positioned. |
| Coffee overflows from filter holder. | Too much coffee grounds; filter clogged; carafe not properly placed. | Reduce coffee grounds. Clean filter holder. Ensure carafe is correctly positioned. Descale if necessary. |
| Brewing process is slow. | Mineral buildup (scale). | Perform a descaling procedure as described in the Maintenance section. |
7. Specifications
| Brand | Rowenta |
| Model Number | CT3801 |
| Capacity | 1 Liter (8-12 cups) |
| Color | White |
| Material | Stainless Steel, Plastic |
| Wattage | 850 watts |
| Voltage | 220V |
| Special Features | Thermal Carafe, Automatic Shut-off, Illuminated On/Off Switch, Visible Water Level, Swivel and Removable Filter Holder |
| Filter Type | Reusable |
| Dishwasher Safe | No |
8. Warranty and Support
Rowenta products are designed for durability and ease of repair. This appliance is part of a program committed to repairability.
- Repairability: This product is repairable at a fair price for 15 years. Rowenta maintains a network of over 6200 approved repairers worldwide.
- Manufacturer: Groupe SEB
- For detailed warranty information or to locate an authorized service center, please refer to the warranty card included with your product or visit the official Rowenta website.
Related Documents - CT3801
 |
Guide d'utilisation Cafetière Rowenta Adagio Manuel d'utilisation complet pour la cafetière Rowenta Adagio, incluant les instructions de sécurité, la préparation du café, le nettoyage, le détartrage et le dépannage. |
 |
Rowenta RO 1233 11 SOAM Vacuum Cleaner User Manual and Guide Comprehensive guide for the Rowenta RO 1233 11 SOAM vacuum cleaner, covering product identification, description of components and accessories, usage instructions, maintenance, and safety precautions. Includes filter replacement and cleaning advice. |
 |
Rowenta Pure Home PU808X Air Purifier User Manual Comprehensive user manual for the Rowenta Pure Home PU808X air purifier, detailing setup, operation, maintenance, and troubleshooting. Includes safety tips and warranty information. |
 |
Rowenta Pure Home Air Purifier PU808X User Manual User manual for the Rowenta Pure Home air purifier (PU808X). Learn about its 4-stage filtration, real-time air quality monitoring, Wi-Fi connectivity, and operation for cleaner indoor air. |
 |
Rowenta Pure Air Essential PU2530 Air Purifier User Manual A comprehensive guide to operating, maintaining, and troubleshooting the Rowenta Pure Air Essential PU2530 air purifier. Learn about its features, safety precautions, filter replacement, and tips for cleaner indoor air. |
 |
Rowenta Silence Force Vacuum Cleaner User Manual and Guide Comprehensive user manual for the Rowenta Silence Force vacuum cleaner, covering operation, maintenance of permanent filters, and accessory usage for optimal cleaning performance. |
Ask a question about this manual
Ask about setup, troubleshooting, compatibility, parts, safety, or missing instructions. Manuals+ will review the question and use this page’s manual context to help answer it.