1. Product Overview
The Ryobi RYCST55 Expand-It Curved-Shaft String Trimmer Attachment is designed for compatibility with most attachment-capable trimmers. This attachment allows for efficient edging and trimming with its 17-inch cutting swath and a convenient bump-feed string head.
Key Features:
- Universal Compatibility: Designed to fit most attachment-capable string trimmers.
- 17-inch Cutting Swath: Provides a wide cutting area for efficient trimming.
- Bump-Feed String Head: Allows for easy line advancement during operation.
- Curved Shaft Design: Enhances maneuverability and ease of use.
- Refurbished Quality: This product has been tested and certified to look and work like new, undergoing functionality testing, basic cleaning, inspection, and repackaging.
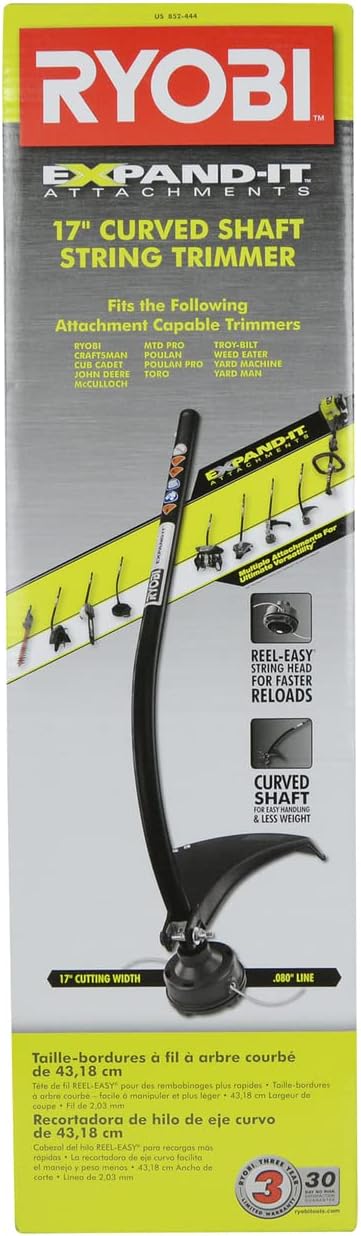
Figure 1.1: Ryobi RYCST55 17-inch Curved Shaft String Trimmer Attachment packaging, highlighting key features and compatibility.
2. Safety Information
Always prioritize safety when operating power tools. Adhere to the following guidelines to prevent injury and ensure proper use of your string trimmer attachment:
- Always wear appropriate personal protective equipment, including eye protection (safety glasses or goggles) and sturdy gloves, when using this string trimmer attachment.
- Ensure all bystanders, children, and pets are kept at a safe distance (at least 50 feet/15 meters) from the operating area.
- Do not operate the trimmer near flammable materials, liquids, or gases, as sparks could ignite them.
- Before performing any maintenance, adjustments, or clearing debris, always disconnect the attachment from the power head.
- Inspect the attachment for any damage or loose parts before each use. Do not operate if damaged.
- Always follow the manufacturer's instructions for safe operation, assembly, and maintenance of both the attachment and the power head.
WARNING: This attachment is designed for use with gas-powered power heads only. Refer to your power head's instruction manual for specific compatibility and safety guidelines.
3. Setup and Assembly
The Ryobi Expand-It attachment system allows for quick and easy connection to compatible power heads. Follow these steps to properly set up your string trimmer attachment:
- Prepare Power Head: Ensure your power head is turned off and the spark plug wire is disconnected (for gas models) or the battery is removed (for electric models) before attaching or detaching any accessories.
- Align Shafts: Align the shaft of the string trimmer attachment with the coupling on your power head. The attachment shaft typically has a square or splined drive shaft that fits into a corresponding receiver on the power head.
- Secure Connection: Push the attachment shaft firmly into the power head coupling until it clicks into place or the locking mechanism engages. Some models may require tightening a knob or lever to secure the connection. Refer to your power head's manual for specific locking instructions.
- Verify Connection: Gently pull on the attachment to ensure it is securely fastened and does not wobble. A loose connection can be dangerous during operation.

Figure 3.1: The Ryobi Curved Shaft String Trimmer Attachment, ready for connection to a compatible power head.

Figure 3.2: Rear view of the product packaging, illustrating the curved shaft design and the REEL EASY™ string head for faster reloads.
4. Operating Instructions
Once the string trimmer attachment is securely connected to your power head, you are ready to begin operation. Always ensure you are in a clear area, free of obstacles and bystanders.
Starting the Trimmer:
- Refer to your power head's instruction manual for specific starting procedures (e.g., priming, choking, pulling the starter cord for gas models, or engaging the trigger for electric models).
- Allow the engine/motor to reach full operating speed before beginning to trim.
Trimming and Edging:
- Hold the trimmer firmly with both hands, maintaining a balanced stance.
- Use a sweeping motion, moving the trimmer from side to side, to cut grass and weeds.
- For edging, tilt the trimmer head to a vertical position and guide the line along the edge of sidewalks, driveways, or flowerbeds.
- The 17-inch cutting swath allows for efficient coverage of larger areas.
Advancing the Trimmer Line (Bump-Feed):
This attachment features a bump-feed string head. To advance the trimmer line:
- While the trimmer is running at full speed, gently tap the bump knob on the bottom of the trimmer head against a firm, flat surface (e.g., the ground).
- The impact will release a small amount of new line. The line cut-off blade on the guard will trim the line to the correct length.
- Avoid excessive bumping, as this can waste line.

Figure 4.1: Detailed view of the string trimmer head, showing the cutting line and guard.

Figure 4.2: A different angle of the trimmer head, highlighting the line exit points and the robust design.

Figure 4.3: Underside view of the trimmer head, clearly showing the bump knob for line advancement.
5. Maintenance
Regular maintenance ensures the longevity and optimal performance of your Ryobi string trimmer attachment.
Cleaning:
- After each use, clean the trimmer head and guard to remove grass clippings, dirt, and debris. Use a damp cloth and mild soap if necessary.
- Ensure the line cut-off blade on the guard is clear of debris to function properly.
Replacing Trimmer Line:
The Ryobi RYCST55 uses a REEL EASY™ bump-feed string head, designed for quick line replacement. It uses 0.080-inch diameter line.
- Prepare: Disconnect the attachment from the power head.
- Remove Spool Cap: Press the tabs on the side of the trimmer head and pull off the spool cap. Remove the old line spool.
- Wind New Line: The spool has an arrow indicating the winding direction. However, some users have found that winding the line in the opposite direction of the