
1. Introduction
This manual provides comprehensive instructions for the proper installation, operation, and maintenance of the Auger 10577 Ball Joint Control Linkage. Please read this manual thoroughly before beginning any work to ensure safety and optimal performance of the component.
The Auger 10577 is a critical component designed for automotive control linkage systems, ensuring precise and reliable operation. Adherence to these instructions will help prevent damage and ensure the longevity of the part.
2. Safety Information
Always prioritize safety when working with automotive components. Failure to follow safety precautions can result in serious injury or damage to the vehicle.
- Wear appropriate personal protective equipment (PPE), including safety glasses and gloves.
- Ensure the vehicle is securely supported on jack stands before working underneath it.
- Disconnect the vehicle's battery if instructed by the vehicle manufacturer's service manual.
- Use only appropriate tools for installation and removal.
- If you are unsure about any step, consult a qualified automotive technician.
3. Package Contents
Verify that all components are present and undamaged upon opening the package.
- 1x Auger 10577 Ball Joint Control Linkage
- 1x Fastening Nut (if applicable, as shown in image)
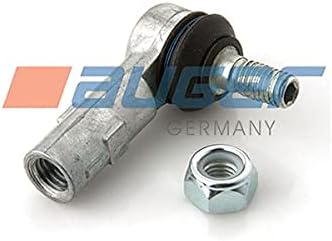
Image 1: The Auger 10577 Ball Joint Control Linkage, showing the threaded shaft, ball joint, and accompanying fastening nut. This component is designed for precise control in automotive systems.
4. Setup and Installation
This section outlines the general procedure for installing the Auger 10577 Ball Joint Control Linkage. Specific steps may vary depending on the vehicle model. Always refer to the vehicle manufacturer's service manual for detailed instructions.
- Preparation: Park the vehicle on a level surface and engage the parking brake. If necessary, lift the vehicle using a suitable jack and secure it with jack stands.
- Locate Existing Component: Identify the control linkage assembly that requires replacement.
- Remove Old Component:
- Loosen and remove any retaining nuts or bolts securing the old ball joint.
- Use a ball joint separator tool if the joint is seized.
- Carefully remove the old ball joint from its mounting points.
- Clean Mounting Area: Clean any rust, dirt, or debris from the mounting surfaces to ensure proper fitment of the new component.
- Install New Ball Joint:
- Insert the threaded shaft of the new Auger 10577 ball joint into its designated mounting hole.
- Secure the ball joint with the provided fastening nut. Do not fully tighten at this stage.
- Connect the other end of the linkage to its respective component, if applicable, and secure it.
- Torque Specifications: Refer to the vehicle manufacturer's service manual for the correct torque specifications for all fasteners. Tighten all nuts and bolts to the specified values.
- Final Inspection: Ensure all components are securely fastened and that there is no interference with other vehicle parts.
5. Operating Considerations
Once installed, the Auger 10577 Ball Joint Control Linkage operates as an integral part of the vehicle's steering or suspension system. No specific "operation" by the user is required beyond normal vehicle use.
- Post-Installation Check: After installation, it is recommended to perform a wheel alignment if the component affects steering geometry.
- Test Drive: Conduct a cautious test drive to ensure proper function and absence of unusual noises or handling characteristics.
6. Maintenance
The Auger 10577 Ball Joint Control Linkage is designed for durability and typically requires minimal maintenance. However, regular inspection is crucial for longevity and safety.
- Regular Inspection: Periodically inspect the ball joint and its protective boot for signs of wear, damage, or grease leakage.
- Boot Integrity: Ensure the rubber boot is intact to prevent contamination from dirt and moisture, which can lead to premature wear.
- Lubrication: If the ball joint is serviceable (has a grease fitting), lubricate it according to the vehicle manufacturer's recommendations using appropriate grease. The Auger 10577 is typically a sealed unit and does not require external lubrication.
- Replacement: Replace the ball joint if excessive play, noise, or damage is detected during inspection.
7. Troubleshooting
This section addresses common issues that may arise after installation or during the lifespan of the ball joint.
| Symptom | Possible Cause | Solution |
|---|---|---|
| Clunking or popping noise from suspension/steering | Worn or loose ball joint, improper installation | Inspect ball joint for play. Re-torque fasteners. Replace if worn. |
| Excessive play in steering wheel | Worn ball joint, other steering/suspension components | Inspect all steering and suspension components, including the ball joint. Replace faulty parts. |
| Uneven tire wear | Misalignment, worn suspension components (including ball joint) | Check for worn components. Perform a wheel alignment. |
If troubleshooting steps do not resolve the issue, consult a professional automotive technician.
8. Specifications
Key specifications for the Auger 10577 Ball Joint Control Linkage:
- Model Number: 10577
- Brand: Auger
- Manufacturer: Auger Autotechnik Gmbh
- Item Weight: Approximately 15.4 Kilograms
- Package Dimensions: Approximately 20.14 x 17.22 x 11.15 cm
- ASIN: B00DZF2VV8
9. Warranty and Support
For warranty information or technical support regarding your Auger 10577 Ball Joint Control Linkage, please refer to the official Auger website or contact your authorized dealer. Keep your purchase receipt as proof of purchase.
Contact Information: Please visit the official Auger website for the most current contact details and support resources.

