Introduction
This manual provides instructions for the installation, programming, and operation of your Orbit 94874 Pocket Star 'Ultima' 4-Station Indoor Sprinkler Timer. Please read these instructions carefully before use to ensure proper function and longevity of your device.
The Orbit 94874 is designed to manage up to four independent irrigation zones, offering flexible programming options for efficient water management.
Safety Information
- This timer is designed for indoor use only. Do not expose to rain or moisture.
- Ensure the power supply is disconnected before performing any wiring.
- Use only the specified 24-volt AC transformer provided with the unit.
- Keep out of reach of children.
Product Overview
The Orbit 94874 features an intuitive interface with an LCD display and large buttons for easy operation. It supports up to 4 irrigation zones and includes advanced features like rain delay and independent programming.

Figure 1: Front view of the Orbit 94874 Pocket Star 'Ultima' 4-Station Indoor Sprinkler Timer, showing the LCD display, control buttons, and rotary dial.
Setup
Installation
- Choose a suitable indoor location near a 230V AC power outlet, protected from direct sunlight and moisture.
- Mount the timer securely to a wall using appropriate screws and anchors (not included).
Wiring
The Orbit 94874 features simple, tool-less "push-in" terminals for easy wire connections.
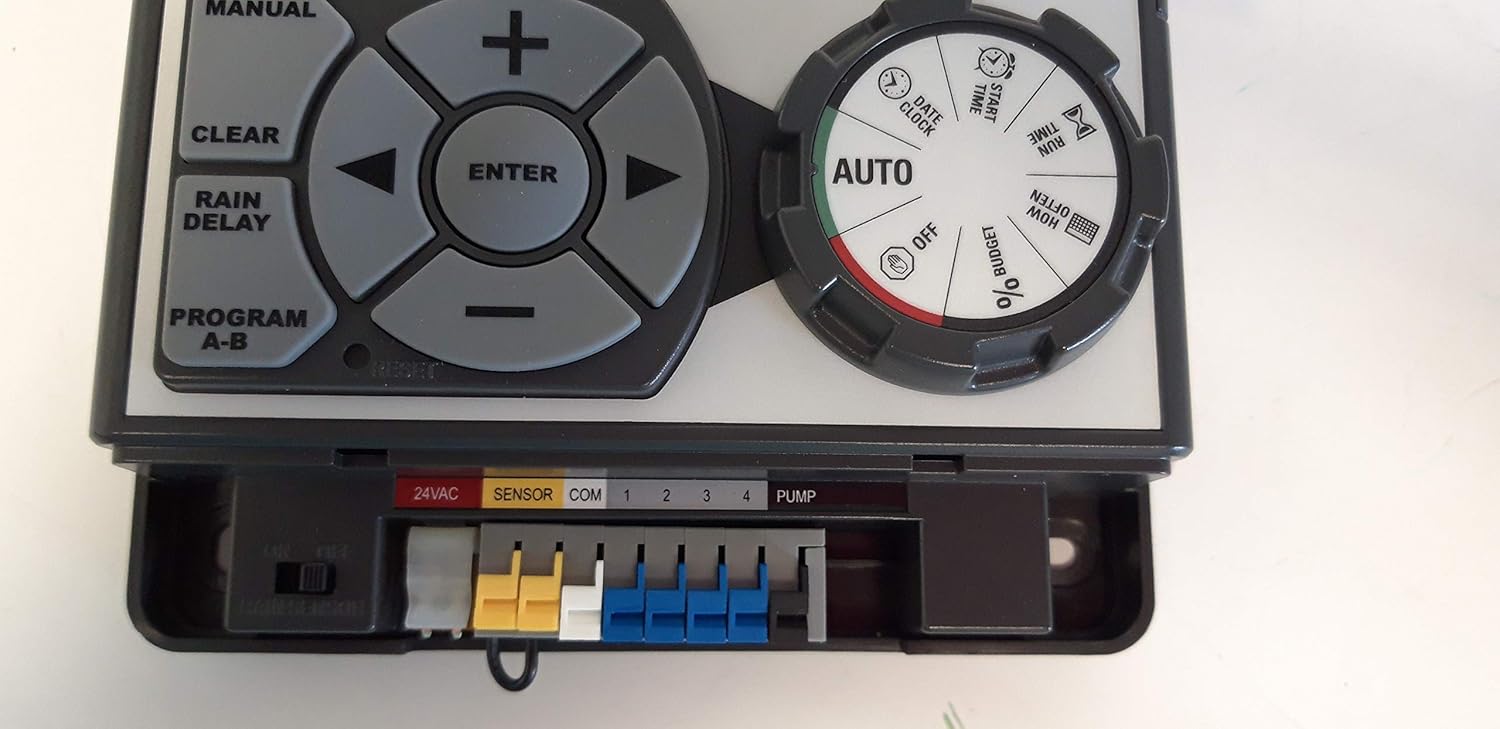
Figure 2: Close-up of the wiring terminals on the Orbit 94874 timer, showing connections for 24VAC, Sensor, Common (COM), and four station zones (1-4), plus a Pump terminal.
- Connect Valve Wires: Connect one wire from each 24V AC solenoid valve to a numbered terminal (1, 2, 3, or 4) corresponding to its irrigation zone.
- Connect Common Wire: Connect the common wire from all valves to the "COM" terminal.
- Connect Pump Start Relay (Optional): If using a pump start relay (sold separately), connect its control wires to the "PUMP" and "COM" terminals.
- Connect Rain Sensor (Optional): Connect a rain sensor (sold separately) to the "SENSOR" terminals. Ensure the rain sensor bypass switch is set correctly (ON/OFF).
- Connect Power: Plug the 24V AC transformer into the power connector on the timer and then into a 230V AC wall outlet.
Operating Instructions
The timer features a rotary dial and a button panel for navigation and setting adjustments.
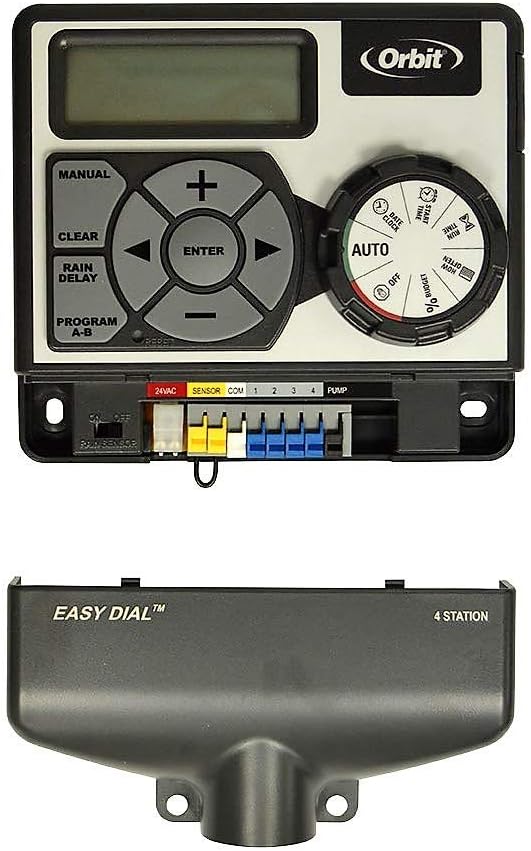
Figure 3: Diagram illustrating the control panel of the Orbit 94874 timer, showing the LCD display, navigation buttons (MANUAL, CLEAR, RAIN DELAY, PROGRAM A-B, ENTER, arrow keys, +, -), and the rotary dial with positions for AUTO, SET CLOCK, SET DATE, START TIME, RUN TIME, HOW OFTEN, % BUDGET, and OFF.
Rotary Dial Functions
- AUTO: Normal operation mode. The programmed schedule runs automatically.
- SET CLOCK: Adjust the current time.
- SET DATE: Set the current year, month, and day.
- START TIME: Configure the start times for watering cycles.
- RUN TIME: Set the duration for each station (1 to 99 minutes).
- HOW OFTEN: Select watering frequency (days of the week, intervals, or odd/even days).
- % BUDGET: Adjust watering duration for all stations by a percentage (seasonal adjust).
- OFF: Turns off all watering programs and functions.
Button Functions
- ENTER: Confirms a setting or moves to the next step.
- MANUAL: Initiates manual watering.
- CLEAR: Clears a setting or program.
- RAIN DELAY: Delays watering for 24, 48, or 72 hours.
- PROGRAM A-B: Switches between Program A and Program B.
- Arrow Keys (Left/Right): Navigates through settings or stations.
- Plus (+)/Minus (-): Adjusts numerical values.
Programming Your Timer
The timer supports two independent programs (A and B), each with up to four start times, allowing for a total of 12 watering cycles per day.
- Set Current Time and Date: Turn the dial to "SET CLOCK" and "SET DATE" to adjust. Use the +/- buttons and ENTER to confirm.
- Select Program: Press "PROGRAM A-B" to choose between Program A or B.
- Set Start Times: Turn the dial to "START TIME". Use the arrow keys to select a start time (1-4) and +/- to set the time. Press ENTER to confirm. Repeat for all desired start times.
- Set Run Times: Turn the dial to "RUN TIME". Use the arrow keys to select a station (1-4) and +/- to set the watering duration (1-99 minutes). Press ENTER to confirm. Repeat for all active stations.
- Set How Often: Turn the dial to "HOW OFTEN". Select your desired watering frequency:
- Days of the Week: Select specific days.
- Intervals: Water every X days.
- Odd/Even Days: Water on odd or even calendar days.
- Return to AUTO: Once programming is complete, turn the dial back to "AUTO" for automatic operation.
Manual Watering
To manually water a station:
- Press the "MANUAL" button.
- Use the arrow keys to select the desired station.
- Use the +/- buttons to set the manual watering duration.
- Press "ENTER" to start manual watering.
- To stop manual watering, press "CLEAR" or turn the dial to "OFF" and then back to "AUTO".
Rain Delay Feature
The rain delay feature allows you to temporarily pause your watering schedule for 24, 48, or 72 hours, conserving water after rainfall.
- Press the "RAIN DELAY" button.
- Each press will cycle through 24, 48, and 72 hours of delay.
- The display will show the remaining delay time.
- To cancel the rain delay, press "CLEAR".
Maintenance
- Keep the timer clean and free from dust. Use a soft, dry cloth for cleaning.
- Ensure the area around the timer is dry and well-ventilated.
- Periodically check wire connections to ensure they are secure.
- The timer features an auto-reset circuit breaker, eliminating the need for fuse replacement.
Troubleshooting
| Problem | Possible Cause | Solution |
|---|---|---|
| Timer display is blank. | No power to the timer. | Check power outlet, transformer connection, and ensure the outlet is live. |
| Sprinklers do not turn on. | Incorrect programming, loose wiring, or valve issues. | Verify program settings (start times, run times, frequency). Check all wiring connections to valves and common. Test valves manually. |
| Timer waters at unexpected times. | Multiple start times set, or incorrect "HOW OFTEN" setting. | Review all start times for Program A and B. Adjust "HOW OFTEN" settings. |
| Rain sensor not working. | Sensor bypass switch is ON, or sensor is faulty/disconnected. | Ensure rain sensor bypass switch is OFF. Check sensor wiring. |
Specifications
- Model: 94874
- Brand: Orbit
- Number of Stations: 4
- Programs: 2 (A & B)
- Start Times per Program: Up to 4
- Watering Duration: 1 to 99 minutes per station
- Rain Delay: 24, 48, or 72 hours
- Input Voltage: 230 Volts AC
- Output Voltage to Valves: 24 Volts AC
- Display Type: LCD
- Material: Plastic
- Color: Grey
- Dimensions (L x W x H): 15.5 x 6.5 x 15.5 Centimetres
- Weight: 0.53 Kilograms
Warranty and Support
For warranty information and technical support, please refer to the official Orbit website or contact Orbit customer service directly. Keep your purchase receipt for warranty claims.


