Introduction
The POWER ZONE TNDHD002 is a heavy-duty indoor digital timer designed to automate the on/off cycles of electrical devices. Featuring 7-day programmability and 16 customizable on/off settings, this timer offers convenience and energy management for various indoor applications. It includes a random 'lived-in' mode, a countdown function, and two 3-prong grounded outlets for versatile use with appliances and lighting.
Safety Information
- Indoor Use Only: This timer is designed for indoor use in dry locations. Do not expose to water or moisture.
- Electrical Rating: Do not exceed the timer's electrical ratings: 15 Amp resistive, 15 Amp tungsten, 1 horsepower motor. Overloading can cause damage or fire.
- Grounding: Ensure the timer is plugged into a properly grounded 3-prong outlet.
- Children: Keep out of reach of children.
- Cleaning: Unplug the timer before cleaning. Use a dry cloth; do not use liquid cleaners.
- Damage: Do not use if the timer or its cord is damaged. Contact customer support for assistance.
Product Overview
Familiarize yourself with the components of your POWER ZONE TNDHD002 timer.
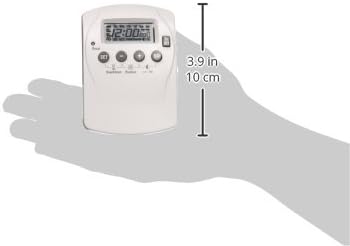
Image 1: Front view of the timer. This image displays the timer's front panel, including the LCD screen, 'SET' button, arrow buttons (up/down), and 'Random/Countdown/Override' button. The dimensions are indicated as approximately 3.9 inches (10 cm) in height.

Image 2: Back view of the timer. This image shows the back of the timer with its two 3-prong grounded outlets, the main plug, and a label containing a condensed programming guide and electrical specifications. The reverse ground pin placement is visible.
Key Features:
- LCD Display: Shows current time, day, and programming status.
- Control Buttons: 'SET', 'Up/Down' arrows, 'Random/Countdown/Override'.
- Two 3-Prong Grounded Outlets: Allows control of two devices simultaneously.
- Reverse Ground Pin Placement: Accommodates most right-angle and transformer plugs when wall-mounted.
- Battery Backup: Maintains programmed settings during power outages after an initial charge.
Setup
Initial Charge:
Before first use, plug the timer into a live outlet for at least 30 minutes to charge the internal battery backup. This ensures that your settings are retained if the timer is unplugged or during a power outage.
Setting Current Time and Day:
- Press the 'SET' button once. The display will show the current time setting.
- Use the 'Up' and 'Down' arrow buttons to adjust the hour. Ensure the correct AM/PM is selected if applicable (some models may require cycling through 24 hours for AM/PM).
- Press 'SET' again to move to minute adjustment. Use 'Up' and 'Down' arrows.
- Press 'SET' again to move to day adjustment. Use 'Up' and 'Down' arrows to select the current day (e.g., MO, TU, WE, TH, FR, SA, SU).
- Press 'SET' to save the current time and day settings.
Daylight Savings Time Adjustment:
The timer can automatically adjust for Daylight Savings Time. Refer to the programming guide on the back of the unit or the full manual for specific instructions on how to activate or deactivate this feature. Typically, you press 'SET' twice to access mode options, then use the arrow buttons to navigate to the Daylight Savings setting and press 'SET' to confirm.
Operating Instructions
Programming On/Off Settings:
The timer allows for up to 16 customizable on/off settings per day or across the 7-day week.
- Press 'SET' twice to enter programming mode. The display will show '1 ON'.
- Use the 'Up' and 'Down' arrow buttons to set the desired 'ON' time for program 1.
- Press 'SET' to confirm the 'ON' time. The display will show '1 OFF'.
- Use the 'Up' and 'Down' arrow buttons to set the desired 'OFF' time for program 1.
- Press 'SET' to confirm the 'OFF' time. The display will then show '2 ON'.
- Repeat steps 2-5 for up to 16 programs. To exit programming mode at any time, press the 'Random/Countdown/Override' button.
- To select specific days for a program, after setting the ON/OFF time for a program, press 'SET' again. The display will show the day selection. Use the 'Up' and 'Down' arrows to cycle through various day combinations (e.g., MO-SU, MO-FR, SA-SU, individual days). Press 'SET' to confirm.
Random "Lived-In" Mode:
This feature turns the connected device on and off multiple times throughout the programmed 'ON' periods, simulating occupancy. To activate, press 'SET' twice to access mode options, then use the arrow buttons to navigate to the 'Random' setting and press 'SET' to confirm. Refer to the programming guide on the unit for exact steps.
Countdown Function:
The countdown function allows for a timed 'ON' period of up to 19 hours and 59 minutes. To use, press 'SET' twice to access mode options, then use the arrow buttons to navigate to the 'Countdown' setting. Set the desired duration using the arrow buttons and press 'SET' to start the countdown. Refer to the programming guide on the unit for exact steps.
On/Off Override Button:
The 'Random/Countdown/Override' button also functions as a manual override. Pressing this button will cycle the timer through its modes: ON, OFF, AUTO. This allows you to manually turn the connected device on or off, bypassing the current program without deleting it. The timer will return to programmed operation at the next scheduled event or when set back to 'AUTO'.
Using the Two 3-Prong Grounded Outlets:
Plug your indoor devices requiring a grounded connection into the two outlets on the side of the timer. You can control two devices from a single wall outlet. Ensure the total wattage/amperage of the connected devices does not exceed the timer's maximum rating.
Maintenance
- Cleaning: Unplug the timer from the wall outlet before cleaning. Wipe the exterior with a soft, dry cloth. Do not use abrasive cleaners, solvents, or immerse the timer in water.
- Storage: When not in use for extended periods, store the timer in a cool, dry place.
- Battery: The internal battery is designed for long life and typically does not require replacement. If the battery backup fails to hold settings, the unit may need to be replaced.
Troubleshooting
- Timer not turning on/off:
- Ensure the timer is plugged into a live outlet.
- Check if the connected device is working by plugging it directly into the wall outlet.
- Verify that the timer is in 'AUTO' mode (not manual ON/OFF override).
- Review your programmed ON/OFF times and day selections carefully.
- Display is blank or not responding:
- The internal battery may be depleted. Plug the timer into a live outlet for at least 30 minutes to charge.
- If the display remains blank after charging, the unit may be faulty.
- Difficulty programming or unresponsive buttons:
- Press buttons firmly and deliberately.
- If buttons are stuck or unresponsive, the unit may be damaged.
- Ensure you are following the programming steps precisely. Some timers require specific sequences.
- Clock not advancing or losing time:
- Ensure the internal battery is fully charged.
- If the timer consistently loses significant time, it may indicate an internal fault.
- AM/PM selection issues:
- Some models cycle through 24 hours (00-23) or require careful attention to the AM/PM indicator during time setting. Ensure you cycle past 12 PM to reach PM hours.
Specifications
| Specification | Detail |
|---|---|
| Model Number | TNDHD002 |
| Brand | POWER ZONE |
| Type | Heavy Duty Indoor Digital Timer |
| Time Setting | 7 Day Programmable |
| Number of Settings | 16 customizable ON/OFF settings |
| Outlets | Two 3-prong grounded outlets |
| Electrical Rating (Resistive) | 15 Amp |
| Electrical Rating (Tungsten) | 15 Amp |
| Motor Horsepower | 1 HP |
| Material | Plastic |
| Color | White |
| Item Weight | 3.17 ounces (0.09 Kilograms) |
| Product Dimensions | 6 x 11.77 x 10 inches (approximate packaging dimensions) |
| Mounting Type | Wall Mount (via plug) |
| Special Features | Random 'Lived-in' Mode, Countdown Function, Daylight Savings Auto-Adjust, Battery Backup, On/Off Override |
Warranty and Support
For warranty information and customer support, please refer to the product packaging or contact POWER ZONE directly. Keep your purchase receipt as proof of purchase. If you encounter issues not covered in this manual, professional assistance may be required.


