HP 611483-001
HP ATX 320W Power Supply User Manual
Model: 611483-001, 613764-001, DPS-320NB, PC9057
1. Product Overview
This manual provides essential information for the safe and effective use of your HP ATX 320W Genuine Power Supply. This power supply unit (PSU) is designed to provide stable and reliable power to compatible computer systems, specifically those requiring 320W output. It is compatible with spare numbers 613764-001 and 613765-001 series.

Figure 1: Front view of the HP ATX 320W Power Supply, showing the main unit and connected power cables.
2. Safety Information and Warnings
Please read all safety instructions carefully before installation and operation. Failure to follow these instructions may result in electric shock, fire, or damage to the product or other components.
- WARNING! HAZARDOUS AREA: Do not remove this cover. No serviceable components inside.
- ATTENTION! ZONE DANGEREUSE: Ne retirez pas ce couvercle sous aucun prétexte. Ne contient pas de composants qui puissent être entretenus par l'utilisateur ou par le client.
- VORSICHT! GEFAHR ZONE: Diese Abdeckung auf keinen Fall abnehmen. Unter dieser Abdeckung befinden sich keine Teile, die einer Wartung bedürfen.
- ATTENZIONE! ZONA PERICOLOSA: Non rimuovere questo copertura. Nessuna possibilità di riparazione dei componenti all'interno.
- ¡PRECAUCIÓN! ÁREA PELIGROSA: No debe quitarse la tapa bajo ninguna circunstancia. Debajo de esta tapa no hay piezas reparables por el propietario.
- ATENÇÃO! ÁREA PERIGOSA: Não remova esta tampa sob nenhuma circunstância. Não há peças que possam ser reparadas pelo usuário dentro.
- Ensure the power supply is disconnected from the main power outlet before any installation, removal, or maintenance procedures.
- Operate the power supply only within the specified voltage range (100-240V ~ 5.5A, 50-60 Hz).
- Do not expose the unit to moisture or extreme temperatures.
- This power supply is designed for indoor use only.

Figure 2: Close-up view of the power supply's warning label, highlighting critical safety instructions in multiple languages. Note the "HAZARDOUS AREA" warning and serial number CT: 5BHTQ0CM53V759.
3. Setup and Installation
Before beginning installation, ensure your computer system is powered off and unplugged from the wall outlet. It is recommended to wear an anti-static wrist strap to prevent electrostatic discharge (ESD) damage to components.
3.1. Pre-installation Checklist
- Verify the power supply's wattage (320W) meets or exceeds the requirements of your system components.
- Confirm the physical dimensions of the power supply (10.71 x 8.03 x 6.38 inches) are compatible with your computer case.
- Ensure you have the necessary tools: Phillips head screwdriver, anti-static wrist strap.
3.2. Installation Steps
- Remove Old Power Supply (if applicable): Disconnect all cables from the existing power supply. Unscrew and carefully remove the old PSU from the computer case.
- Position New Power Supply: Gently slide the new HP ATX 320W Power Supply into the designated bay in your computer case. Ensure the fan is oriented correctly for proper airflow (typically facing downwards or towards the rear vent).
- Secure Power Supply: Use the provided screws to secure the power supply to the computer case. Typically, four screws are used at the rear of the case.
- Connect Main Power Cables:
- Connect the 20+4 pin ATX main power connector to the motherboard.
- Connect the 4-pin or 8-pin CPU power connector to the motherboard.
- Connect Peripheral Cables: Connect SATA power connectors to hard drives, SSDs, and optical drives. Connect Molex connectors to any other required peripherals (e.g., case fans, older drives).
- Connect Graphics Card Power (if applicable): If your graphics card requires additional power, connect the appropriate PCIe power connectors from the PSU to the graphics card.
- Cable Management: Route cables neatly to improve airflow and aesthetics within the case.
- Close Case: Once all connections are secure, replace the side panel of your computer case.
- Connect External Power: Plug the AC power cord into the power supply and then into a wall outlet or surge protector.
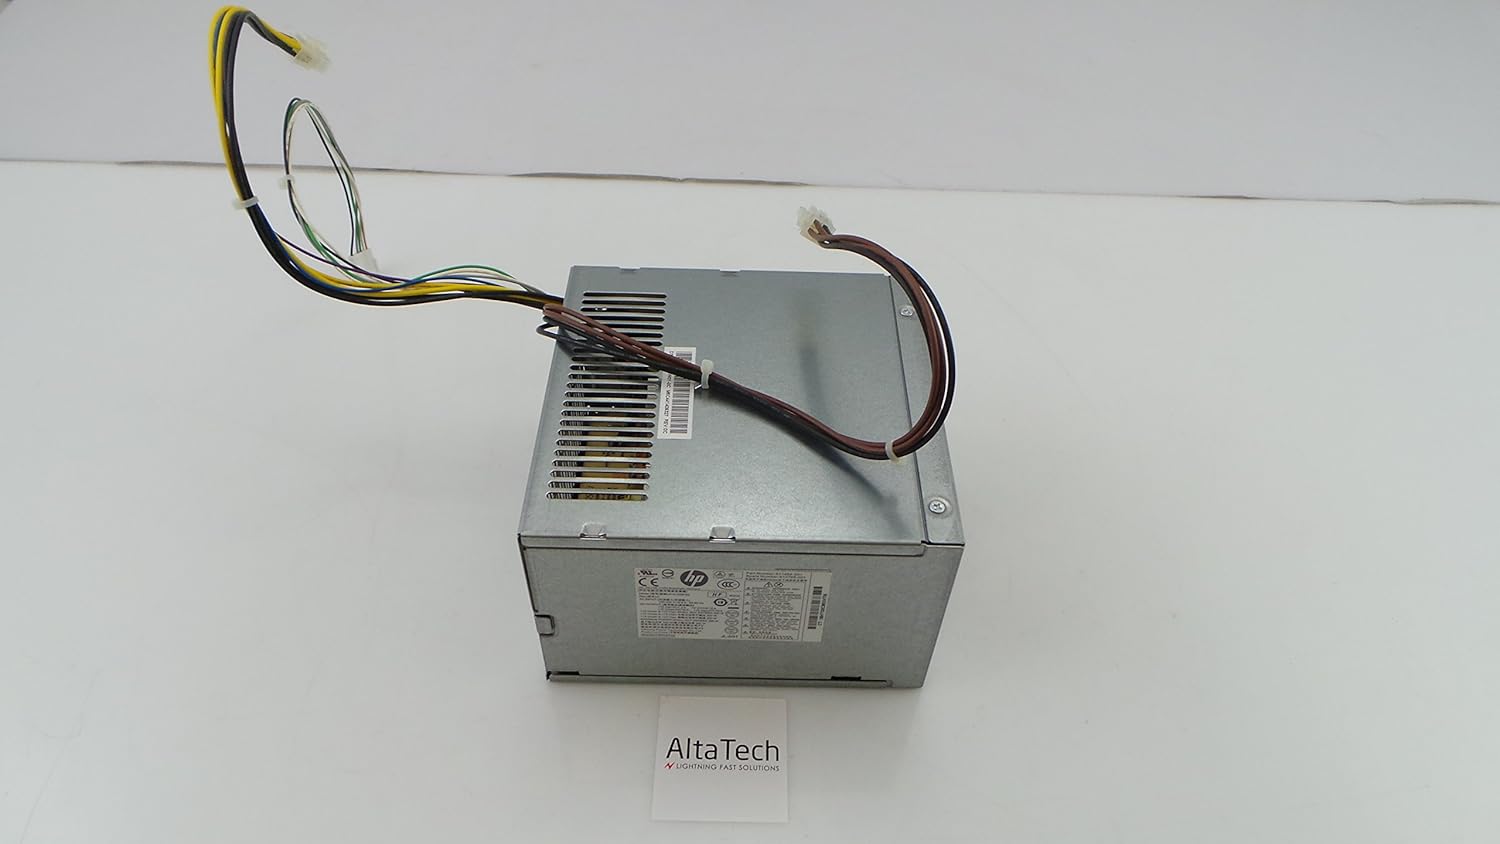
Figure 3: View of the power supply showcasing its various output cables, including ATX, CPU, SATA, and Molex connectors, essential for connecting to computer components.
4. Operating Instructions
After successful installation, you can power on your computer system.
- Ensure all internal connections are firm and the AC power cord is securely plugged into both the power supply and the wall outlet.
- Press the power button on your computer case. The system should boot normally.
- The power supply's fan will operate to cool the unit. Ensure there is adequate ventilation around your computer case.
5. Maintenance
The HP ATX 320W Power Supply is designed for reliable operation with minimal maintenance. However, periodic checks can help ensure longevity and optimal performance.
- Dust Removal: Periodically (e.g., every 6-12 months), power off and unplug your computer. Open the case and use compressed air to gently clear dust from the power supply's fan and ventilation grilles. Do not open the power supply unit itself.
- Cable Inspection: Occasionally check that all power cables are securely connected and not frayed or damaged.
- Ventilation: Ensure that the computer case's ventilation openings are not obstructed, allowing for proper airflow to and from the power supply.

Figure 4: Side view of the power supply, illustrating the ventilation grilles crucial for heat dissipation and maintaining optimal operating temperature.
6. Troubleshooting
If you encounter issues with your power supply, refer to the following common problems and solutions:
| Problem | Possible Cause | Solution |
|---|---|---|
| Computer does not power on. | Loose power cable, faulty wall outlet, power supply switch off, internal connection issue. |
|
| System powers on but shuts down unexpectedly. | Overheating, insufficient wattage, faulty component. |
|
| Loud noise from power supply. | Fan obstruction or failure. |
|
7. Specifications
Detailed technical specifications for the HP ATX 320W Power Supply:
| Brand | HP |
| Model Numbers | 611483-001, 613764-001, DPS-320NB, PC9057, 0K13146 |
| Output Wattage | 320 Watts |
| Input Voltage | 100-240V ~ 5.5A, 50-60 Hz |
| Form Factor | ATX |
| Connector Type | ATX |
| Compatible Devices | PC |
| Item Weight | 3.09 Pounds (1.4 kg) |
| Product Dimensions (LxWxH) | 10.71 x 8.03 x 6.38 inches (27.2 x 20.4 x 16.2 cm) |
| Cooling Method | Air |
| Manufacturer | Hp Inc. |
| ASIN | B00CQAUN90 |
| Date First Available | December 22, 2011 |
8. Warranty and Support
For warranty information and technical support regarding your HP ATX 320W Power Supply, please refer to the original purchase documentation or contact HP customer support directly. Details regarding protection plans may also be available from your retailer.
HP Support Website: www.hp.com/support
When contacting support, please have your product model number (611483-001 or 613764-001) and serial number (if applicable, often found on a label on the unit, e.g., CT: 5BHTQ0CM53V759) ready.