1. Introduction
This manual provides essential information for the safe and effective installation, operation, and maintenance of the Schneider Electric GV2P16 Manual Motor Starter. The GV2P16 is an IEC-compliant device designed for motor protection and control, featuring a 600VAC voltage rating and a 14-amp current capacity. Please read this manual thoroughly before using the product.
2. Safety Information
WARNING: Electrical equipment should only be installed, operated, serviced, and maintained by qualified personnel. No responsibility is assumed by Schneider Electric for any consequences arising out of the use of this material.
- Always disconnect power before working on the device or connected equipment.
- Ensure proper grounding to prevent electrical shock.
- Verify all wiring connections comply with local and national electrical codes.
- Do not operate the device if it appears damaged.
- Use appropriate personal protective equipment (PPE).
3. Product Overview
The Schneider Electric GV2P16 Manual Motor Starter is a compact device integrating motor protection and control functions. It provides thermal-magnetic protection against overloads and short circuits.
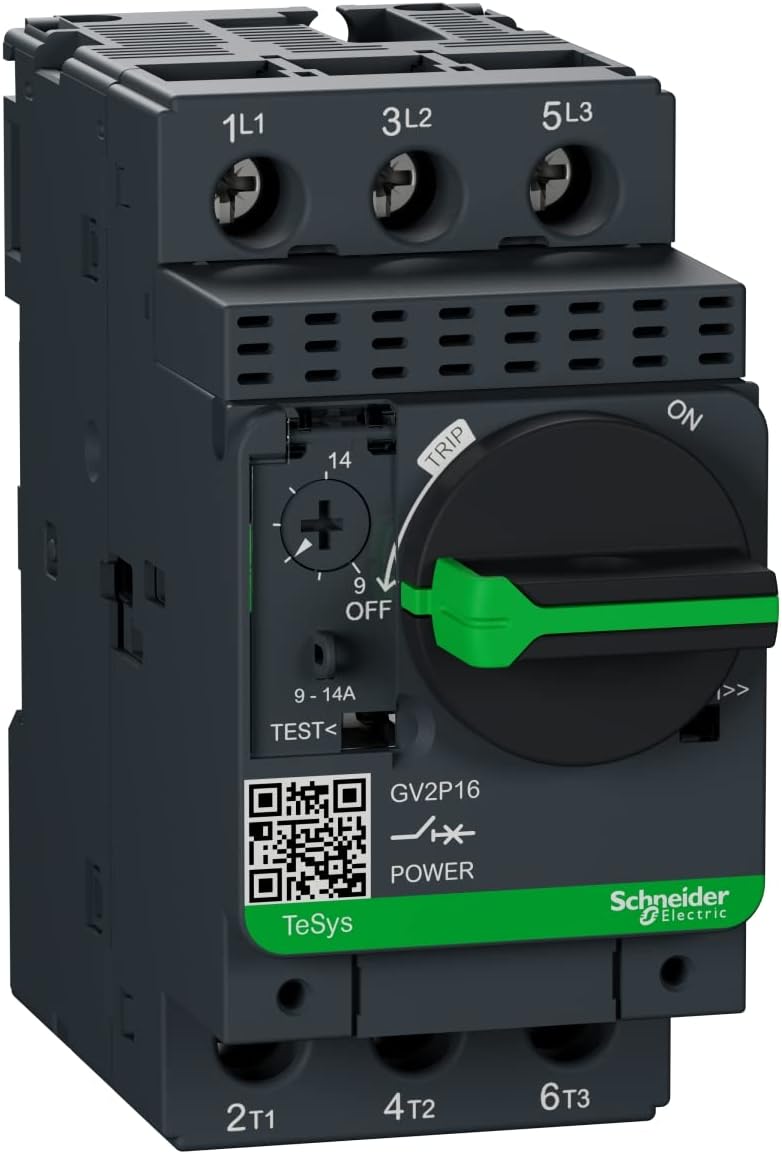
Figure 1: Schneider Electric GV2P16 Manual Motor Starter. Key components include:
- 1L1, 3L2, 5L3: Input power terminals.
- 2T1, 4T2, 6T3: Output terminals to the motor.
- Current Adjustment Dial (9-14A): Used to set the thermal overload protection current. The image shows it set to approximately 14A.
- Operating Handle (ON/OFF/TRIP): Rotates to turn the motor starter ON or OFF. The "TRIP" indicator shows when an overload or short circuit has occurred.
- TEST button: For verifying the trip mechanism.
- QR Code: Provides access to product information and documentation. For more details, visit go2se.com/ref=GV2P16.
- TeSys & Schneider Electric Branding: Product line and manufacturer identification.
4. Setup & Installation
Follow these steps for proper installation:
- Mounting: Mount the GV2P16 on a DIN rail or screw-mount it in an appropriate enclosure. Ensure adequate ventilation.
- Wiring - Power Input: Connect the incoming power supply to the 1L1, 3L2, and 5L3 terminals. Use appropriate wire gauges as per local electrical codes and the device's current rating.
- Wiring - Motor Output: Connect the motor leads to the 2T1, 4T2, and 6T3 terminals.
- Grounding: Ensure the motor starter and the motor are properly grounded.
- Current Setting: Adjust the thermal overload current setting dial (9-14A) to match the motor's full load current (FLA). This setting protects the motor from overcurrents.
- Pre-Operation Check: Before applying power, double-check all wiring connections for tightness and correctness.
5. Operating Instructions
- Turning ON: Rotate the operating handle clockwise to the "ON" position. The motor should start.
- Turning OFF: Rotate the operating handle counter-clockwise to the "OFF" position. The motor should stop.
- Trip Condition: If an overload or short circuit occurs, the device will automatically trip, and the operating handle will move to the "TRIP" position. The motor will stop.
- Resetting After Trip: To reset the device after a trip, first rotate the handle to the "OFF" position, then wait a few moments for the thermal element to cool (if tripped by overload). After cooling, rotate the handle to the "ON" position. Investigate the cause of the trip before restarting.
- Testing the Trip Mechanism: Periodically press the "TEST" button to verify the proper functioning of the trip mechanism. The device should trip when the button is pressed.
6. Maintenance
The GV2P16 Manual Motor Starter requires minimal maintenance. Regular inspections are recommended to ensure optimal performance and safety.
- Visual Inspection: Periodically inspect the device for any signs of physical damage, discoloration, or loose connections.
- Cleaning: Keep the device free from dust and debris. Use a dry, soft cloth for cleaning. Do not use solvents or abrasive cleaners.
- Connection Tightness: Check terminal screw tightness periodically, especially in environments with vibration.
- Functionality Test: Perform a trip test using the "TEST" button at regular intervals to confirm the protection mechanism is operational.
7. Troubleshooting
| Problem | Possible Cause | Solution |
|---|---|---|
| Device does not turn ON. | No power supply; tripped condition; incorrect wiring. | Check power source; reset device if tripped; verify wiring connections. |
| Device trips frequently. | Motor overload; short circuit; incorrect current setting; motor fault. | Check motor load; inspect motor and wiring for short circuits; verify current setting matches motor FLA; consult a motor technician. |
| Motor runs but device feels hot. | Overload condition; poor ventilation; loose connections. | Reduce motor load; ensure adequate airflow around the device; tighten terminal connections. |
8. Specifications
| Parameter | Value |
|---|---|
| Model Number | GV2P16 |
| Brand | Schneider Electric |
| Voltage Rating | 600 VAC |
| Amperage | 14 Amps |
| Adjustable Current Range | 9 - 14 Amps (Thermal Overload) |
| Certification | IEC/IP20 |
| Item Weight | 11.7 ounces |
| Product Dimensions (L x W x H) | 1.9 x 3.7 x 4 inches |
| Material | Copper |
| Country of Origin | CHINA |
9. Warranty & Support
Warranty: According to the product information, there is no specific warranty description provided for this item. Please refer to your point of purchase or Schneider Electric's official website for the most current warranty terms and conditions applicable to your region.
Technical Support: For technical assistance, product inquiries, or further documentation, please visit the official Schneider Electric website or contact their customer support services. You can also find additional resources via the QR code on the device or by visiting go2se.com/ref=GV2P16.


