1. Introduction
The Lutron Maestro Motion Sensor Dimmer Switch provides automated lighting control and dimming capabilities. This device is designed to turn lights on when motion is detected and off when a room is vacated, while also allowing manual adjustment of light levels. It is suitable for various applications, including bathrooms, garages, laundry rooms, and closets, and does not require a neutral wire for installation.
This manual provides detailed instructions for the safe installation, configuration, and operation of your Maestro Motion Sensor Dimmer Switch.
2. Safety Information
- WARNING: Risk of Electric Shock. Turn off power at the circuit breaker or fuse box before installation.
- Install in accordance with all national and local electrical codes.
- Use only with compatible dimmable bulbs (LED, CFL, incandescent, halogen, electronic low-voltage, magnetic low-voltage).
- Do not install if the product is damaged.
- Ensure proper grounding.
- This device is for indoor use only.
- Operating temperature range: 32°F (0°C) to 104°F (40°C).
3. Package Contents
Your package should contain the following items:
- (1) Lutron Maestro Motion Sensor Dimmer Switch (MSCL-OP153M-WH)
Note: Coordinating Claro wallplate and additional accessories are sold separately.

Image: Front view of the Lutron Maestro Motion Sensor Dimmer Switch and its retail packaging, highlighting key features like auto on/off, dimming, and 10-year warranty.
4. Key Features
- Automatic Operation: Lights turn on and off automatically based on occupancy.
- Dimming Capability: Adjust light levels to your preferred brightness.
- XCT Sensing Technology: Detects fine motion to prevent lights from turning off inadvertently.
- No Neutral Wire Required: Simplifies installation in many existing homes.
- Smart Ambient Light Detection: Prevents lights from turning on if sufficient natural light is present.
- Programmable Time-out: Set lights to turn off 1, 5, 15, or 30 minutes after a room is vacated.
- Vacancy-Only Mode: Can be configured for manual-on, auto-off operation to meet specific energy codes (e.g., Title 24).
- Versatile Application: Supports single-pole, 3-way, or multi-location wiring (with compatible accessory switches).
- Broad Compatibility: Works with various bulb types including dimmable CFLs and LEDs, incandescent, halogen, and low-voltage lighting.

Image: Visual representation of the Maestro Motion Sensor Dimmer's features, including superior sensing technology, compatibility with existing wiring, energy saving, and daylight adaptation.
5. Installation Instructions
Installation typically takes about 15 minutes. For detailed wiring diagrams and step-by-step instructions, please refer to the official Lutron user guide PDF available online or included with your product.
- Turn Off Power: Before beginning, turn off the power at the circuit breaker for the light switch you are replacing.
- Remove Existing Switch: Carefully remove the existing wallplate and switch from the wall box.
- Identify Wires: Identify the hot, load, and ground wires. This device does not require a neutral wire.
- Wire the Maestro Switch: Connect the wires from the wall box to the corresponding wires on the Maestro switch.
- Connect the green ground wire from the Maestro switch to the bare copper or green ground wire in the wall box.
- Connect the remaining wires as per the detailed wiring diagram in the official user guide.
- Mount the Switch: Secure the Maestro switch into the wall box.
- Attach Wallplate: Install the new wallplate (sold separately).
- Restore Power: Turn the power back on at the circuit breaker.
Wiring Configuration: This switch supports single-pole, 3-way, or multi-location applications. For 3-way or multi-location setups, a compatible accessory switch (e.g., Lutron MA-AS-WH) may be required.
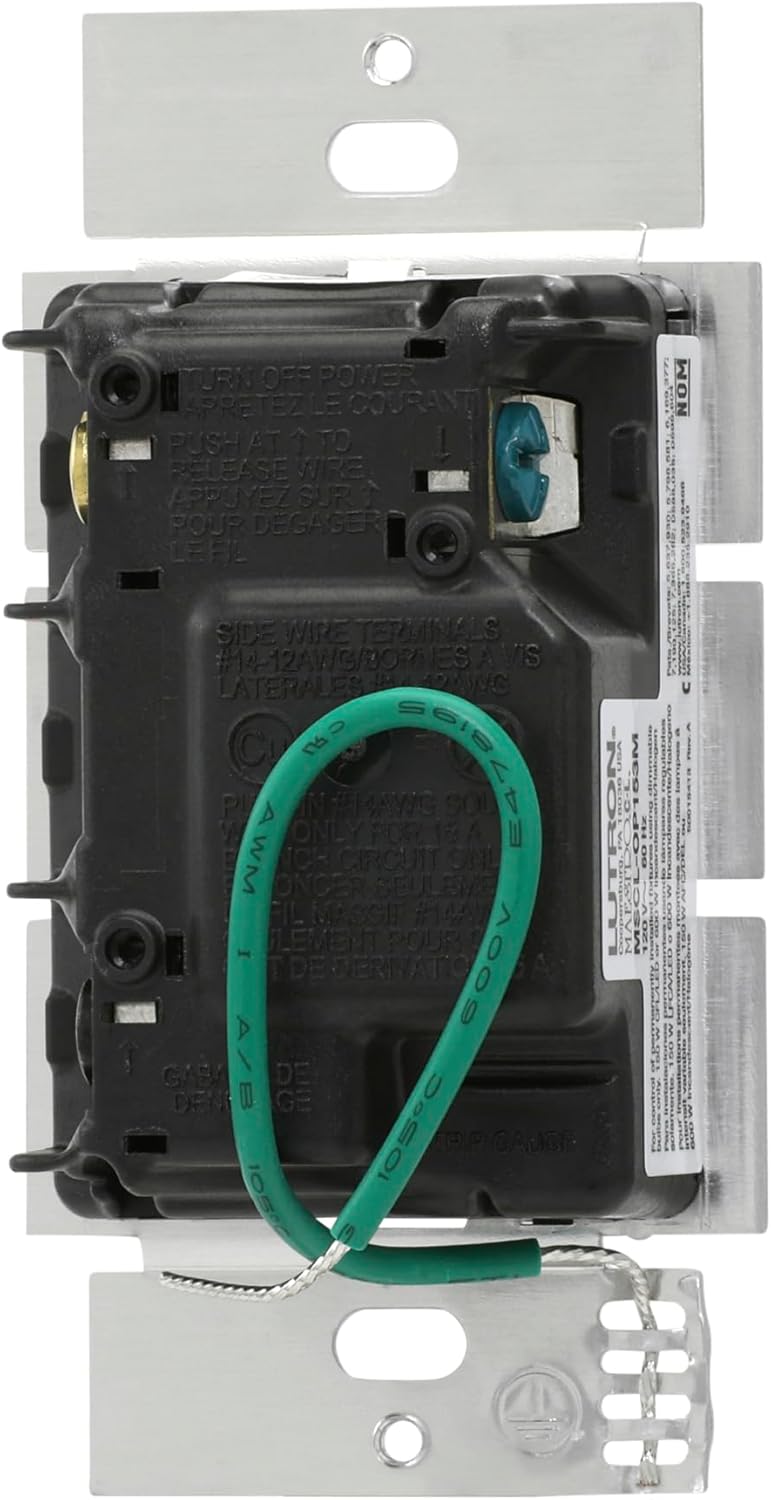
Image: Rear view of the Maestro Motion Sensor Dimmer Switch, illustrating the wiring terminals and the green ground wire for electrical connection.

Image: Alternate rear view of the Maestro Motion Sensor Dimmer Switch, providing another perspective on the wiring connections and product labeling.
6. Operating Instructions

Image: Diagram of the Maestro Motion Sensor Dimmer Switch, labeling the tap switch for manual control, the rocker for light level adjustment, and the sensor for automatic operation.
- Automatic On/Off: The sensor will automatically turn lights on when you enter the room and off after you leave, based on programmed settings.
- Manual On/Off: Press the large tap switch at the top to manually turn lights on or off.
- Adjusting Light Level: Use the rocker switch on the right side to brighten or dim the lights to your desired level.
- Preset Light Level: The switch can be programmed to turn on to a specific preset light level.
- Service Switch: A small pull-out switch at the bottom can be used to completely cut power to the lights for maintenance or to keep them off while you are in the room.
7. Programming and Customization
The Maestro Motion Sensor Dimmer Switch offers several customizable settings to optimize its performance for your specific needs.
- Time-out Settings: Adjust how long the lights remain on after no motion is detected. Options typically include 1, 5, 15, or 30 minutes.
- Occupancy vs. Vacancy Mode:
- Occupancy Mode (Default): Lights turn on automatically when motion is detected and turn off automatically when the room is vacant.
- Vacancy Mode: Lights must be turned on manually (by pressing the tap switch) but will turn off automatically when the room is vacant. This mode is often used to comply with energy codes like Title 24.
- Ambient Light Detection: The sensor can be configured to prevent lights from turning on if there is already sufficient natural light in the room. The device learns your preferred light level over time.
- Sensor Sensitivity: Adjust the sensitivity of the motion sensor to detect fine movements or require more significant motion.
- Preset Light Level: Program the switch to always turn on to a specific dimmed level, regardless of the last manual adjustment.
Refer to the full user manual PDF for detailed instructions on how to access and change these programming settings.

Image: The sensor dimmer's daylighting feature, which measures ambient light to prevent unnecessary activation when a room is already bright.

Image: The delayed off feature, useful for controlling a bathroom fan to clear moisture after the room is vacated.
8. Maintenance
- Cleaning: To clean the switch, wipe with a soft, damp cloth. Do not use chemical cleaners or abrasives.
- Regular Checks: Periodically check that the switch and wallplate are securely mounted.
- Bulb Compatibility: Ensure that any replacement bulbs are dimmable and compatible with the switch's specifications to avoid flickering or damage.
9. Troubleshooting
| Problem | Possible Cause | Solution |
|---|---|---|
| Lights do not turn on automatically. |
|
|
| Lights turn off too quickly or unexpectedly. |
|
|
| Lights flicker or do not dim properly. |
|
|
| Switch is hot to the touch. |
|
|
10. Technical Specifications
| Specification | Detail |
|---|---|
| Model Number | MSCL-OP153M-WH |
| Brand | Lutron |
| Color | White |
| Operation Mode | Automatic (Occupancy/Vacancy Sensing) |
| Operating Voltage | 120 V~ 60 Hz |
| Current Rating | 1.25 Amps |
| Wattage (Max Load) |
|
| Circuit Type | Single-Pole, 3-Way, Multi-Location |
| Dimensions (L x W x H) | 4.2 x 2.2 x 1.75 inches (107 x 56 x 44 mm) |
| Weight | 4.3 ounces (122 g) |
| Temperature Rating | 32°F (0°C) to 104°F (40°C) |
| Connectivity Protocol | X-10 |
| UPC | 00784276054843 |
11. Warranty Information
Lutron provides a 10-year warranty with product registration for the Maestro Motion Sensor Dimmer Switch. A 5-year warranty is provided without registration.
For full warranty terms and conditions, please refer to the official warranty document provided with your product or visit the Lutron website.
12. Customer Support
If you have any questions or require further assistance with your Lutron Maestro Motion Sensor Dimmer Switch, please contact Lutron customer support.
- Online Resources: Visit the official Lutron website for FAQs, additional documentation, and support contact information.
- User Manual PDF: A detailed user guide is available for download: Lutron Maestro User Manual (PDF)


