1. Introduction
Thank you for choosing the I-TECH Pressotherapy Device, model LYMPHO 4 LEG2-ABD. This device is designed to provide pressotherapy treatments, which can aid in lymphatic drainage, improve blood circulation, and offer relaxation. Please read this manual thoroughly before operating the device to ensure safe and effective use. Keep this manual for future reference.
Important Safety Information
- Consult your physician before using this device if you have any pre-existing medical conditions, are pregnant, or have pacemakers or other implanted medical devices.
- Do not use the device on open wounds, inflamed areas, or areas with skin infections.
- Ensure the device is disconnected from the power supply before cleaning or maintenance.
- Keep the device away from water and extreme temperatures.
- This device is intended for personal use and should not replace professional medical treatment.
2. Package Contents
Carefully unpack all components and ensure all items are present. If any items are missing or damaged, contact your retailer immediately.
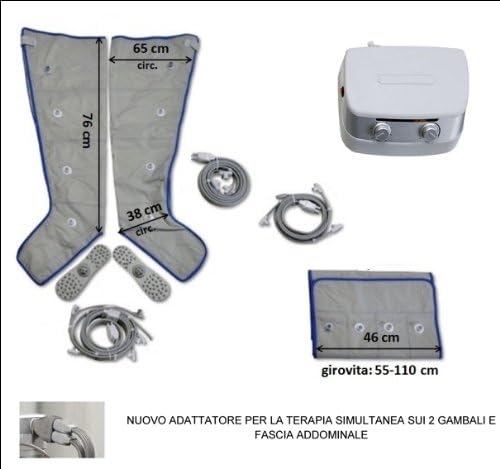
Figure 2.1: Included components and their approximate dimensions.
- I-TECH Pressotherapy Main Unit
- Leg Sleeves (2 units)
- Abdominal Sleeve (1 unit)
- Air Tube Set (multiple tubes for connecting sleeves to the main unit)
- Power Adapter
- User Manual (this document)
3. Device Overview
Familiarize yourself with the main unit and its controls before operation.

Figure 3.1: I-TECH Pressotherapy Main Unit.
- Power Button: Located on the side (red button, not visible in this image but typically present).
- Time Control Dial: Left dial, used to set the duration of the treatment (e.g., 5, 10, 15, 20, 25, 30 minutes).
- Pressure Control Dial: Right dial, used to adjust the intensity of the air compression.
- Air Outlets: Ports on the back or side of the unit where air tubes are connected (not visible).
4. Setup
Follow these steps to set up your pressotherapy device for the first time.
- Place the Main Unit: Position the I-TECH main unit on a stable, flat surface near a power outlet.
- Connect Air Tubes: Identify the air tubes. Connect one end of the air tubes to the corresponding ports on the leg or abdominal sleeves. Ensure a secure connection.
- Connect to Main Unit: Connect the other end of the air tubes to the air outlets on the main unit. If using both leg sleeves and the abdominal sleeve simultaneously, ensure the correct adapter is used (as indicated in Figure 2.1).
- Connect Power: Plug the power adapter into the main unit, then plug the adapter into a wall power outlet.

Figure 4.1: User adjusting the device while wearing leg sleeves.
5. Operating Instructions
Once the device is set up, you can begin your pressotherapy treatment.
- Wear the Sleeves: Put on the leg sleeves or abdominal sleeve. Ensure they are comfortably snug but not overly tight before inflation. Zip or fasten them securely.
- Power On: Press the power button (usually located on the side of the main unit) to turn on the device.
- Set Treatment Time: Use the left dial (Time Control) to select your desired treatment duration (e.g., 15, 20, 30 minutes).
- Adjust Pressure: Use the right dial (Pressure Control) to set the desired compression intensity. Start with a lower setting and gradually increase it to a comfortable level.
- Begin Treatment: The device will automatically begin the compression and decompression cycles according to the selected settings.
- Monitor Comfort: During the treatment, ensure you remain comfortable. If you experience any pain or discomfort, reduce the pressure or stop the treatment immediately.
- End Treatment: The device will automatically shut off once the set time has elapsed. You can also manually turn off the device by pressing the power button.
- Remove Sleeves: After the treatment, power off the device, then carefully unfasten and remove the sleeves.

Figure 5.1: User relaxing during a leg pressotherapy session.

Figure 5.2: User engaging in leisure activities during treatment.

Figure 5.3: User demonstrating the abdominal sleeve application.
6. Maintenance
Proper maintenance ensures the longevity and hygienic use of your device.
Cleaning
- Always disconnect the device from the power outlet before cleaning.
- Wipe the main unit with a soft, damp cloth. Do not use abrasive cleaners or immerse the unit in water.
- The sleeves can be wiped clean with a damp cloth and mild soap. Ensure they are completely dry before storage.
Storage
- Store the device and its accessories in a cool, dry place, away from direct sunlight and extreme temperatures.
- Avoid folding the air tubes sharply to prevent damage.
7. Troubleshooting
If you encounter any issues with your device, refer to the following common problems and solutions.
| Problem | Possible Cause | Solution |
|---|---|---|
| Device does not turn on. | No power supply. | Check if the power adapter is securely plugged into the unit and the wall outlet. Ensure the outlet is functional. |
| No compression or weak compression. | Air tubes are not properly connected or are damaged. Sleeves are not properly sealed. | Ensure all air tubes are securely connected to both the main unit and the sleeves. Check sleeves for any tears or unzipped sections. |
| Device makes unusual noise. | Normal operation noise or internal issue. | A low humming sound is normal during operation. If the noise is loud or unusual, discontinue use and contact customer support. |
If the problem persists after attempting these solutions, please contact customer support for further assistance.
8. Specifications
- Model: LYMPHO 4 LEG2-ABD
- Manufacturer: I.A.C.E.R. S.r.l.
- Product Dimensions (L x W x H): 35 x 35 x 35 cm
- Product Weight: 997.9 grams
- ASIN: B00BQEWCM8
- Power Supply: (Specific voltage/amperage not provided, refer to device label or power adapter)
- Treatment Time Settings: Adjustable (e.g., 5, 10, 15, 20, 25, 30 minutes)
- Pressure Settings: Adjustable
9. Warranty and Support
For warranty information and customer support, please refer to the warranty card included with your product or contact the manufacturer directly.
Manufacturer: I.A.C.E.R. S.r.l.
Please retain your proof of purchase for any warranty claims.