Introduction
This manual provides essential information for the installation, operation, and maintenance of your HP M2N68-LA Motherboard (Part No. 462798-001). Please read this manual thoroughly before proceeding with installation to ensure proper functionality and to prevent damage to the component or other system parts.
The HP M2N68-LA is a robust motherboard designed for personal computer and server applications, supporting a range of AMD processors.
Product Overview
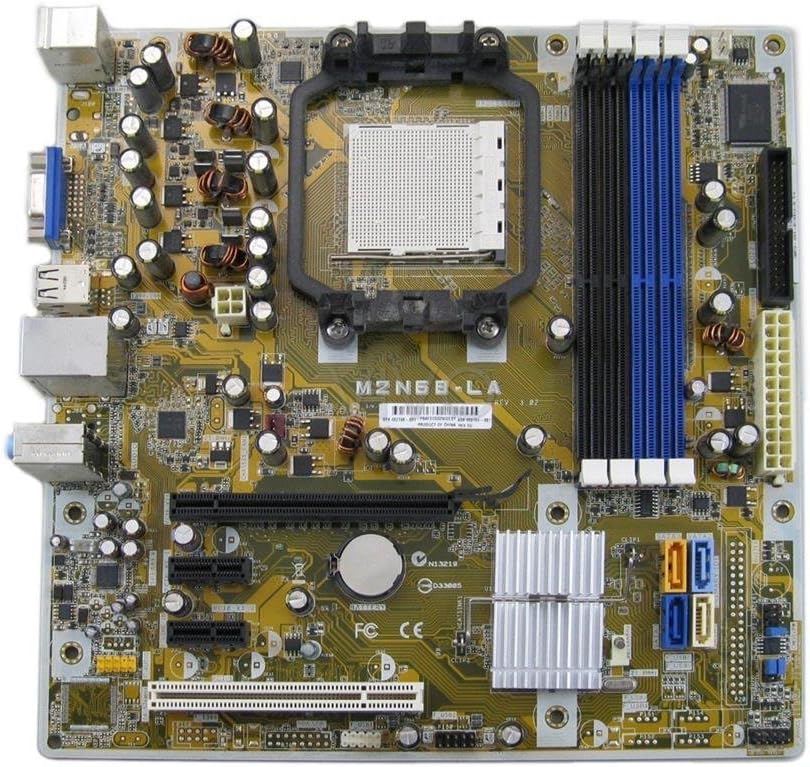
Figure 1: Top-down view of the HP M2N68-LA Motherboard. Key components visible include the CPU socket (center), four DDR2/DDR3 RAM slots (blue and black, right), PCI Express and PCI slots (bottom), SATA ports (orange/blue, bottom right), and various power connectors and headers.
The M2N68-LA motherboard features a Socket AM2 CPU socket, supporting AMD Athlon 64, Athlon 64 X2, Athlon 64 FX, Athlon II, Phenom, Phenom II, and Sempron processors. It is equipped with an AMD 785E chipset and provides 2 memory slots, supporting up to 8 GB of RAM. The board includes a 24-Pin main power connector and a PCI Express graphics card interface.
Setup and Installation
Before beginning installation, ensure your computer is powered off and disconnected from the main power supply. Always handle the motherboard by its edges to avoid static discharge.
1. Preparing the Chassis
Ensure your computer case is compatible with ATX form factor motherboards. Install the I/O shield provided with your chassis or the motherboard into the rear opening of the case.
2. Installing the CPU
- Locate the CPU socket (Socket AM2) on the motherboard.
- Lift the load lever on the side of the CPU socket.
- Carefully align the CPU with the socket, ensuring the triangular marker on the CPU matches the marker on the socket. Do not force the CPU into place.
- Lower the load lever to secure the CPU.
- Apply a thin, even layer of thermal paste to the top of the CPU.
- Install the CPU cooler according to its manufacturer's instructions, ensuring proper contact and secure mounting.
3. Installing Memory Modules
The motherboard has 2 memory slots. For optimal performance, refer to your system's memory configuration guidelines.
- Open the clips at both ends of the memory slot.
- Align the notch on the memory module with the key in the memory slot.
- Press down firmly on both ends of the module until the clips snap into place.
4. Mounting the Motherboard
- Install standoffs in the chassis at the locations corresponding to the motherboard's mounting holes.
- Carefully place the motherboard into the chassis, aligning it with the standoffs and the I/O shield.
- Secure the motherboard with screws, ensuring not to overtighten.
5. Connecting Power and Peripherals
- Connect the 24-pin ATX main power connector from your power supply to the corresponding header on the motherboard.
- Connect the 4-pin or 8-pin CPU power connector (if applicable) to the motherboard.
- Connect SATA data cables from your storage drives (HDDs/SSDs) to the SATA ports on the motherboard.
- Connect front panel headers (power button, reset button, HDD LED, power LED, USB ports, audio jacks) to their respective pins on the motherboard. Refer to the motherboard's silkscreen labels for correct orientation.
- Install any expansion cards (e.g., graphics card in the PCI Express slot) and secure them.
Operating Instructions
Once all components are installed and connected, you can proceed with system startup.
1. Initial Power On
- Ensure all cables are securely connected.
- Connect the power cord to your power supply and a wall outlet.
- Press the power button on your computer case.
- Observe for POST (Power-On Self-Test) beeps and display output.
2. BIOS/UEFI Configuration
Upon initial boot, you may need to enter the BIOS/UEFI setup to configure boot order, system time, and other settings. Typically, you press Del, F2, or F10 during startup to access the setup utility.
3. Operating System Installation
Install your preferred operating system (e.g., Windows, Linux) from a bootable USB drive or optical disc. Follow the on-screen prompts for installation.
4. Driver Installation
After OS installation, install the necessary drivers for the motherboard's chipset, audio, network, and any integrated graphics. These drivers are typically available on the HP support website or included with your operating system.
Maintenance
Regular maintenance helps ensure the longevity and stable operation of your motherboard.
- Dust Removal: Periodically clean dust from the motherboard and components using compressed air. Ensure the system is powered off and unplugged before cleaning.
- Component Checks: Ensure all cables and expansion cards are securely seated.
- BIOS Updates: Check the HP support website for BIOS updates. Only update the BIOS if necessary and follow the instructions carefully. Incorrect BIOS updates can render the motherboard inoperable.
- Thermal Paste: If replacing the CPU cooler, reapply thermal paste to the CPU.
Troubleshooting
This section provides solutions to common issues you might encounter.
| Problem | Possible Cause | Solution |
|---|---|---|
| System does not power on. | Loose power connections, faulty power supply, incorrect front panel wiring. | Check 24-pin and CPU power connectors. Verify front panel power switch wiring. Test power supply. |
| No display output. | Loose graphics card, faulty monitor cable, incorrect display input. | Reseat graphics card. Check monitor cable and input source. Test with another monitor. |
| System beeps repeatedly. | Memory issue, graphics card issue, CPU issue. | Reseat RAM modules. Try one RAM module at a time. Reseat graphics card. Consult motherboard beep codes for specific diagnosis. |
| Operating system not booting. | Incorrect boot order, corrupted OS, faulty storage drive. | Check BIOS boot order. Attempt OS repair or reinstallation. Test storage drive. |
Specifications
| Feature | Detail |
|---|---|
| Model Name | M2N68-LA |
| Part Number | 462798-001 |
| Brand | HP |
| CPU Socket | Socket AM2 |
| Compatible Processors | AMD Athlon 64, Athlon 64 X2, Athlon 64 FX, Athlon II, Phenom, Phenom II, Sempron |
| Chipset Type | AMD 785E |
| Memory Slots Available | 2 |
| Memory Storage Capacity (Max) | 8 GB |
| Main Power Connector Type | 24-Pin |
| Graphics Card Interface | PCI Express |
| Compatible Devices | Personal Computer, Server |
| Date First Available | February 25, 2013 |
Warranty and Support
This HP M2N68-LA Motherboard is typically covered by a warranty period. For specific warranty details and support, please refer to the original vendor or HP's official support channels.
The product description mentions a 180-day warranty from the seller. For direct manufacturer support or updated drivers, visit the official HP Store or their support website.
For returns or issues with the item purchased, please follow the quick and simple return process offered by your vendor.