1. Introduction
This manual provides detailed instructions for the assembly, operation, and maintenance of your ShelterLogic 70658 Greenhouse-in-a-Box. This 10' x 20' peak roof greenhouse is designed to provide a protected environment for growing plants, starting seeds, and extending growing seasons. Please read all instructions carefully before beginning assembly and retain this manual for future reference.

Image 1.1: The ShelterLogic Greenhouse-in-a-Box in an outdoor setting, showing its peak roof design and a person inside tending to plants.
2. Safety Information
WARNING:
- Always assemble and anchor the greenhouse according to the provided instructions to prevent tipping or collapse.
- Be cautious of sharp edges on the steel frame during assembly and use.
- The translucent cover is UV-treated, but prolonged exposure to sunlight may cause degradation over time.
- Keep children and pets away from the greenhouse when in use or during assembly.
- Do not use the greenhouse in extreme weather conditions such as heavy snow, high winds, or severe storms without additional reinforcement.
3. Package Contents
Verify that all components listed below are present before beginning assembly. If any parts are missing or damaged, contact customer support.
- Steel frame (1-3/8" tubular high-grade steel)
- Translucent cover (ClearView, triple-layer heat bonded ripstop fabric, 5.5 oz thick, UV-treated)
- Double zippered front door with vent
- Rear panel with vent
- Bungee cords
- 15" auger anchors (8 included)
- Ratchet tie-downs
- Hardware kit
- Easy step-by-step instructions
4. Setup and Assembly
Assembly typically requires two people and approximately 2 hours. Follow the included step-by-step instructions carefully.
4.1 Site Preparation
Choose a level site with good drainage. Clear the area of any debris or sharp objects that could damage the cover. Ensure sufficient space around the greenhouse for assembly and access.
4.2 Frame Assembly
The frame consists of 1-3/8" tubular high-grade steel with a premium powder coat finish for resistance against chipping, peeling, rust, and corrosion. Organize all frame parts and identify them using the stamped numbers. Some numbers may be similar, so verify carefully before connecting.

Image 4.1: Detail of the ShelterLock steel stabilizers, which enhance frame strength and stability.
4.3 Cover Installation
Carefully drape the translucent cover over the assembled frame. The cover features ClearView technology for enhanced illumination and is UV-treated for plant protection. Ensure the cover is centered and aligned with the frame.
4.4 Tensioning and Anchoring
Utilize the Easy Slide Cross Rail tensioning system to lock down the cover for a snug fit and to square up the frame. The Ratchet-Tite tensioning system provides solid cover anchoring to the frame. Secure the greenhouse using the eight 15" auger anchors provided. Proper anchoring is critical for stability, especially in windy conditions.

Image 4.2: The Ratchet-Tite tensioning system ensures the cover is securely fastened to the frame.
5. Operating Instructions
5.1 Access and Ventilation
The greenhouse features a double-zippered front door for walk-in access. This door can be rolled up and secured at your preferred height. Both the front door and the rear panel include vents to facilitate air circulation, which is essential for plant health.

Image 5.1: The double-zippered front door provides easy access and can be rolled up.
Easy Flow roll-up side panels allow for maximum airflow and temperature control. Use the included bungee cord fasteners to hold the sides open and hook-and-loop fasteners to keep them down when closed.

Image 5.2: A detailed view of a roll-up vent, demonstrating its design for air circulation.
5.2 Light Management
The translucent ClearView cover is designed to provide enhanced illumination, ideal for plant growth. It allows a significant amount of diffused light to reach plants, reducing shadows and scorching for consistent lighting.
6. Maintenance
- Frame Inspection: Periodically check the steel frame for any signs of damage, rust, or loose connections. The powder coat finish helps prevent corrosion, but regular inspection is recommended.
- Cover Care: The UV-treated cover is durable, but inspect it regularly for tears or wear. Clean the cover with mild soap and water as needed. Avoid harsh chemicals that could degrade the material.
- Anchoring: Ensure all auger anchors and ratchet tie-downs remain secure, especially after strong winds or heavy precipitation. Re-tighten as necessary.
- Winterization: In areas prone to heavy snow, it is advisable to remove the cover during winter months to prevent structural damage from snow accumulation. The portable design allows for easy disassembly and storage.
7. Troubleshooting
- Greenhouse Instability: If the greenhouse feels unstable, re-check all frame connections and ensure the auger anchors are fully engaged and the ratchet tie-downs are taut. Consider adding additional weights to the base in areas with frequent high winds.
- Cover Damage: Small tears in the cover can often be repaired with a suitable repair tape designed for polyethylene materials. For significant damage, replacement covers are available. Ensure no sharp edges on the frame are rubbing against the cover.
- Poor Airflow/Temperature Control: Verify that the roll-up side panels and end panel vents are functioning correctly and are opened as needed to regulate temperature and humidity.
- Difficulty Assembling: Refer to the step-by-step instructions. Ensure all parts are correctly identified and oriented. Assembly is significantly easier with two people.
8. Specifications
| Feature | Detail |
|---|---|
| Model Number | 70658 |
| Assembled Dimensions (L x W x H) | 240" x 120" x 96" (10' x 20' x 8') |
| Frame Material | Alloy Steel |
| Nominal Wall Thickness | 0.0236 inches |
| Cover Material | Polyethylene (PE) - ClearView, UV-treated |
| Number of Doors | 1 (Double-zippered front door) |
| Number of Vents | 2 (Front door and rear panel) |
| Item Weight | 68 pounds |
| GTIN / UPC | 677599706585 |
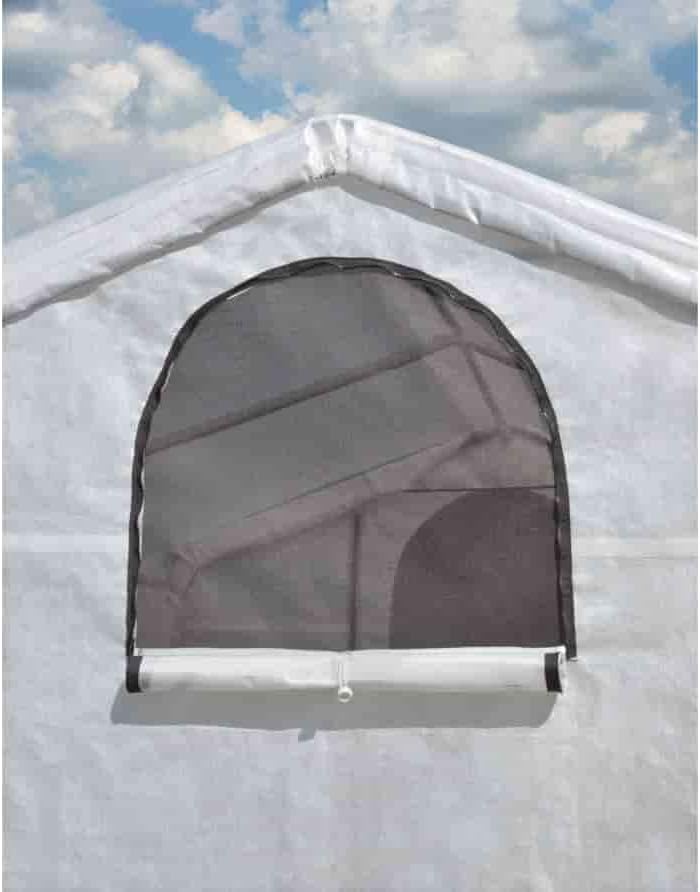
Image 8.1: Dimensional diagram of the ShelterLogic Greenhouse-in-a-Box.
9. Warranty and Support
ShelterLogic is committed to providing quality products. For specific warranty information, product registration, ordering parts, or general inquiries, please refer to the official ShelterLogic website or contact their customer service department. Online manuals and how-to videos are also available through their support channels.
Customer support is available 7 days a week.
Manufacturer: Shelter Logic - DROP SHIP