1. Introduction
The OSTENT Quad-Band GSM GPRS Modem Pool is an integrated solution featuring 16 GPRS modems within a single unit. This device streamlines the management of multiple modems, offering an efficient way to handle large-scale wireless communication needs. It connects to a PC or server via a single USB interface, which then emulates 16 COM ports (RS232/serial ports) for individual modem control using AT Commands. Designed with a robust casing, it is suitable for various critical environments, including those with high temperatures or strong electromagnetic fields.

Figure 1: Front view of the OSTENT Quad-Band GSM GPRS Modem Pool.
2. Product Components
Before proceeding with installation, please ensure all the following components are present in your package:
- One Power Supply Adapter (EU Plug)
- One USB Data Line
- Sixteen DB Antennas
- One Modem Pool Unit

Figure 2: A single DB antenna, part of the 16 included antennas.
3. Setup Instructions
3.1 Pre-Installation Check
Verify that your region has adequate GSM/GPRS coverage for 850MHz, 900MHz, 1800MHz, or 1900MHz frequencies before installation.
3.2 Connecting Components
- Attach Antennas: Carefully screw each of the 16 DB antennas onto their respective ports on the modem pool unit. Ensure they are finger-tight to establish a secure connection.
- Connect USB Data Line: Plug one end of the provided USB data line into the USB port on the modem pool unit and the other end into an available USB port on your PC or server.
- Connect Power Adapter: Insert the power supply adapter into the DC input port on the modem pool unit. Then, plug the power adapter into a suitable electrical outlet.
- Power On: Locate the power switch on the modem pool unit and switch it to the 'ON' position. The power indicator light should illuminate.
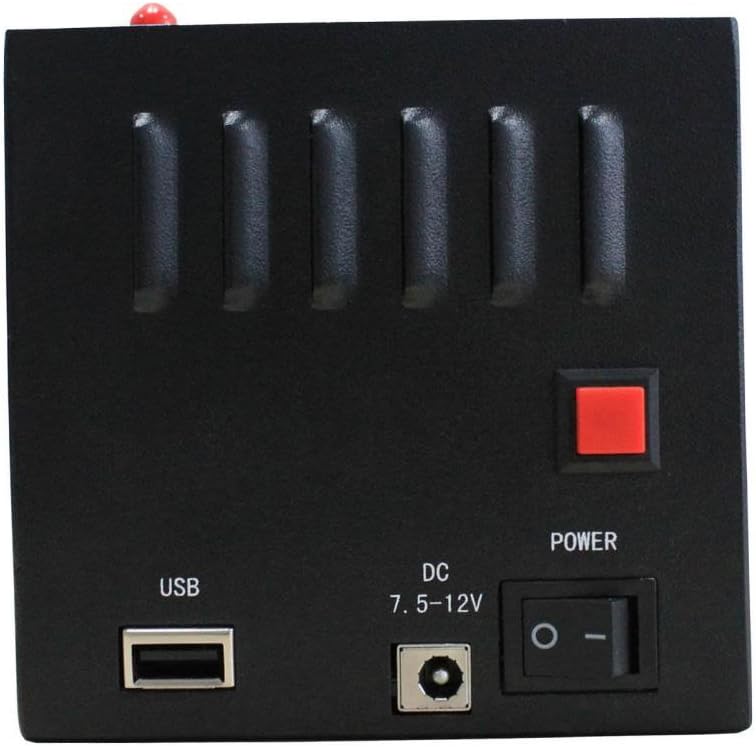
Figure 3: Close-up of the modem pool's USB, DC input, and power switch.
3.3 Driver Installation
Upon connecting the modem pool to your PC or server via USB, the operating system should automatically detect the device and attempt to install necessary drivers. If automatic installation fails, you may need to manually install drivers provided by the manufacturer or locate them through your operating system's device manager. The USB interface will be emulated as 16 separate COM (RS232/serial) ports on your computer.
4. Operating Instructions
The modem pool is controlled using standard AT Commands, conforming to ETSI GSM 2+ standard. Each of the 16 modems can be individually addressed and controlled via its emulated COM port.
4.1 AT Commands
To interact with each modem, you will use AT Commands through a serial communication program (e.g., HyperTerminal, PuTTY, or custom software) connected to the respective COM port. Common AT Commands include:
- AT: Checks for modem response.
- AT+CSQ: Checks signal quality.
- AT+CMGF=1: Sets SMS text mode.
- AT+CMGS="<phone_number>": Sends an SMS message.
- AT+CGATT=1: Attaches to GPRS service.
Refer to the Wavecom Q24PLUS module's AT Command set documentation for a comprehensive list of commands and their usage for SMS, MMS, TCP/IP, and other functionalities.
4.2 SMS and MMS Functionality
The modem pool supports sending and receiving SMS and MMS messages. This is typically managed through specific AT Commands that control message formatting, sending, and retrieval. Software applications can be developed or utilized to automate these processes across multiple modems.
4.3 TCP/IP Communication
Leveraging GPRS capabilities, the modem pool supports TCP/IP communication. This allows for data transfer over the internet, enabling applications such as remote monitoring, data logging, and other M2M (Machine-to-Machine) communications. Configuration for TCP/IP typically involves setting up GPRS contexts and establishing connections using AT Commands.
5. Maintenance
To ensure optimal performance and longevity of your modem pool, follow these maintenance guidelines:
- Cleaning: Periodically clean the exterior of the unit with a soft, dry cloth. Avoid using liquid cleaners or solvents.
- Ventilation: Ensure the modem pool is placed in a well-ventilated area to prevent overheating. Do not block the ventilation slots.
- Environmental Conditions: Operate the device within the specified temperature range (-20°C to +55°C active status, -25°C to +70°C preserved condition) and avoid excessive humidity or direct sunlight.
- Antenna Connections: Periodically check that all antennas are securely connected. Loose connections can degrade signal quality.
6. Troubleshooting
If you encounter issues with your modem pool, refer to the following common troubleshooting steps:
- No Power: Ensure the power adapter is correctly connected to both the unit and the power outlet. Check the power switch is in the 'ON' position.
- Modem Not Detected: Verify the USB data line is securely connected. Reinstall or update USB drivers if necessary. Check Device Manager for any unrecognized devices or COM port conflicts.
- No Network Signal: Ensure all 16 antennas are properly attached. Check the GSM/GPRS coverage in your area. Try repositioning the unit for better signal reception.
- AT Command Errors: Confirm the correct COM port is selected for the modem you are trying to control. Ensure the AT Commands are correctly formatted according to the Wavecom Q24PLUS module documentation.
- Failed SMS/MMS/TCP/IP: Check network signal strength. Verify SIM card registration and balance (if applicable). Ensure GPRS settings (APN, username, password) are correctly configured via AT Commands.
7. Specifications
| Feature | Specification |
|---|---|
| Model | Wavecom Q24PLUS Module |
| Modem Type | Industrial-grade GSM Modem |
| Frequency Support | GSM/GPRS 850/900/1800/1900MHz (Quad-Band) |
| Standard Conformance | ETSI GSM 2+ |
| Interface | USB (emulates 16 COM ports) |
| Control Method | AT Commands (GSM 07.07, 07.05) |
| Power Source | 5-24V DC |
| Operating Temperature | -20°C ~ +55°C |
| Storage Temperature | -25°C ~ +70°C |
| Number of Ports | 16 |
| Compatible Devices | Personal Computer |
| UPC | 609652472267 |
8. Warranty and Support
This OSTENT product is covered by the manufacturer's standard warranty. For specific warranty terms and conditions, please refer to the documentation included with your purchase or visit the official OSTENT website. For technical support, troubleshooting assistance, or inquiries regarding product functionality, please contact OSTENT customer service through their official channels. Keep your purchase receipt or proof of purchase handy when seeking support.