Product Overview
The Bosch LR1G laser receiver is designed to enhance the detection range of green-beam rotary lasers, extending it up to 500 feet. It features a dual-sided LCD display for clear visual readouts and built-in magnets for secure attachment to metal surfaces. The receiver provides precise on-grade position indication through an LCD arrow display and selectable audio signals, ensuring accuracy for various leveling tasks.

Figure 1: The Bosch LR1G Green-Beam Rotary Laser Receiver, a compact and robust device for extended laser detection.
Key Features
- Extended Accuracy: Increases green-beam rotary laser detection up to 650 feet with an accuracy of +/-1 mm (fine) or +/-3 mm (coarse).
- Dual-Sided LCD Display: Provides easy visual readouts from both sides of the receiver for enhanced usability.
- Magnetic Attachment: Equipped with heavy-duty magnets for secure attachment to metal surfaces, facilitating use at greater distances.
- Clear On-Grade Indication: Features an LCD arrow display and selectable audio signal for precise high/low on-grade position indication.
- Broad Compatibility: Works with Bosch and most green-beam rotary lasers. Note: While primarily for green-beam, some red-beam compatibility may vary by specific laser model.

Figure 2: Diagram highlighting key features of the Bosch LR1G, including the dual-sided LCD, magnetic top, and ergonomic grip.
Setup
1. Battery Installation
The Bosch LR1G receiver operates on two AA batteries. To install or replace batteries:
- Locate the battery compartment cover on the back of the receiver.
- Open the cover by sliding or unlatching it according to the markings.
- Insert two fresh AA batteries, ensuring correct polarity (+/-) as indicated inside the compartment.
- Close the battery compartment cover securely.
2. Attaching the Receiver to a Pole or Rod
The LR1G receiver is designed to be used with a compatible clamp system for secure attachment to a leveling rod or pole. This allows for precise height adjustments during operation.
- Align the receiver with the mounting slot on the clamp system.
- Slide the receiver firmly into the clamp until it clicks into place.
- To remove, press the release button on the clamp and slide the receiver out.
- Attach the clamp system to your leveling rod or pole and adjust the clamp to secure it firmly.
Operating Instructions
1. Powering On and Off
Press the power button (usually marked with a circle and vertical line) on the receiver to turn it on. Press and hold the same button to turn it off.
2. Selecting Detection Modes
The LR1G offers different detection sensitivities and audio feedback options:
- Fine Mode: Provides higher precision (e.g., +/-1 mm) for critical leveling tasks. Indicated by a single line on the display.
- Coarse Mode: Offers a wider detection band (e.g., +/-3 mm) for quicker, less precise adjustments. Indicated by a double line on the display.
- Audio Signal: Toggle the audio signal on or off using the speaker icon button. The audio pitch changes as the receiver approaches the laser plane, becoming a continuous tone when on-grade.
3. Detecting the Laser Beam
To detect the laser beam from your rotary laser:
- Ensure both your rotary laser and the LR1G receiver are powered on.
- Move the receiver vertically along the leveling rod in the path of the laser beam.
- The LCD display will show arrows indicating whether the receiver needs to move up or down to reach the laser plane.
- When the receiver is precisely on the laser plane, a solid line will appear on the LCD, and the audio signal (if enabled) will emit a continuous tone.
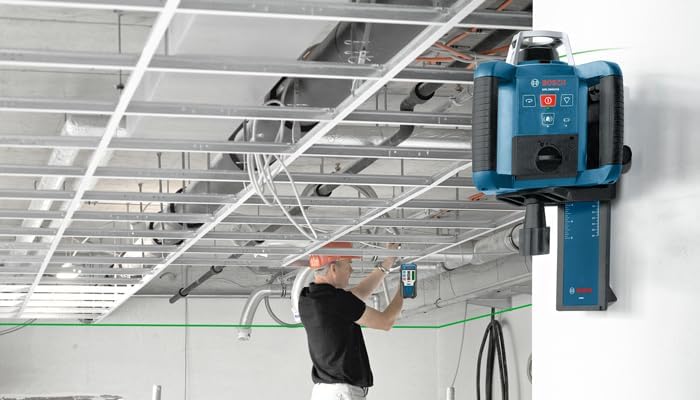
Figure 3: The Bosch LR1G receiver being used in conjunction with a rotary laser to establish a level line on a construction site.
4. Marking the Level Line
Once the receiver indicates it is on-grade:
- Locate the marked line on the side of the LR1G receiver. This mark indicates the exact center of the detection area.
- Use a pencil or marker to transfer this line onto the surface you are working on (e.g., a wall, a post). This mark represents your precise laser level line.
5. Outdoor Use Considerations
When operating outdoors, direct sunlight can sometimes interfere with laser detection. If the sun is directly hitting the receiver's screen, it may be difficult for the laser to be picked up. To improve detection in bright conditions, try to create a shadow over the receiver's screen by leaning over it or using a temporary shield.
Maintenance
- Cleaning: Keep the receiver clean and free of dust and debris. Use a soft, damp cloth for cleaning. Do not use harsh chemicals or abrasive cleaners.
- Storage: Store the receiver in its carrying case in a dry, cool place when not in use. Remove batteries if storing for extended periods to prevent leakage.
- Battery Replacement: Replace batteries promptly when the low battery indicator appears to ensure optimal performance.
- Inspection: Regularly inspect the receiver for any signs of damage, such as cracks in the casing or display. Do not use if damaged.
Troubleshooting
| Problem | Possible Cause | Solution |
|---|---|---|
| Receiver not detecting laser. |
|
|
| Inaccurate readings. |
|
|
| Audio signal is too quiet or absent. |
|
|
Specifications
| Attribute | Detail |
|---|---|
| Brand | Bosch |
| Model Number | LR1G |
| Material | Plastic |
| Color | Clear, Green, Red |
| Product Dimensions | 5.8"L x 2.9"W |
| Style | 65 ft. Receiver - GREEN |
| Item Weight | 7.04 ounces |
| Operation Mode | Automatic |
| UPC | 000346429084 |
| GTIN | 00000346429084 |
| Manufacturer | Bosch |
| Power Source | Battery Powered |
| Item Package Quantity | 1 |
| Special Features | Green-line |
| Batteries Included? | No |
| Batteries Required? | No (Requires 2 AA batteries, not included) |
| Date First Available | February 1, 2013 |
Warranty Information
Bosch measuring and layout tools are covered by a one-year limited warranty. An additional year of coverage is available when you register your tool within eight weeks of purchase. For detailed terms and conditions, please visit the official Bosch website or call 1-877-BOSCH99.

Figure 4: Visual representation of Bosch's limited warranty, indicating 1 year standard and +1 year upon registration.
Customer Support
For further assistance, technical support, or service inquiries regarding your Bosch LR1G Laser Receiver, please contact Bosch Customer Service:
- Phone: 1-877-BOSCH99
- Website: Refer to the official Bosch Tools website for product registration, FAQs, and service center locations.