1. Introduction
This manual provides comprehensive instructions for the installation, operation, and maintenance of the Triton 06933 Snowmobile Trailer Gas Shock Lift Kit. This kit is specifically designed to assist in tilting and holding the front of Triton straight front snowmobile trailers, significantly enhancing the ease and safety of loading and unloading snowmobiles.
The gas shock mechanism helps counteract the weight of trailer covers or salt shields, preventing the trailer tongue from slamming down during loading. Please read all instructions carefully before proceeding with installation or use.
2. Safety Information
- Always wear appropriate safety gear, including eye protection and gloves, during installation.
- Ensure the trailer is on a stable, level surface and properly secured before beginning any work.
- Keep hands and fingers clear of pinch points when installing or testing the gas shock.
- Do not attempt to modify the gas shock or any components of the kit.
- If you are unsure about any step, consult a qualified professional.
3. Package Contents
Verify that all components listed below are present in your kit before beginning installation:
- 1x Triton 06928 Gas Shock (approximately 27-inch shaft, 28.5 inches overall length)
- Mounting Brackets (various sizes)
- Bolts, Nuts, and Washers (complete mounting hardware)

Figure 1: All components included in the Triton 06933 Snowmobile Trailer Gas Shock Lift Kit. This image displays the gas shock, various mounting brackets, bolts, nuts, and washers.
4. Setup and Installation
This kit is designed for Triton straight front snowmobile trailers. Installation typically requires two wrenches, with a narrow adjustable wrench being helpful for the ball socket joints.
- Identify Mounting Locations: Locate suitable mounting points on your Triton straight front snowmobile trailer. The gas shock is designed to connect between the trailer frame and the tilting deck, allowing it to assist in lifting and holding the deck in the tilted position. Refer to Figure 2 for a typical installation example.
- Install Mounting Brackets: Securely attach the provided mounting brackets to the trailer frame and tilting deck using the bolts, nuts, and washers. Ensure all fasteners are tightened to prevent movement.
- Attach Gas Shock: Connect the ball socket ends of the gas shock to the installed mounting brackets. The swiveling mounting screws at either end of the shock should align with the ball studs on the brackets. Use a narrow adjustable wrench if needed to secure the ball socket joints.
- Test Functionality: Carefully tilt the trailer deck to ensure the gas shock operates smoothly and holds the deck in the desired tilted position. Verify that there is no binding or excessive strain on any components.
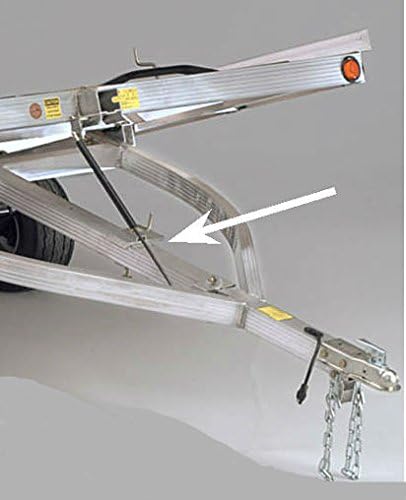
Figure 2: Example of the gas shock installed on a Triton snowmobile trailer. The white arrow indicates the position of the installed gas shock, connecting the trailer frame to the tilting deck.
5. Operating Instructions
Once installed, the Triton 06933 Gas Shock Lift Kit will assist in the manual tilting operation of your snowmobile trailer. When you lift the front of the trailer deck, the gas shock will extend, providing upward force to help hold the deck in the tilted position. This reduces the effort required to keep the trailer tilted, especially when loading or unloading snowmobiles, and prevents the deck from dropping unexpectedly.
- To tilt the trailer, manually lift the front of the trailer deck. The gas shock will extend to support the deck.
- To lower the trailer, apply downward pressure to the deck. The gas shock will compress as the deck returns to its horizontal position.
- Always ensure the trailer is stable and clear of obstructions before tilting or lowering.
6. Maintenance
Regular maintenance ensures the longevity and proper function of your gas shock lift kit:
- Visual Inspection: Periodically inspect the gas shock and all mounting hardware for signs of wear, corrosion, or damage. Check for loose bolts or cracked brackets.
- Cleanliness: Keep the gas shock shaft clean and free of dirt, ice, or debris. Wipe down with a damp cloth as needed. Avoid using harsh chemicals that could damage seals.
- Lubrication: The gas shock is a sealed unit and does not require internal lubrication. However, ensure the ball socket joints are free to swivel.
- Functionality Check: Test the shock's ability to hold the trailer deck in the tilted position. If it no longer provides adequate support, it may need replacement.
7. Troubleshooting
If you encounter issues with your Triton 06933 Gas Shock Lift Kit, consider the following:
- Shock Does Not Hold Trailer Deck:
- Verify that all mounting hardware is securely tightened.
- Ensure the shock is installed correctly and not binding.
- If the trailer is significantly heavier (e.g., due to multiple snowmobiles, heavy covers, or modifications), a single gas shock may not provide sufficient lift. Consider installing a second gas shock if your trailer design allows for it and additional support is needed.
- The gas shock may have lost pressure over time. If it feels weak or offers no resistance, it may need replacement.
- Difficulty Tilting/Lowering Trailer:
- Check for obstructions or debris around the shock or trailer hinge points.
- Ensure the shock is not bent or damaged, which could impede its movement.
8. Specifications
| Model Number | 06933 |
| Gas Shock Part Number | 06928 |
| Gas Shock Shaft Length | Approximately 27 inches |
| Gas Shock Overall Length | Approximately 28.5 inches (measured from center of ball socket to center of ball socket when extended) |
| Compatibility | Triton straight front snowmobile trailers |
| Included Components | Gas shock, complete mounting hardware |

Figure 3: The Triton 06928 Gas Shock with an indicated overall length of 28-1/2 inches (28.5 inches).
9. Warranty and Support
For warranty information regarding your Triton 06933 Snowmobile Trailer Gas Shock Lift Kit, please refer to the documentation provided at the time of purchase or contact Triton directly through their official website. For technical support or assistance with installation, please reach out to Triton customer service or your authorized retailer.

