Doctor Who F0F4
Doctor Who TARDIS Mini Fridge User Manual
Model: F0F4
1. Introduction
Thank you for purchasing the Doctor Who TARDIS Mini Fridge. This unique appliance is designed to keep your beverages and snacks cool, or even warm, in a compact and portable form. Its iconic TARDIS design, complete with sound effects and a flashing light, makes it a perfect addition for any Doctor Who enthusiast. Please read this manual thoroughly before operation to ensure proper use and maintenance.

Figure 1: Front view of the Doctor Who TARDIS Mini Fridge. The fridge is designed to resemble the iconic blue police box from Doctor Who, featuring "POLICE PUBLIC CALL BOX" signage and window details.
2. Safety Information
To reduce the risk of fire, electric shock, or injury, always follow these basic safety precautions:
- Read all instructions before using the appliance.
- Do not immerse the appliance, cord, or plug in water or other liquids.
- Do not operate the appliance with a damaged cord or plug, or after the appliance malfunctions or has been damaged in any manner.
- Ensure adequate ventilation around the unit. Do not block ventilation openings.
- Do not place the appliance near heat sources such as radiators, heat registers, stoves, or other appliances that produce heat.
- Use only the power cords provided with the unit.
- Unplug the appliance from the outlet when not in use and before cleaning.
- This appliance is for indoor use only.
3. Package Contents
Please check the package for the following items:
- Doctor Who TARDIS Mini Fridge Unit
- AC Power Cord (for standard wall outlets)
- DC Car Adapter (for 12V car outlets)
- Removable Interior Shelf
4. Setup
- Unpacking: Carefully remove the mini fridge and all accessories from the packaging. Retain packaging for future storage or transport.
- Placement: Place the mini fridge on a flat, stable surface. Ensure there is at least 10 cm (4 inches) of space around the back and sides of the unit for proper ventilation. Avoid placing it in direct sunlight or near heat sources.
- Power Connection:
- For Home/Office Use (AC 110V): Connect the AC power cord to the AC input port on the back of the fridge. Plug the other end into a standard 110V AC wall outlet.
- For Car Use (DC 12V): Connect the DC car adapter to the DC input port on the back of the fridge. Plug the other end into your vehicle's 12V DC car outlet (cigarette lighter socket).
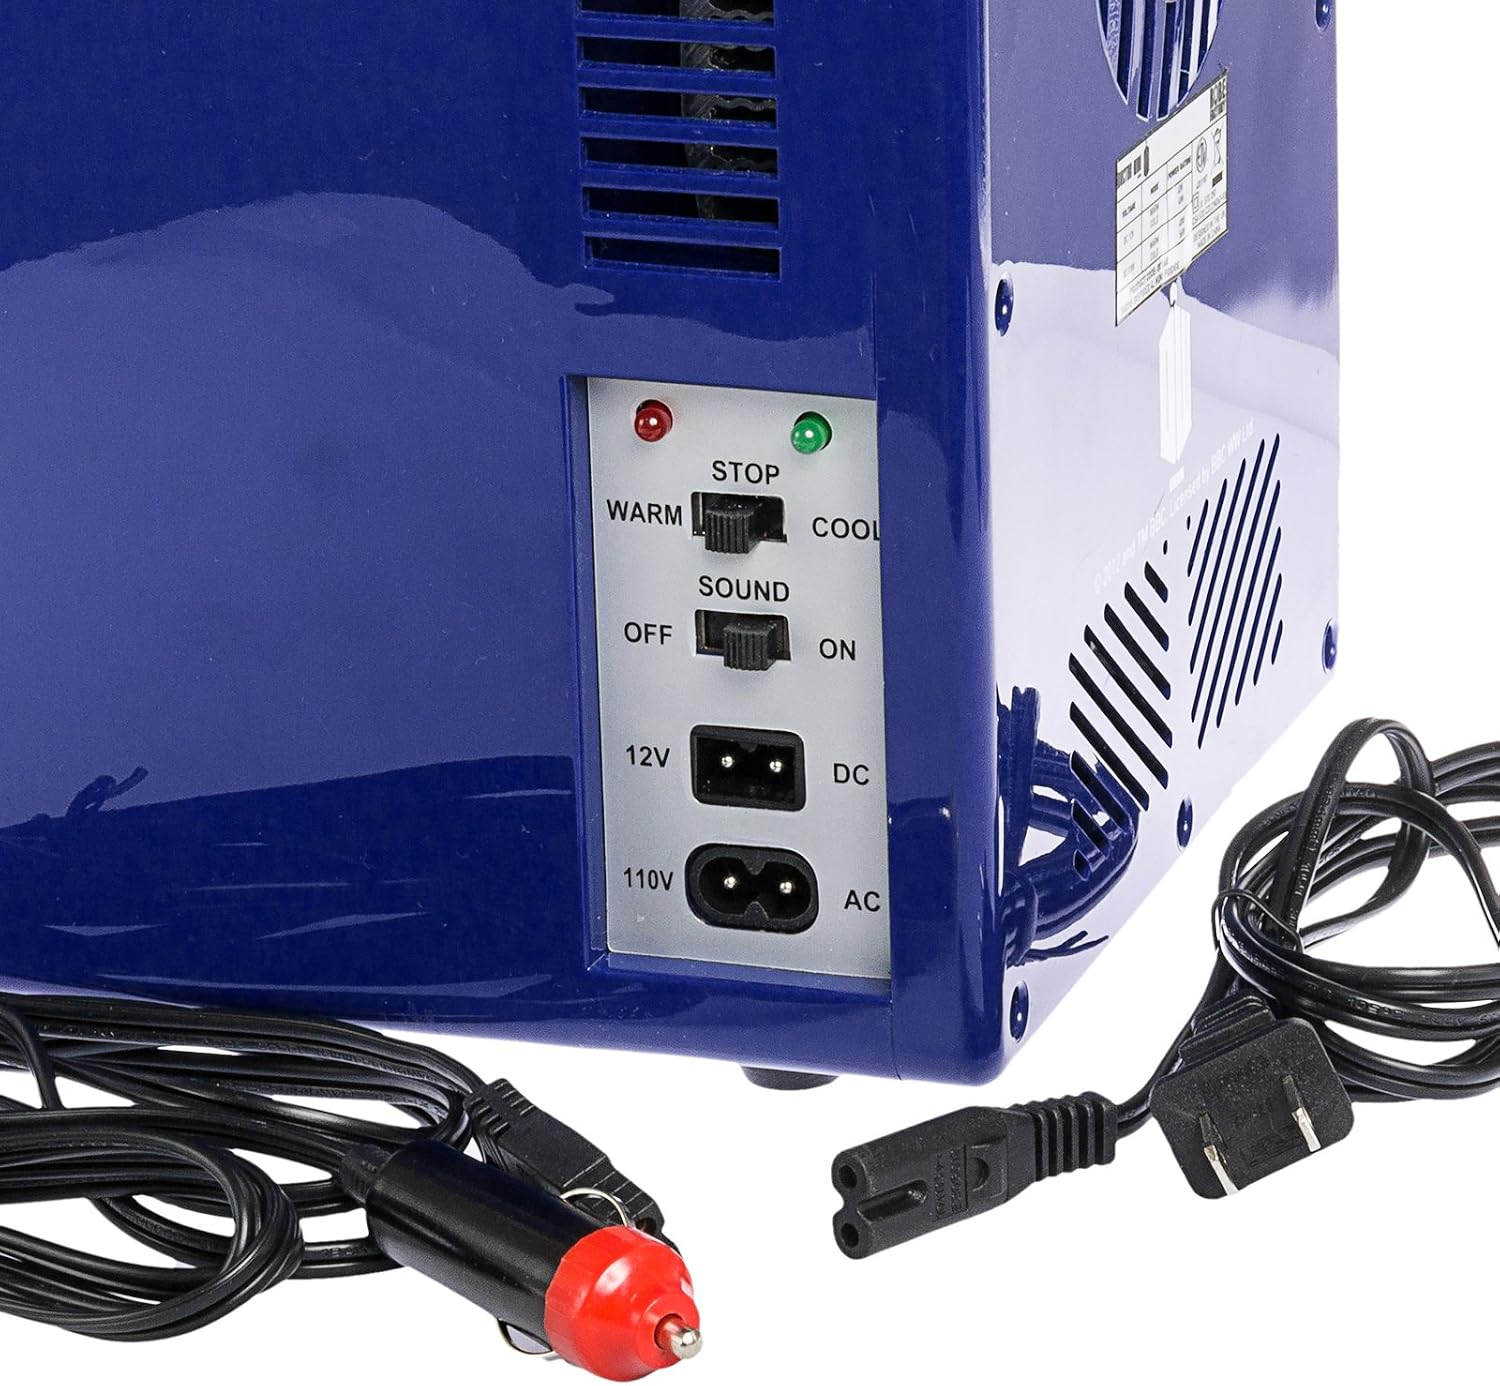
Figure 2: Rear view of the TARDIS Mini Fridge, highlighting the control panel with switches for Warm/Cool and Sound On/Off, along with the 12V DC and 110V AC power input ports.
5. Operating Instructions
The TARDIS Mini Fridge features both cooling and warming functions, along with an optional sound and light effect.
5.1 Controls Overview
- WARM/COOL Switch: Located on the back panel. Slide to "COOL" for refrigeration, or "WARM" for heating. The corresponding indicator light (green for COOL, red for WARM) will illuminate.
- SOUND ON/OFF Switch: Located on the back panel. Slide to "ON" to activate the TARDIS sound effect when the door is opened and the blue light on top flashes. Slide to "OFF" to disable the sound.
5.2 Cooling Mode
- Ensure the fridge is properly connected to a power source (AC or DC).
- Slide the WARM/COOL switch to the "COOL" position. The green "COOL" indicator light will illuminate.
- Allow approximately 30 minutes for the internal temperature to stabilize before placing items inside.
- The fridge can hold up to six 12-ounce (355ml) beverage cans or approximately 4 liters (14 cu. ft.) of contents. The removable shelf can be adjusted or removed to accommodate different sized items.

Figure 3: Interior view of the TARDIS Mini Fridge, showing the removable shelf and compact storage space.

Figure 4: The TARDIS Mini Fridge in a typical use setting on a desk, demonstrating its compact size and capacity to hold several beverage cans.
5.3 Warming Mode
- Ensure the fridge is properly connected to a power source (AC or DC).
- Slide the WARM/COOL switch to the "WARM" position. The red "WARM" indicator light will illuminate.
- Allow approximately 30 minutes for the internal temperature to stabilize before placing items inside. This mode is suitable for keeping food warm, not for cooking or reheating cold food.
5.4 TARDIS Sound and Light Feature
When the SOUND ON/OFF switch is set to "ON", the mini fridge will emit the iconic TARDIS dematerialization sound effect and the blue light on top will flash when the door is opened. To disable this feature, slide the SOUND ON/OFF switch to "OFF".

Figure 5: Close-up view of the flashing blue light located on the top of the TARDIS Mini Fridge, which activates with the sound effect when the door is opened.
6. Maintenance and Cleaning
Regular cleaning will help maintain the performance and appearance of your mini fridge.
- Always unplug the unit from the power source before cleaning.
- Wipe the interior and exterior surfaces with a soft cloth dampened with mild soap and water.
- Do not use abrasive cleaners, solvents, or harsh chemicals, as these may damage the surfaces.
- Ensure the unit is completely dry before plugging it back in.
- If frost builds up inside during cooling, unplug the unit and allow the frost to melt naturally. Wipe away excess water with a cloth.
7. Troubleshooting
| Problem | Possible Cause | Solution |
|---|---|---|
| Unit does not power on. | No power supply; loose connection. | Check if the power cord is securely plugged into both the unit and the outlet. Try a different outlet. Ensure the power source (AC or DC) is active. |
| Unit is not cooling/warming effectively. | Insufficient ventilation; door not closed properly; ambient temperature too high/low; too many items inside. | Ensure adequate space around the unit for ventilation. Check that the door is fully closed. Avoid placing hot items directly into cooling mode or cold items into warming mode. Do not overfill the fridge. |
| TARDIS sound is not working. | Sound switch is OFF. | Slide the SOUND ON/OFF switch on the back panel to the "ON" position. |
8. Specifications
- Model: F0F4
- Brand: Doctor Who
- Capacity: 4 Liters (approx. 6 x 12oz cans)
- Dimensions (L x W x H): 33.78 x 28.19 x 20.32 cm (13.3 x 11.1 x 8 inches)
- Weight: 2.72 kg (6 lbs)
- Power Input: AC 110V (standard wall outlet), DC 12V (car outlet)
- Functions: Cooling and Warming
- Color: Blue
9. Warranty and Support
This product comes with a standard manufacturer's warranty. For specific warranty details, please refer to the documentation included with your purchase or contact the retailer where the product was purchased. For technical support or inquiries, please contact the manufacturer's customer service department.
Ask a question about this manual
Ask about setup, troubleshooting, compatibility, parts, safety, or missing instructions. Manuals+ will review the question and use this page’s manual context to help answer it.