VIVO STAND-V001
VIVO Single Monitor Arm Desk Mount
Model: STAND-V001
1. Safety Information
Please read this manual thoroughly before installation and use. Improper installation or use may result in damage or injury. Keep this manual for future reference.
- Weight Capacity: Do not exceed the maximum weight capacity of 22 lbs (10 kg).
- VESA Compatibility: Ensure your monitor has VESA mounting patterns of 75x75mm or 100x100mm.
- Desktop Thickness: The mount is compatible with desktops up to 3.25 inches (8.25 cm) thick.
- Monitor Size: Supports standard screens from 13 to 32 inches and ultrawide monitors up to 38 inches.
- Always ensure all screws and connections are securely tightened before placing a monitor on the mount.
- Use caution when making adjustments to prevent pinching or dropping the monitor.
2. Package Contents
Verify that all components are present and undamaged before beginning installation.

Overview of the VIVO Single Monitor Arm Desk Mount, illustrating its main components including the articulating arm, vertical pole, C-clamp, and grommet mounting options.
- Monitor Arm Assembly
- Vertical Pole
- C-Clamp Base
- Grommet Base Option
- VESA Plate
- Cable Clips
- All necessary hardware (screws, washers, hex wrenches)
3. Setup Instructions
3.1. Verify Compatibility
Before installation, confirm your monitor and desktop meet the mount's requirements.
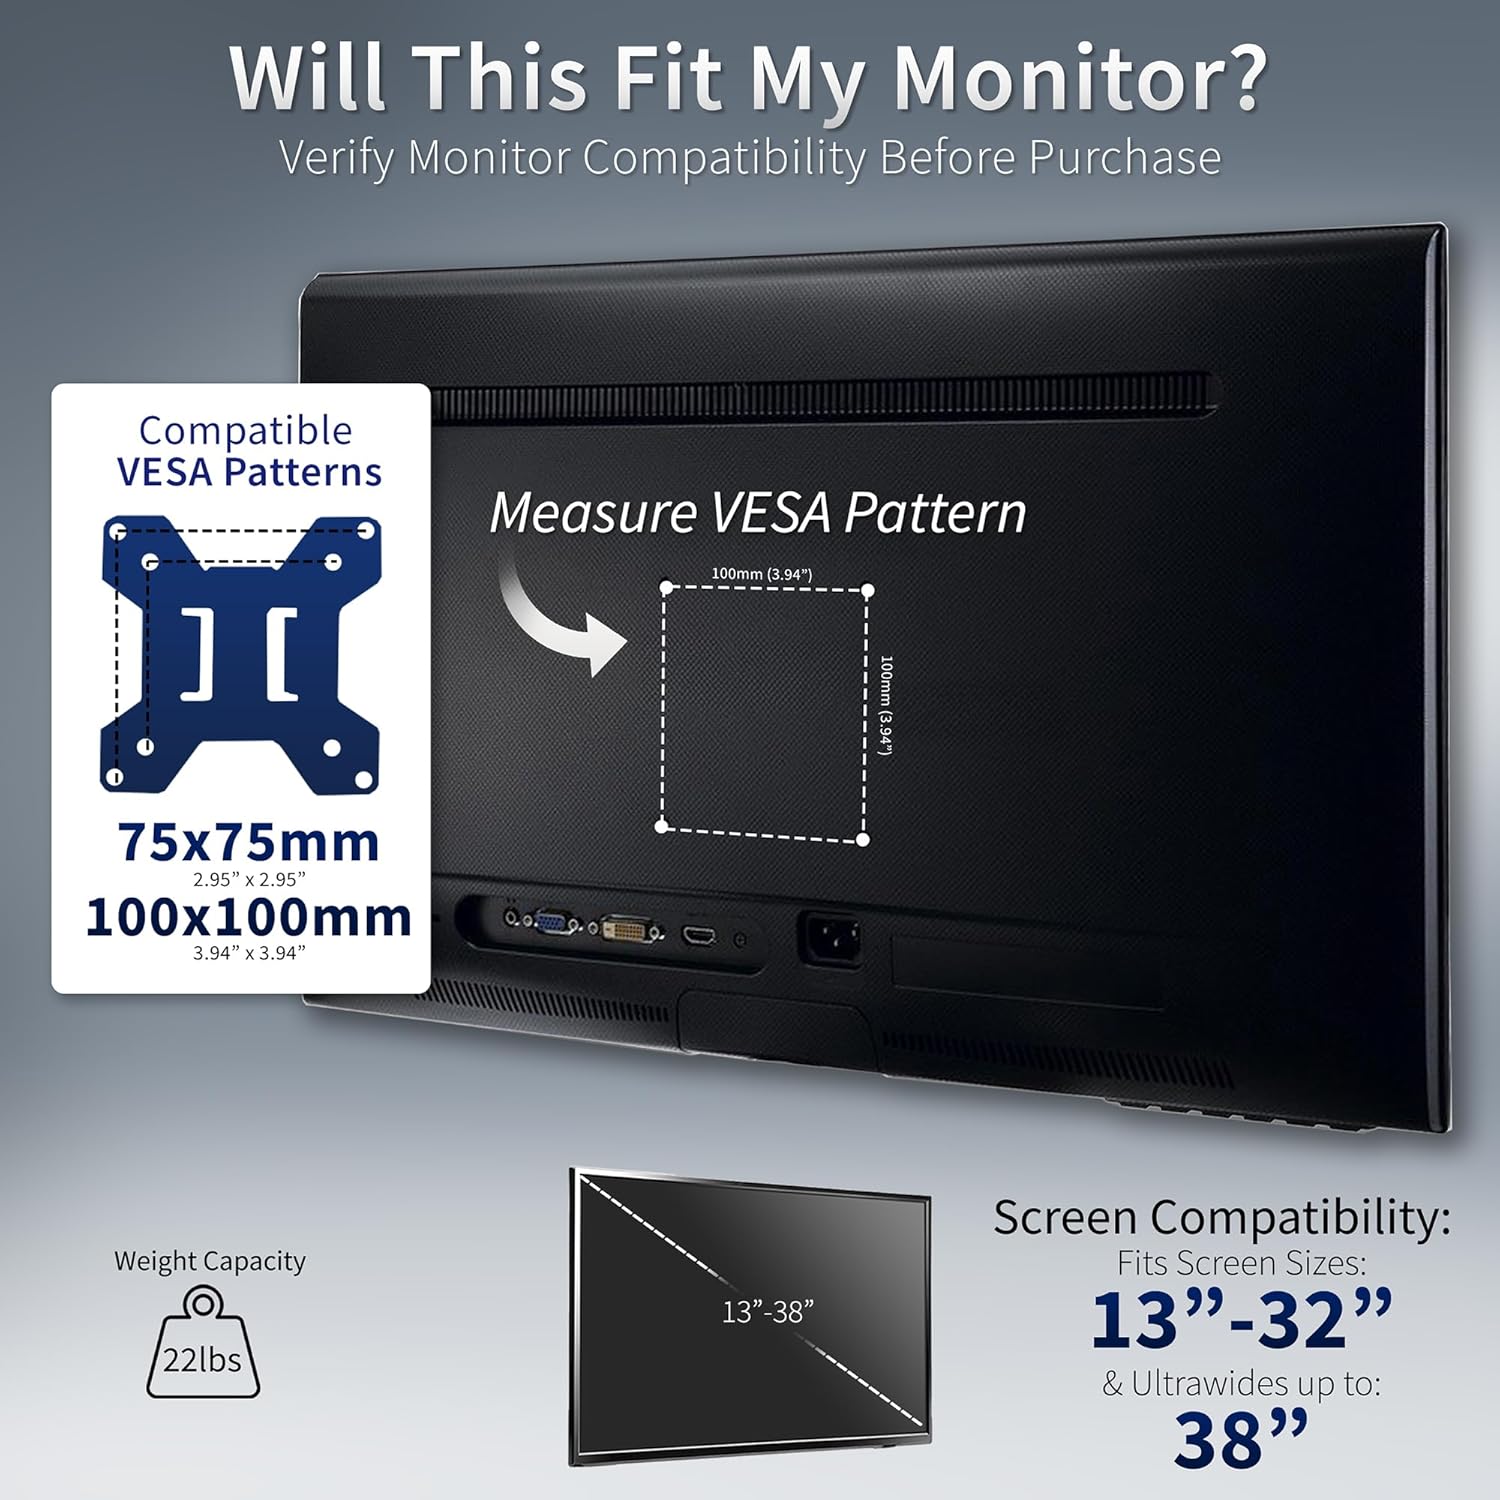
Monitor Compatibility

This image illustrates how to measure the VESA pattern on the back of your monitor to ensure compatibility with the mount. It highlights the 75x75mm and 100x100mm VESA standards.
- Check your monitor's VESA pattern (distance between mounting holes). It must be 75x75mm or 100x100mm.
- Ensure your monitor's weight does not exceed 22 lbs.
- Confirm your monitor size is between 13 and 32 inches, or up to 38 inches for ultrawide models.
Desktop Compatibility
This diagram details desktop compatibility, showing that the mount is designed for flat, straight-edge desktops up to 3.25 inches thick. It also illustrates the C-clamp and grommet mounting methods.
- The mount is designed for flat, straight-edge desktops.
- Maximum desktop thickness for both C-clamp and grommet options is 3.25 inches.
3.2. Choose Mounting Option
The STAND-V001 offers two installation methods: C-clamp or grommet base.

A comprehensive diagram outlining the key dimensions and features of the monitor arm, such as its 22 lbs weight capacity, 16-inch screen height adjustment along the pole, VESA 75x75mm and 100x100mm compatibility, and maximum desktop thickness of 3.25 inches for both C-clamp and grommet options.
C-Clamp Installation
- Attach the C-clamp base to the vertical pole.
- Position the C-clamp on the edge of your desk.
- Tighten the C-clamp screw until the mount is securely fastened to the desk. Ensure it is stable and does not wobble.
Grommet Base Installation
- If your desk has a grommet hole, or you can drill one, use the grommet base.
- Assemble the grommet base components as per the included diagram.
- Insert the pole through the grommet hole and secure it from underneath the desk using the provided hardware.
3.3. Attach VESA Plate to Monitor
- Carefully place your monitor face down on a soft, clean surface.
- Align the detachable VESA plate with the mounting holes on the back of your monitor.
- Secure the VESA plate to the monitor using the appropriate screws and washers from the hardware kit. Do not overtighten.
3.4. Mount Monitor to Arm
- With the VESA plate attached to your monitor, carefully slide the monitor onto the end of the monitor arm.
- Ensure the VESA plate locks securely into place on the arm. Some models may require tightening a screw to fully secure.
- Once attached, gently test the stability of the monitor before releasing it completely.
4. Operating Instructions
4.1. Adjustments
The monitor arm allows for various adjustments to achieve an ergonomic viewing experience.

An illustration of the monitor arm's articulation capabilities, including 360-degree swivel, 360-degree rotation, and a tilt range of +90 to -90 degrees, allowing for flexible screen positioning.
- Tilt: The monitor can be tilted +90° to -90° to reduce glare and optimize viewing angles. Loosen the tilt screw, adjust, and re-tighten.
- Swivel: The arm allows for 360° swivel, enabling you to share your screen or change viewing direction.
- Rotation: Rotate your monitor 360° to switch between landscape and portrait orientation.
- Height Adjustment: The monitor arm can be adjusted up to 16 inches along the center pole. Loosen the collar on the pole, slide the arm to the desired height, and re-tighten the collar securely.
4.2. Cable Management
Keep your workspace tidy and organized using the integrated cable management system.

This image demonstrates the integrated cable management system, with cables neatly organized and secured along the monitor arm and pole using detachable clips.
- Route your power and AV cables through the detachable cable clips located on the arm and the center pole.
- Ensure cables have enough slack to allow for full range of motion without tension.
5. Maintenance
Regular maintenance ensures the longevity and safe operation of your monitor arm.
- Cleaning: Wipe the mount with a soft, damp cloth. Avoid harsh chemicals or abrasive cleaners.
- Periodic Checks: Periodically check all screws and connections to ensure they remain tight and secure. Re-tighten if necessary.
- Inspect cables routed through the management system for any signs of wear or pinching.
6. Troubleshooting
If you encounter issues, refer to the following common problems and solutions.
- Monitor is sagging or not holding position:
- Ensure your monitor's weight does not exceed the 22 lbs capacity.
- Check and tighten all screws on the VESA plate and arm joints. - Difficulty adjusting height:
- The height adjustment along the pole requires loosening the collar, adjusting, and then re-tightening. This is not designed for frequent, quick adjustments like a gas spring arm. - Mount feels unstable on the desk:
- Ensure the C-clamp or grommet base is tightened securely to the desktop. The desktop itself must be sturdy enough to support the mount and monitor.
- Verify that your desktop thickness is within the 3.25-inch limit. - Cables are not staying in clips:
- Ensure cables are properly routed and not overfilled in the clips. Replace clips if they are damaged.
7. Specifications
| Model Number | STAND-V001 |
| Screen Compatibility | 13" to 32" (standard), up to 38" (ultrawide) |
| Weight Capacity | 22 lbs (10 kg) |
| VESA Compatibility | 75x75mm, 100x100mm |
| Desktop Thickness | Up to 3.25 inches (8.25 cm) |
| Tilt Range | +90° to -90° |
| Swivel | 360° |
| Rotation | 360° |
| Height Adjustment | Up to 16" along the center pole |
| Material | Alloy Steel, Aluminum |
| Color | Black |
| Product Dimensions | 16.54 x 4.33 x 5.91 inches |
| Item Weight | 6.18 pounds |
8. Warranty and Support
VIVO is committed to providing quality products and customer satisfaction.
- U.S. Based Support: Our sales and technical support team members are based in the U.S. to provide high-quality assistance.
- Product Protection: For information regarding product protection plans or warranty details, please refer to your purchase documentation or contact VIVO customer service.
- Contact: For further assistance or inquiries, please visit the official VIVO website or refer to the contact information provided with your product packaging.
Related Documents - STAND-V001
 |
VIVO STAND-V120K Pneumatic Arm Dual Ultrawide Monitor Extra Tall Desk Mount Assembly Manual Step-by-step assembly and installation instructions for the VIVO STAND-V120K Pneumatic Arm Dual Ultrawide Monitor Extra Tall Desk Mount. Includes safety guidelines, adjustment tips, and cable management instructions. |
 |
VIVO STAND-V100D Pneumatic Arm Single Ultrawide Monitor Desk Mount Instruction Manual Detailed instruction manual for assembling and installing the VIVO STAND-V100D Pneumatic Arm Single Ultrawide Monitor Desk Mount. Includes package contents, tools needed, step-by-step assembly instructions for desk clamp and grommet options, and adjustment guidance. |
 |
VIVO STAND-V100HU Pneumatic Arm Single Ultra Wide Monitor Desk Mount Instruction Manual Instruction manual for the VIVO STAND-V100HU Pneumatic Arm Single Ultra Wide Monitor Desk Mount. Includes assembly steps for clamp and grommet mounting, VESA plate installation, and tension adjustment instructions. |
 |
VIVO Dual Ultrawide Vertical Monitor Desk Stand STAND-V200L Instruction Manual Instruction manual for the VIVO Dual Ultrawide Vertical Monitor Desk Stand (STAND-V200L). This guide provides detailed steps for assembly, installation, and adjustment of the monitor desk stand, including package contents, tools needed, and safety warnings. |
 |
VIVO STAND-V300D Pneumatic Arm Triple Ultrawide Monitor Extra Tall Desk Mount Assembly Manual Assembly instructions for the VIVO STAND-V300D triple ultrawide monitor extra tall desk mount. Includes safety warnings, parts list, and step-by-step installation guide. |
 |
VIVO MOUNT-V101G1/W Pneumatic Arm Ultrawide Monitor Wall Mount Instruction Manual Comprehensive instruction manual for the VIVO MOUNT-V101G1/W Pneumatic Arm Single Ultrawide Monitor Wall Mount. Includes package contents, tools needed, step-by-step assembly instructions for wood and concrete walls, VESA plate attachment, gas spring adjustment, and safety guidelines. |
Ask a question about this manual
Ask about setup, troubleshooting, compatibility, parts, safety, or missing instructions. Manuals+ will review the question and use this page’s manual context to help answer it.