Eurodib HBS-250L
Eurodib HBS-250L Manual 10" Meat Slicer User Manual
Model: HBS-250L
1. Introduction and Overview
The Eurodib HBS-250L is a robust and efficient manual meat slicer designed for professional use. Featuring a 10-inch blade, this belt-driven slicer is constructed from durable anodized aluminum, ensuring longevity and ease of cleaning. It is equipped with a built-in blade sharpener, a Perspex protector guard for safety, and a waterproof emergency shut-off switch. This appliance is ideal for slicing various meats with adjustable thickness from 0.2mm to 15mm.
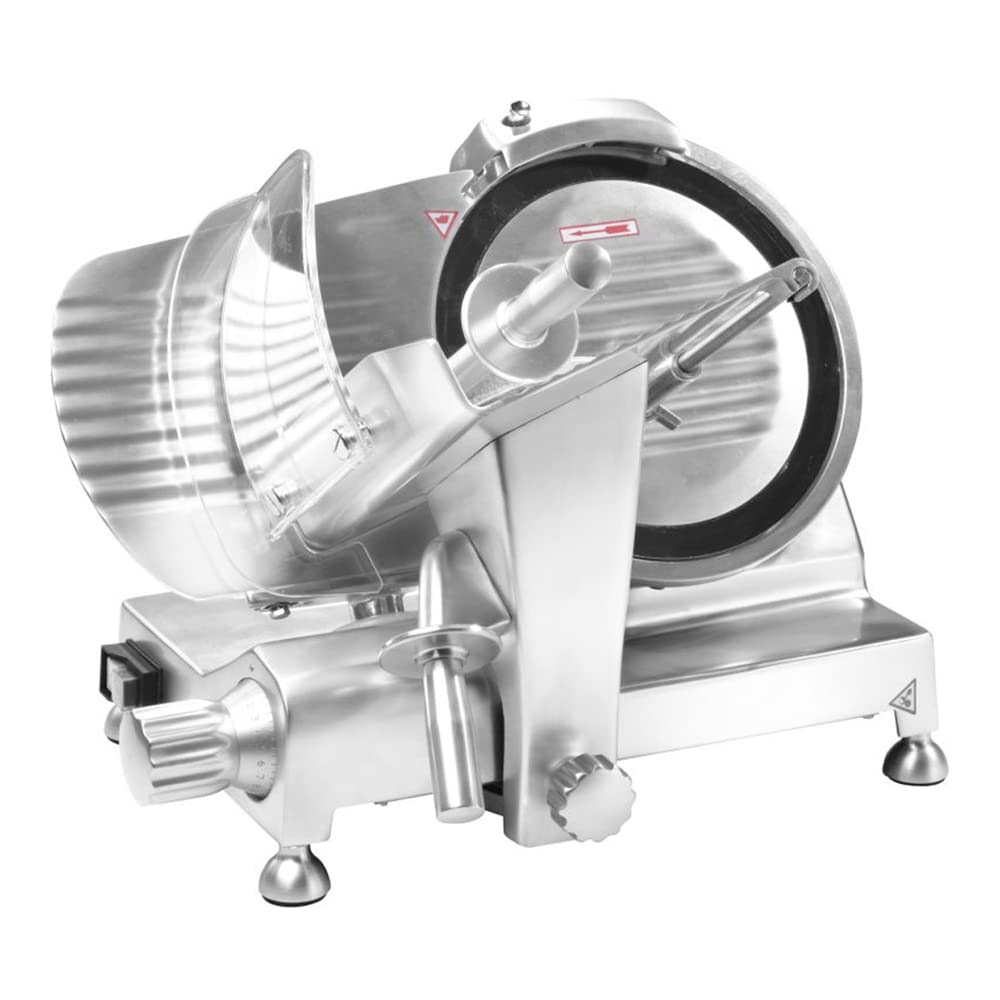
Figure 1: Eurodib HBS-250L Manual 10" Meat Slicer. This image shows the full view of the meat slicer, highlighting its stainless steel construction, the 10-inch blade, the food carriage, and the thickness adjustment knob.
2. Important Safety Instructions
Please read all instructions carefully before operating the meat slicer. Failure to follow these instructions may result in serious injury or damage to the appliance.
- Sharp Blade: The blade is extremely sharp. Always exercise extreme caution when handling, cleaning, or sharpening the blade. Keep hands clear of the blade at all times.
- Electrical Safety: Ensure the power supply matches the appliance's requirements (120V). Do not operate with a damaged cord or plug. Keep the appliance away from water and do not immerse it.
- Personal Protective Equipment: It is recommended to wear cut-resistant gloves when cleaning or handling the blade.
- Stable Surface: Always operate the slicer on a stable, level, and non-slip surface.
- Food Pusher: Always use the food pusher to hold food items. Never use your bare hands to push food towards the blade.
- Children and Unauthorized Users: Keep the appliance out of reach of children and ensure only trained personnel operate it.
- Emergency Shut-off: Familiarize yourself with the location and operation of the emergency shut-off switch.
- Unplug When Not in Use: Always unplug the slicer from the power outlet before cleaning, maintenance, or when not in use.
3. What's in the Box
Upon unpacking, please verify that all components are present and undamaged.
- Eurodib HBS-250L Meat Slicer (Main Unit)
Note: The meat slicer comes fully assembled with the 10-inch blade, blade sharpener, Perspex protector guard, and food carriage.
4. Setup
- Unpacking: Carefully remove the slicer from its packaging. Retain packaging for future storage or transport.
- Placement: Place the slicer on a sturdy, level, and non-slip countertop or table. Ensure there is adequate space around the unit for safe operation and cleaning.
- Initial Cleaning: Before first use, clean all parts that will come into contact with food. Refer to the "Maintenance and Cleaning" section for detailed instructions.
- Power Connection: Ensure the slicer's power switch is in the "OFF" position. Plug the power cord into a grounded 120V electrical outlet.
5. Operating Instructions
- Prepare Food: Place the item to be sliced (e.g., meat) onto the food carriage. Secure it firmly against the back plate and use the food pusher to hold it in place.
- Adjust Slice Thickness: Use the thickness adjustment knob, located on the side of the slicer, to set the desired slice thickness. The range is from 0.2mm (very thin) to 15mm (thick). Turn the knob clockwise for thicker slices and counter-clockwise for thinner slices.
- Power On: Turn the slicer on using the power switch. The blade will begin to rotate.
- Slicing: While holding the food pusher firmly, gently push the food carriage back and forth, guiding the food against the rotating blade. The sliced food will fall onto the receiving tray (not included, but typically placed below).
- Safety Features: The Perspex protector guard is designed to prevent accidental contact with the blade. Always ensure it is properly positioned during operation. In case of emergency, press the red emergency shut-off switch to immediately stop the blade.
- Power Off: Once slicing is complete, turn off the slicer using the power switch and unplug it from the outlet before cleaning or leaving unattended.
Blade Sharpening
The HBS-250L features an integrated blade sharpener to maintain optimal slicing performance.
- Safety First: Ensure the slicer is unplugged before attempting to sharpen the blade.
- Position Sharpener: Locate the blade sharpener assembly, typically positioned above the blade. Follow the specific instructions for engaging the sharpening stones. This usually involves lifting or rotating the sharpener into position so the stones make contact with the blade.
- Sharpening Process: With the sharpener engaged, briefly turn on the slicer for a few seconds (e.g., 5-10 seconds). Do not over-sharpen.
- Deburring: Some sharpeners have a separate deburring stone. If applicable, engage the deburring stone and run the slicer for 1-2 seconds to remove any burrs from the blade edge.
- Clean Blade: After sharpening, carefully clean the blade to remove any metal particles. Refer to the cleaning instructions.
6. Maintenance and Cleaning
Regular cleaning and maintenance are crucial for the longevity and hygienic operation of your meat slicer.
- Always Unplug: Before any cleaning or maintenance, always ensure the slicer is unplugged from the power outlet.
- Blade Cleaning: The blade is extremely sharp. Use cut-resistant gloves. Carefully wipe down both sides of the blade with a damp cloth and mild detergent. Do not immerse the blade or the entire unit in water.
- Unit Cleaning: Wipe down the body of the slicer, food carriage, and other surfaces with a damp cloth and mild, food-safe detergent. Rinse with a clean damp cloth and dry thoroughly.
- Food Pusher and Guard: Remove and clean the food pusher and Perspex guard separately with warm soapy water. Rinse and dry completely before reattaching.
- Product Care Instructions: Hand Wash Only. Do not place any parts in a dishwasher.
- Lubrication: Periodically, apply food-grade lubricant to moving parts as indicated in the detailed product manual (if applicable, general slicer maintenance).
7. Troubleshooting
| Problem | Possible Cause | Solution |
|---|---|---|
| Slicer does not turn on. | Not plugged in; power switch off; circuit breaker tripped; emergency stop engaged. | Ensure unit is plugged in. Check power switch. Reset circuit breaker. Disengage emergency stop button. |
| Uneven slices or difficulty slicing. | Dull blade; food not properly secured; incorrect thickness setting. | Sharpen the blade. Ensure food is firmly pressed against the back plate and held by the pusher. Adjust thickness setting. |
| Slicer makes unusual noise. | Lack of lubrication; foreign object; worn belt. | Refer to maintenance for lubrication. Unplug and inspect for foreign objects. Contact service if noise persists. |
| Blade stops during operation. | Overload; motor overheating; emergency stop engaged. | Reduce load. Allow motor to cool. Disengage emergency stop. |
8. Specifications
| Feature | Detail |
|---|---|
| Model Number | HBS-250L |
| Brand | Eurodib |
| Product Dimensions | 16.3 x 19.7 x 14 inches |
| Item Weight | 36.2 Pounds |
| Blade Size | 10 inches |
| Blade Material | Stainless Steel |
| Operation Mode | Manual |
| Material | Aluminum, Stainless Steel |
| Color | Silver |
| Slice Thickness | 0.2mm - 15mm |
| Special Features | Integrated Blade Sharpener, Perspex Protector Guard, Waterproof Emergency Shut-off Switch |
| Recommended Uses | Meat |
| Power | 1.4 amps, 150 watts, 1/5 hp (120v) |
| Certifications | cETLus, ETL-Sanitation |
9. Warranty and Support
For warranty information, technical support, or service inquiries regarding your Eurodib HBS-250L Meat Slicer, please contact Eurodib customer service directly.
Please have your model number (HBS-250L) and purchase information ready when contacting support.
Manufacturer: Eurodib
Website: www.eurodib.com (Note: This is a placeholder URL, please refer to official Eurodib documentation for actual contact details.)
Ask a question about this manual
Ask about setup, troubleshooting, compatibility, parts, safety, or missing instructions. Manuals+ will review the question and use this page’s manual context to help answer it.