1. Important Safety Instructions
Always observe basic safety precautions when using electrical appliances to reduce the risk of fire, electric shock, and personal injury.
- Always use in a well-ventilated area. Ensure adequate airflow to prevent the buildup of hazardous fumes.
- Avoid inhaling spray. Use appropriate respiratory protection, such as a respirator or mask, especially when working with certain materials.
- Keep away from heat and open flames. Many painting materials are flammable. Do not spray near pilot lights, stoves, heaters, or other ignition sources.
- Wear appropriate personal protective equipment (PPE), including safety glasses, gloves, and protective clothing, to prevent skin and eye contact with materials.
- Dispose of contents and container in accordance with local, state, and federal regulations. Follow guidelines for proper disposal of paint, solvents, and cleaning materials.
- Never point the sprayer at any person or animal. Always ensure the spray nozzle is directed away from yourself and others.
- Ensure the work area is free from obstructions and well-lit.
Warning: Always disconnect the power cord from the electrical outlet before performing any assembly, adjustments, or cleaning procedures.
2. Product Overview
The BLACK+DECKER HVLP200-QS 400W Paint Sprayer is designed for efficient and even application of various painting materials. Understanding its components is crucial for proper operation and maintenance.

Components:
- Filter Cover: Protects the air filter from debris and dust.
- Sprayer Release Button: Controls the release and dispersion of material.
- Power Unit: Generates and delivers pressurized fluid.
- Sprayer: The main assembly for material application.
- Spray Trigger: Activates the spraying mechanism.
- Flow Control Knob: Regulates the flow rate of the liquid.
- Flow Indicator: Indicates the rate of liquid flow.
- Side Fill Canister: Container for holding painting material, designed for easy refilling.
- Lid: Secures the side fill canister.
- Pattern Select Nozzle: Allows selection of different spray patterns.
- Plug and Power Cord: Connects the sprayer to an electrical power source.


3. Specifications
| Feature | Specification |
|---|---|
| Brand | BLACK+DECKER |
| Model Name | HVLP200 |
| Model Number | HVLP200-QS |
| Power Source | Corded Electric |
| Power | 400W |
| Tank Volume | 400 Cubic Centimeters (1.2 Liters) |
| Maximum Pressure | 10 Pound per Square Inch |
| Item Weight | 2.2 Pounds (1.49 kg) |
| Hose Length | 1.5 Meters |
| Material | Stainless Steel |
| Color | Black |
4. Setup
4.1 Attaching the Pickup Tube
The pickup tube should be aligned in the direction you will be spraying to ensure maximum material usage.
- For spraying at an upward angle or straight on, position the pickup tube towards the back of the canister.
- For spraying at a downward angle, position the pickup tube towards the front of the canister.
4.2 Removing and Attaching the Sprayer Motor Unit
To remove the sprayer from the motor unit:
- Press and hold the sprayer release button.
- Rotate the sprayer 90° and pull it from the motor unit.
To attach the sprayer to the motor unit:
- Push and hold the sprayer release button.
- Hold the sprayer at 90° to the motor unit.
- Align the tabs on the sprayer with the slots in the motor unit.
- Push the sprayer into the motor unit and rotate it 90° until it locks into place.
- Release the sprayer release button.
Warning: Ensure that the sprayer is firmly attached to the motor unit before performing any spray operations.
4.3 Filling the Canister
Proper preparation of your material is key for optimal performance.
- Ensure the side fill canister is completely screwed onto the sprayer.
- Lay the sprayer on its side with the canister side facing up.
- Pour the properly thinned and strained material into the side fill canister.
- Once filled, screw the lid onto the side fill canister until it is securely tightened.
Note: Always strain the material thoroughly before use to prevent foreign particles from entering the sprayer and causing blockages.
4.4 Material Thinning Guide
Refer to this table for general guidance on thinning various materials. Always follow the paint manufacturer's recommendations.
| Material Type | Thinning Required |
|---|---|
| Oil based paints, varnishes and polyurethanes | Low (less than 2 metal nozzles) |
| Solid colour water based paints (e.g. latex) | More thinning |
| Water based paints (more than 2 metal nozzles) | No thinning required |
Note: Not recommended for textured paint.
5. Operation
5.1 Switching On and Off
The sprayer is controlled by the spray trigger.
- To turn the sprayer on, squeeze the spray trigger.
- To turn the sprayer off, release the spray trigger.
Warning: Never pull the trigger while adjusting the spray setting.
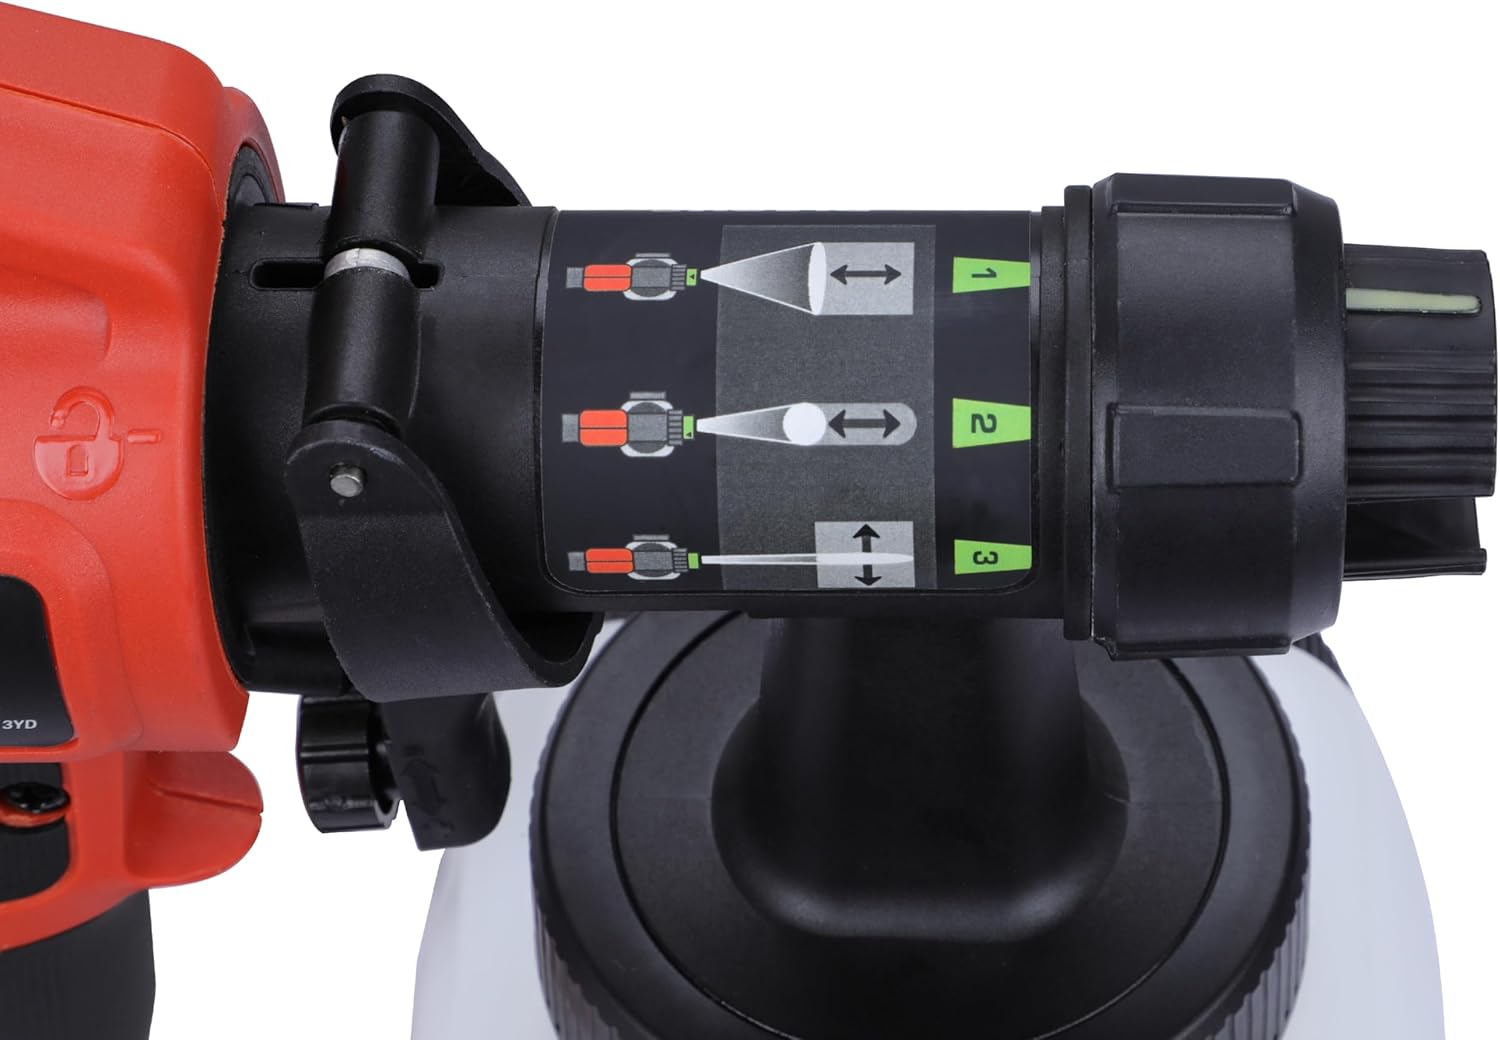
5.2 Selecting the Spray Pattern
The sprayer is equipped with a pattern select nozzle (10) offering three spray patterns for various applications.

- Horizontal Flat Jet: For applying paint up and down on surfaces.
- Circular Jet: Ideal for corners, edges, and narrow surfaces.
- Vertical Flat Jet: For applying paint side to side.
To change the spray pattern, turn the pattern select nozzle until the green indicator on the nozzle aligns with the desired pattern number (1, 2, or 3).
5.3 Adjusting Flow Control
The flow control knob (6) regulates the amount of liquid sprayed.

- Turn the flow control knob clockwise to increase the flow of liquid.
- Turn the flow control knob counter-clockwise to decrease the flow of liquid.
The flow indicator on the back of the sprayer moves upward for maximum flow and downward for minimum flow as the flow control knob is adjusted.
Note: Always test the spray pattern on scrap material to adjust the flow control knob and spray pattern for the desired finish. Thinner materials require the indicator closer to the icon, while thicker materials require it further from the icon.
5.4 Tips for Optimum Use
- Always stir and strain the material thoroughly before use.
- Ensure the surface is properly prepared, free from dust, dirt, rust, and grease. Prime highly absorbent or porous surfaces.
- Mask all edges and other areas, and use drop cloths to protect floors and unpainted areas.
- Remove any skin that forms on top of paint before mixing. Strain paint through a funnel with a filter or hosiery to remove impurities.
- Keep cleaning supplies, paper towels, and rags available for unexpected spills.
5.5 Developing Proper Spraying Technique
Practice spraying on a piece of scrap material to become familiar with the sprayer's features.
- Ensure the surface to be sprayed is clean and free of dust, dirt, and grease.
- Cover any areas not intended to be sprayed.
- Maintain a spraying distance of 25mm to 35mm from the surface.
- For large surfaces, use the 'crosshatch' method: spray in horizontal strips, then cross over with vertical strips.
- Keep your arm at a consistent distance from the surface and avoid moving your wrist to ensure even spray distribution.
- Maintain smooth and consistent speed. Begin spraying after the pass has started and release the trigger before stopping.
- Avoid spraying too heavily in one area; several lighter coats are better than one heavy coat to prevent runs and dripping.
- Turn off the power unit and clean the sprayer when not spraying for any length of time.
6. Maintenance and Cleaning
Regular cleaning and maintenance will ensure the longevity and optimal performance of your paint sprayer.
- After each use, empty any remaining material from the canister.
- Clean the canister thoroughly with an appropriate cleaning solution (water for water-based paints, mineral spirits for oil-based paints).
- Disassemble the sprayer nozzle and clean all parts with the appropriate cleaning solution and a brush. Ensure all paint residue is removed.
- Clean the exterior of the sprayer with a damp cloth. Do not immerse the motor unit in liquid.
- Regularly check and clean the air filter to ensure proper airflow and prevent overheating.
- Store the sprayer in a clean, dry place away from extreme temperatures.
7. Troubleshooting
If you encounter issues with your paint sprayer, refer to the following common problems and solutions:
- No spray or weak spray: Check if the canister is empty, material is too thick (thin as per guide), nozzle is clogged (clean thoroughly), or pickup tube is incorrectly positioned.
- Uneven spray pattern: Adjust the pattern select nozzle. Ensure consistent spraying distance and speed.
- Runs or drips: Material may be too thin or too much material is being applied. Adjust flow control knob to reduce flow or apply thinner coats.
- Sprayer not turning on: Check power connection and ensure the spray trigger is fully squeezed.
- Motor overheating: Ensure the air filter is clean and not obstructed. Allow the unit to cool down.
If problems persist, contact customer support.
8. Warranty and Support
BLACK+DECKER is committed to providing quality products and support.

Customer Care Contact:
- PHONE:1800-203-0644
MON-SAT 09:00 AM - 06:00 PM IST (Except Government Holidays) - EMAIL:SBD-CUSTOMERCOMMUNICATIONS@SBDINC.COM
Number of Authorized Service Centers: 500+ - WHATSAPP:Chat with us
+91 96060 55835