1. Product Overview
The Power Stop KOE5280 Autospecialty Front Replacement Brake Kit is engineered to restore the original braking performance of your vehicle. This kit includes Autospecialty OE Replacement Brake Rotors and high-performance Evolution ceramic pads, providing a comprehensive solution for front brake system maintenance.
Key Features:
- OE Stock Replacement: Designed to match original equipment specifications for a direct fit.
- Ceramic Brake Pads: Z17 Evolution ceramic formula offers reliable stopping power, reduced brake dust, and quiet operation.
- Precision-Made Rotors: Autospecialty non-coated rotors are mill-balanced and precision-made to ensure proper fitment and smooth operation.
- Complete Hardware: Includes stainless steel hardware for a straightforward installation.
- Vehicle Specific: Compatible with 2006 BMW 525i models manufactured from September 29, 2006, and all 2007 BMW 525i models.

Figure 1: Power Stop KOE5280 Autospecialty Front Replacement Brake Kit components.
2. Safety Information
Always prioritize safety when working on your vehicle's braking system. Improper installation or maintenance can lead to serious injury or vehicle damage. If you are not confident in your ability to perform this installation, seek assistance from a qualified automotive technician.
- Wear appropriate personal protective equipment, including safety glasses and gloves.
- Ensure the vehicle is securely supported on jack stands on a level surface before beginning work.
- Disconnect the negative battery terminal before working on any electrical components.
- Do not use petroleum-based products on rubber brake components.
- Keep brake fluid away from painted surfaces, as it can damage paint.
- Dispose of old brake components and fluids according to local regulations.
3. Product Components
The Power Stop KOE5280 kit includes the following items:
- 2x Front Autospecialty Stock Replacement Rotors
- 1x Front Z17 Ceramic Brake Pad Set with Hardware
- 1x Electronic Brake Pad Wear Sensor
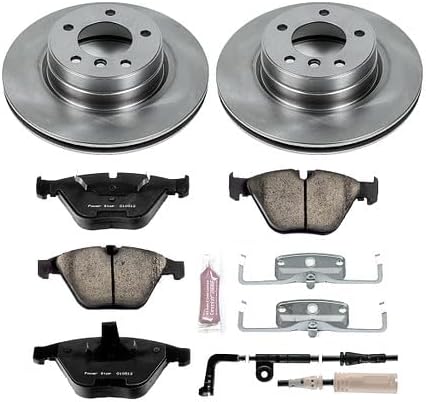
Figure 2: All components included in the Power Stop KOE5280 brake kit.
4. Installation Instructions
This section outlines the general steps for installing the Power Stop KOE5280 brake kit. Refer to your vehicle's specific service manual for detailed torque specifications and procedures.
4.1. Pre-Installation Checks
- Verify that the kit is correct for your vehicle by checking the 'Amazon Confirmed Fit' bar or your vehicle's specifications. This kit is for BMW 525i (2006-2007).
- Gather all necessary tools, including a jack, jack stands, lug wrench, socket set, torque wrench, brake cleaner, and a C-clamp or brake caliper compression tool.
- Inspect all components for any shipping damage or manufacturing defects before installation.
4.2. Removal of Old Components
- Loosen the lug nuts on the front wheels while the vehicle is on the ground.
- Raise the front of the vehicle and secure it with jack stands. Remove the front wheels.
- Locate the brake caliper and remove the caliper guide pin bolts. Carefully slide the caliper off the rotor and support it to avoid stressing the brake hose. Do not let the caliper hang by the brake hose.
- Remove the old brake pads from the caliper bracket.
- Remove the caliper bracket mounting bolts and detach the bracket.
- Remove the old brake rotor. It may be held in place by a retaining screw or simply by the wheel studs.
4.3. Installation of New Components
- Clean the wheel hub surface thoroughly to ensure the new rotor sits flush.
- Install the new Power Stop Autospecialty rotor onto the hub. Secure it with any retaining screws if applicable.
- Install the caliper bracket and tighten its mounting bolts to the manufacturer's specified torque.
- Install the new stainless steel hardware (clips) into the caliper bracket.
- Compress the caliper piston(s) using a C-clamp or brake caliper compression tool. This creates space for the thicker new pads.
- Install the new Power Stop Z17 Evolution ceramic brake pads into the caliper bracket. Ensure the wear sensor is correctly installed on the appropriate pad.
- Slide the caliper back over the new pads and rotor. Reinstall and tighten the caliper guide pin bolts to the manufacturer's specified torque.
- Reconnect the electronic brake pad wear sensor.
- Repeat the process for the other front wheel.
- Reinstall the wheels and hand-tighten the lug nuts.
- Lower the vehicle and fully tighten the lug nuts in a star pattern to the manufacturer's specified torque.

Figure 3: Illustration of brake pad installation.

Figure 4: Power Stop rotors are precision-made for optimal fit and balance.

Figure 5: Dual-layer rubberized shims contribute to noise-free braking.

Figure 6: Premium stainless steel hardware is included for durability and ease of installation.
5. Operating (Brake Break-In Procedure)
After installing new brake pads and rotors, a proper break-in procedure is crucial for optimal performance and longevity. This process beds the pads to the rotors, ensuring maximum friction and preventing premature wear or noise.
- Perform 5-6 moderate stops from 40 mph down to 10 mph. Avoid coming to a complete stop.
- Allow the brakes to cool for 10-15 minutes by driving at a moderate speed without heavy braking.
- Perform 2-3 hard stops from 50 mph down to 10 mph. Again, avoid coming to a complete stop.
- Allow the brakes to cool completely for at least 30 minutes.
During the break-in period, avoid sudden hard braking or prolonged heavy braking, which can overheat the components and cause glazing.
6. Maintenance
Regular inspection and maintenance of your braking system are essential for safety and performance.
- Routine Inspection: Inspect brake pads and rotors every 10,000-12,000 miles or during tire rotations. Check for uneven wear, cracks, or excessive rust on rotors, and measure pad thickness.
- Brake Fluid: Check brake fluid level and condition regularly. Consult your vehicle's manual for recommended brake fluid replacement intervals.
- Cleaning: Use a dedicated brake cleaner to remove dust and debris from calipers, pads, and rotors during inspections. This helps maintain optimal performance and reduces brake dust accumulation on wheels.

Figure 7: Power Stop ceramic pads are designed for low dust, keeping wheels cleaner.
7. Troubleshooting
If you experience issues with your braking system after installation, consider the following common problems and solutions:
- Brake Noise (Squealing/Grinding):
- Ensure proper break-in procedure was followed.
- Check for proper installation of anti-rattle clips and shims.
- Verify that all components are clean and free of debris.
- Inspect for uneven rotor wear or pad glazing.
- Vibration/Pulsation:
- Check for proper lug nut torque.
- Ensure rotors are seated flush against the hub; clean hub surface if necessary.
- Inspect rotors for runout or warping (though new rotors are unlikely to be warped).
- Reduced Braking Performance:
- Ensure proper break-in procedure was completed.
- Check for air in the brake lines (requires bleeding the brake system).
- Verify correct installation of all components.
If issues persist, consult a professional mechanic.
8. Specifications
| Brand | Power Stop |
| Model Number | KOE5280 |
| Vehicle Service Type | Car, Truck |
| Year Compatibility | 2006 (from 9/29/06), 2007 BMW 525i |
| Position | Front |
| Item Weight | 40.8 pounds |
| Product Dimensions | 14 x 14 x 12 inches |
| UPC | 792088969958 |
9. Environmental Compliance (Leaf Mark)
Power Stop brake pads comply with copper-free legislation in California and Washington, indicated by the 'Leaf Mark' symbol on the product packaging. This symbol guarantees that the brake pads meet specified levels for harmful materials, protecting fish and other wildlife from contaminants like copper, nickel, zinc, asbestiform fibers, cadmium, chromium, mercury, and lead.
There are three levels of restriction: N, B, and A. Level A, currently required in California (since 2014) and Washington (since 2015), restricts asbestiform fibers, cadmium, chromium, lead, and mercury to very low percentages. Level B, required by 2021, further restricts copper to less than 5%. Level N, to be instituted in California by 2025, will require less than 0.5% copper.
Video 1: Explanation of the Copper Leaf Mark and environmental compliance for brake pads.
10. Warranty & Support
This Power Stop brake kit comes with a 24 Month / 24,000 Miles Warranty. For warranty claims or technical support, please contact Power Stop customer service directly.
For additional information and resources, visit the official Power Stop website: www.powerstop.com
Video 2: Overview of Power Stop Autospecialty Kit features and benefits.