
Introduction
This manual provides essential instructions for the safe and efficient operation, maintenance, and troubleshooting of your Janome 2212 FullSize Freearm Sewing Machine. Please read this manual thoroughly before using the machine to ensure proper function and longevity.
Important Safety Instructions
- Always unplug the machine from the electrical outlet when removing covers, lubricating, or when making any other user servicing adjustments mentioned in the instruction manual.
- Do not operate the machine with damaged cord or plug. If it is not working properly, has been dropped or damaged, or dropped into water, return the machine to the nearest authorized dealer or service center for examination, repair, electrical or mechanical adjustment.
- Never operate the machine with any air openings blocked. Keep ventilation openings of the sewing machine and foot controller free from the accumulation of lint, dust, and loose cloth.
- Keep fingers away from all moving parts. Special care is required around the sewing machine needle.
- Always use the proper needle plate. The wrong plate can cause the needle to break.
- Do not pull or push fabric while stitching. This may deflect the needle causing it to break.
- Use only accessories recommended by the manufacturer as contained in this manual.
Product Overview
The Janome 2212 is a versatile full-size freearm sewing machine designed for ease of use and reliability. It features 12 built-in stitches, including a four-step buttonhole, and offers advanced features like a free arm and drop feed for various sewing projects.

Figure 1: Front view of the Janome 2212 Sewing Machine.
Included Accessories:
- 3 Bobbins
- Needles
- Feet (Blindhem Foot G, H Foot, Sliding Buttonhole Foot B, Zipper Foot E)
- Seam Ripper
- Foot Controller with Cords
- Instruction Manual

Figure 2: Included accessories for the Janome 2212.
Setup
1. Power Connection
Connect the foot controller cord to the machine's power socket and then plug the machine into a suitable electrical outlet. Ensure the machine is turned off before plugging or unplugging.
2. Spool Pin Setup
Place your thread spool onto the spool pin located on top of the machine. The spool pins can be pulled up for use and pushed down for storage.

Figure 3: Spool pins for thread placement.
3. Winding the Bobbin
Proper bobbin winding is crucial for consistent stitch quality. Follow these steps or refer to the video demonstration below:
- Remove the free arm plate by sliding it off to the left.
- Open the bobbin case cover and remove the bobbin case by pulling the small flag. Remove any existing bobbin.
- Place an empty bobbin onto the bobbin winder spindle.
- Take the thread from the spool pin, guide it under the bobbin tensioner spring, and then thread it through the small hole on the bobbin from the inside out.
- Push the bobbin winder spindle to the right.
- While holding the thread tail, gently press the foot controller to start winding. The machine will stop automatically when the bobbin is full.
- Once winding is complete, push the bobbin winder spindle back to the left, remove the bobbin, and cut the thread using the built-in thread cutter on the side of the machine.
Video 1: Demonstration of bobbin winding on the Janome 2212 Sewing Machine. This video shows how to correctly load the thread onto the bobbin and use the machine's bobbin winder function.
4. Threading the Machine
Follow the numbered threading path indicated on the machine. Ensure the presser foot is raised and the needle is in its highest position before threading.
- Guide the thread from the spool pin through the upper thread guide.
- Bring the thread down the right channel, around the tension disc, and up the left channel.
- Pass the thread through the take-up lever from right to left.
- Guide the thread down through the remaining thread guides to the needle.
- Thread the needle from front to back.
- Place the wound bobbin into the bobbin case, ensuring the thread unwinds in the correct direction (usually counter-clockwise). Insert the bobbin case back into the machine.
- Turn the handwheel towards you to lower and raise the needle, catching the bobbin thread. Pull both threads under the presser foot and towards the back.

Figure 4: Detailed view of the needle and presser foot area, showing the threading path.
Operating the Machine
1. Stitch Selection
The Janome 2212 offers 12 built-in stitches. Use the Selector Dial on the front of the machine to choose your desired stitch pattern (A-G, or buttonhole options). The selected stitch will be displayed in the window.
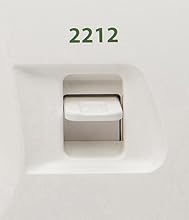
Figure 5: Stitch Selector Dial.

Figure 6: Stitch Pattern Display.
2. Stitch Length Adjustment
Adjust the stitch length using the Length Dial. Turn the dial to select the desired stitch length from 0 to 4. For stretch stitches (S.S.), refer to the manual for specific settings.
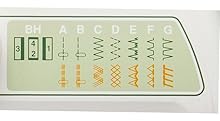
Figure 7: Stitch Length Dial.
3. Free Arm Operation
To use the free arm for sewing cuffs, sleeves, or other small circular items, simply slide off the accessory box (free arm plate) from the base of the machine. This exposes the narrow free arm.
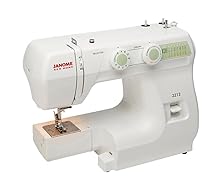
Figure 8: Machine with free arm exposed.
4. Drop Feed Function
The drop feed lever is located on the back of the free arm. Lowering the feed dogs allows for free-motion sewing, darning, or embroidery. Raise the feed dogs for regular sewing.
5. Four-Step Buttonhole
The Janome 2212 includes a four-step buttonhole function. Attach the sliding buttonhole foot B and follow the markings on the stitch selector for each step to create a perfect buttonhole.
Maintenance
1. Cleaning the Machine
Regular cleaning helps maintain your machine's performance. Unplug the machine before cleaning.
- Lint Removal: Remove the needle plate and bobbin case. Use a small brush to remove lint and dust from the feed dogs and bobbin area.
- Exterior Cleaning: Wipe the exterior surfaces with a soft, damp cloth. Do not use harsh chemicals.
2. Needle Replacement
Replace the needle regularly (after 8-10 hours of sewing or when it becomes dull/bent) to prevent skipped stitches and fabric damage. Use only Janome-approved needles suitable for your fabric type.
- Turn off the machine and raise the needle to its highest position.
- Loosen the needle clamp screw and remove the old needle.
- Insert the new needle with the flat side facing the back of the machine, pushing it up as far as it will go.
- Tighten the needle clamp screw securely.
Troubleshooting
| Problem | Possible Cause | Solution |
|---|---|---|
| Skipped Stitches | Incorrect needle, bent needle, improper threading, wrong needle size for fabric. | Replace needle, re-thread machine, ensure correct needle type/size. |
| Thread Breaking | Incorrect tension, poor quality thread, needle bent or dull, improper threading. | Adjust tension, use quality thread, replace needle, re-thread machine. |
| Fabric Puckering | Incorrect tension, wrong stitch length, pulling fabric. | Adjust tension, select appropriate stitch length, guide fabric gently. |
| Machine Not Starting | Power cord not plugged in, foot controller not connected, bobbin winder engaged. | Check power connections, ensure bobbin winder is disengaged (pushed left). |
Specifications
- Model: Janome 2212
- Stitch Count: 12 built-in stitches
- Stitch Speed: Up to 860 stitches per minute (SPM)
- Buttonhole: 4-step buttonhole
- Arm Type: Full-size freearm
- Dimensions: Approximately 15.2 x 11.6 x 6 inches (Product Dimensions)
- Weight: Approximately 14 pounds
- Power Source: AC
- Material: Metal (internal frame), Plastic (exterior casing)
Warranty and Support
For warranty information, service, or technical support, please refer to the warranty card included with your purchase or contact Janome customer service directly. Keep your proof of purchase for warranty claims.
Additional resources and FAQs may be available on the official Janome website.


