Introduction
This manual provides detailed instructions for the installation, operation, and maintenance of your Soundstream PN4.320D 4-Channel Picasso Nano Class-D Amplifier. This amplifier is designed to deliver high-quality audio performance in a compact form factor. Please read this manual thoroughly before installation and use to ensure proper function and safety.
Setup and Installation
Proper installation is crucial for optimal performance and safety. If you are unsure about any part of the installation process, consult a professional installer.
1. Mounting the Amplifier
Choose a secure, dry location for mounting the amplifier, away from direct sunlight and heat sources. Ensure adequate ventilation around the unit. Use the provided mounting hardware to secure the amplifier firmly.
2. Power Connections
- Battery (B+) Connection: Connect a heavy-gauge power cable directly from the vehicle's positive battery terminal to the amplifier's B+ terminal. Install an appropriate fuse (not supplied) within 18 inches of the battery.
- Ground (GND) Connection: Connect a heavy-gauge ground cable from the amplifier's GND terminal to a clean, unpainted metal surface on the vehicle chassis. Ensure a solid, low-resistance connection.
- Remote (REM) Turn-On Connection: Connect a remote turn-on wire from your head unit's remote output to the amplifier's REM terminal. This wire turns the amplifier on and off with your head unit.
3. Input Connections
The PN4.320D supports both RCA (low-level) and High-Level inputs.
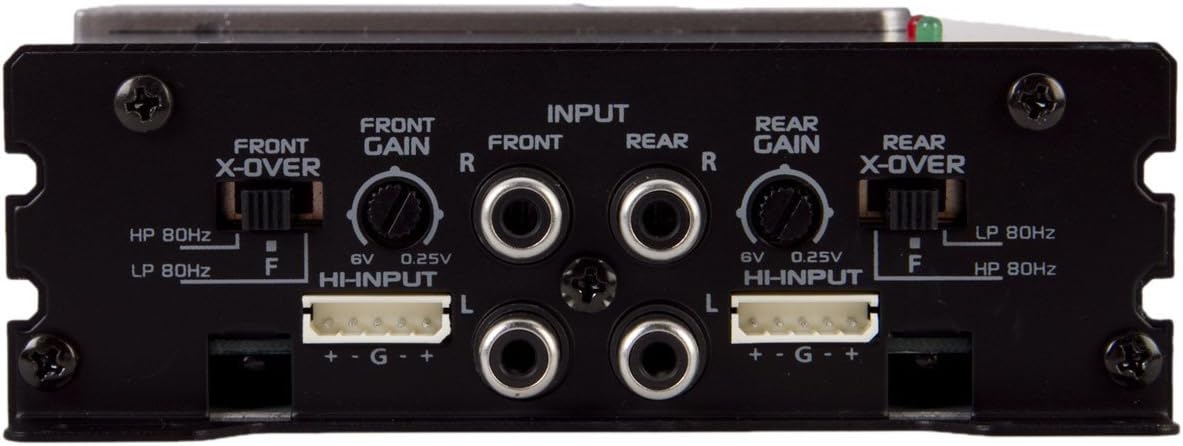
Image 1: Rear panel of the Soundstream PN4.320D amplifier, illustrating the input connections, gain controls, and crossover switches for both front and rear channels. This view shows the RCA inputs, high-level input connectors, and crossover frequency selectors.
- RCA Inputs (Low-Level): Connect RCA cables from your head unit's pre-amp outputs to the corresponding "FRONT" and "REAR" RCA input jacks on the amplifier. Ensure correct left (L) and right (R) channel connections.
- High-Level Inputs: If your head unit does not have RCA outputs, use the provided high-level input harness. Connect the speaker wires from your head unit to the high-level input connector. The image shows "HHNPUT" connectors with "+ - G +" labels for both front and rear channels. Connect the positive and negative speaker wires from your head unit to the corresponding terminals on the high-level input harness.
4. Speaker Connections
Connect your speakers to the amplifier's speaker output terminals. Ensure correct polarity (+ to + and - to -) for all speakers. This amplifier is a 4-channel unit, allowing connection of up to four speakers or two speakers in bridged mode (refer to specific wiring diagrams for bridged mode, not detailed here).
5. Initial Settings (Refer to Image 1)
- Gain Control: The "FRONT GAIN" and "REAR GAIN" knobs adjust the input sensitivity. Start with the gain set to minimum (0.25V) and slowly increase it until the desired volume is achieved without distortion. The range is typically 0.25V to 6V.
- Crossover (X-OVER) Switches: Each channel pair (Front and Rear) has a crossover switch.
- HP 80Hz: High-Pass filter set at 80Hz. This allows frequencies above 80Hz to pass, typically used for full-range speakers to prevent low bass distortion.
- LP 80Hz: Low-Pass filter set at 80Hz. This allows frequencies below 80Hz to pass, typically used for subwoofers.
- F (Full Range): Disables the crossover, allowing all frequencies to pass.
Adjust these switches according to your speaker type and desired sound reproduction. For example, if using full-range speakers, you might set it to HP 80Hz or F. If using a subwoofer on a bridged channel, you would set it to LP 80Hz.
Operating Instructions
Once the amplifier is properly installed and configured, operating it is straightforward.
- Power On/Off: The amplifier will automatically turn on when your head unit is powered on (via the remote turn-on wire) and turn off when the head unit is off.
- Volume Control: Adjust the overall system volume using your head unit's volume control. The amplifier's gain controls are for matching the input signal level, not for daily volume adjustments.
- Audio Adjustments: Fine-tune your audio experience using the crossover settings on the amplifier and any equalization features on your head unit.
Maintenance
The Soundstream PN4.320D amplifier requires minimal maintenance to ensure long-term performance.
- Cleaning: Periodically wipe the amplifier's exterior with a soft, dry cloth to remove dust. Do not use harsh chemicals or abrasive cleaners.
- Ventilation: Ensure that the amplifier's cooling fins are not obstructed to allow for proper heat dissipation.
- Connections: Occasionally check all power, ground, and speaker connections to ensure they remain secure and free from corrosion.
Troubleshooting
If you experience issues with your amplifier, refer to the following common problems and solutions before contacting support.
| Problem | Possible Cause | Solution |
|---|---|---|
| No Power / Amplifier Not Turning On |
|
|
| No Sound Output |
|
|
| Distorted Sound |
|
|
| Amplifier Overheating |
|
|
Specifications
Key technical specifications for the Soundstream PN4.320D amplifier:
- Model: PN4.320D
- Channels: 4-Channel
- Amplifier Class: Class D
- RMS Power Rating (4 ohms): 60 watts x 4 channels
- RMS Power Rating (2 ohms): 80 watts x 4 channels
- Max Power Output: 320 watts
- Crossover Settings (Front/Rear): Selectable High-Pass (HP 80Hz), Low-Pass (LP 80Hz), or Full Range (F)
- Variable Low-Pass Filter: 50-250 Hz, 24 dB/octave (May be an internal adjustment or on another panel not shown)
- Subsonic Filter: 12 dB at 10-50 Hz
- Variable Bass Boost: 0 to +12 dB at 45 Hz
- Phase Switch: 180 degree
- Power Supply: Pulse Width Modulated MOSFET
- Input Sensitivity: 0.25V - 6V (High-Level Input)
- Dimensions (L x W x H): 7 x 4.75 x 2 inches
Warranty and Support
Soundstream products are designed for reliability and performance. For specific warranty information, please refer to the warranty card included with your product or visit the official Soundstream website. For technical support or service inquiries, please contact Soundstream customer service.


