1. Introduction
The My Weigh iBalance 201 is a high-quality table top precision scale designed for accurate weighing up to 200 grams with a readability of 0.01 grams. This manual provides essential information for setting up, operating, and maintaining your scale to ensure optimal performance and longevity.
Key features include a digital display, multiple weighing units, tare function, and a protective windscreen. The scale can be powered by an AC adapter or batteries, offering versatility for various environments.
2. Product Overview
The iBalance 201 scale features a compact design with a stainless steel weighing platform and an intuitive control panel.

Figure 2.1: My Weigh iBalance 201 Precision Scale with digital display and control buttons.
2.1 Components
- Weighing Platform: Stainless steel surface for placing items to be weighed.
- Digital Display: Shows weight readings, unit indicators, and other status icons.
- Control Buttons: Power (①), UNITS, Z (Tare), PCS (Counting).
- Adjustable Feet: Located on the bottom, used for leveling the scale.
- Bubble Level: Integrated indicator for ensuring the scale is level.
- AC Adapter Port: For connecting the power adapter.
- Battery Compartment: For optional battery power (4 AA batteries, not included).
- Protective Windscreen: Clear enclosure to minimize air current interference during weighing.
- Calibration Weight: A 200g calibration weight is included for accurate calibration.
3. Setup
3.1 Unpacking
Carefully remove all components from the packaging. Inspect the scale and accessories for any signs of damage. Retain the packaging for future storage or transport.
3.2 Powering the Scale
- AC Power: Connect the provided AC adapter to the scale's power port and plug it into a suitable electrical outlet.
- Battery Power: Open the battery compartment on the underside of the scale and insert 4 AA batteries, observing correct polarity.
3.3 Leveling the Scale
For accurate measurements, the scale must be perfectly level. Place the scale on a stable, flat surface. Adjust the four adjustable feet on the bottom of the scale until the bubble in the integrated level indicator is centered.
3.4 Assembling the Windscreen
The clear plastic windscreen helps to prevent air currents from affecting sensitive measurements. Assemble the panels by sliding them into the designated grooves on the scale base and connecting the top frame. Ensure all panels are securely fitted.

Figure 3.1: My Weigh iBalance 201 Precision Scale with the protective windscreen assembled.
3.5 Calibration
Calibration ensures the scale provides accurate readings. It is recommended to calibrate the scale before first use and periodically thereafter, or if the scale is moved.
- Turn the scale ON and allow it to warm up for a few minutes.
- Ensure the scale is empty and stable.
- Refer to the specific calibration procedure outlined in the separate quick start guide or on the manufacturer's website for detailed steps. Typically, this involves pressing a specific button sequence and placing the 200g calibration weight on the platform when prompted.
- The display will indicate successful calibration or an error message (e.g., "FAIL"). If an error occurs, re-check the environment for drafts, ensure the scale is level, and repeat the process.
4. Operating Instructions
4.1 Turning On/Off
- Press the ON/OFF button (①) to turn the scale on.
- Press and hold the ON/OFF button (①) to turn the scale off.
4.2 Changing Weighing Units
Press the UNITS button to cycle through available weighing units (e.g., grams, ounces, carats, grains, etc.). The active unit will be displayed on the screen.
4.3 Tare Function
The tare function allows you to subtract the weight of a container, so only the net weight of the contents is measured.
- Place an empty container on the weighing platform.
- Press the Z button. The display will reset to zero.
- Add the items to be weighed into the container. The display will show only the weight of the items.
4.4 Weighing Procedure
- Ensure the scale is on and displaying zero. If not, press the Z button.
- Carefully place the item to be weighed onto the center of the weighing platform.
- Wait for the reading to stabilize. The stability indicator (often a small circle or icon) will appear on the display when the reading is stable.
- Read the weight displayed.
4.5 Counting Function (PCS)
The counting function allows you to count a large number of small, uniform items.
- Place a sample quantity of items (e.g., 10, 20, 50, or 100 pieces) on the platform.
- Press and hold the PCS button until the display shows a prompt for sample size (e.g., P10, P20).
- Press the PCS button repeatedly to select the sample size that matches the number of items you placed.
- Press the Z button to confirm. The display will show the count of the sample.
- Add more items to be counted. The display will show the total count.
5. Maintenance
5.1 Cleaning
To clean the scale, use a soft, damp cloth with a mild detergent. Do not use abrasive cleaners or immerse the scale in water. Ensure the scale is unplugged and turned off before cleaning.
5.2 Storage
When not in use, store the scale in a clean, dry environment, away from extreme temperatures, humidity, and direct sunlight. If storing for an extended period, remove the batteries to prevent leakage.
6. Troubleshooting
- Scale does not turn on: Check AC adapter connection or ensure batteries are correctly inserted and not depleted.
- Inaccurate readings / Unstable display:
- Ensure the scale is on a stable, level surface.
- Check the bubble level and adjust feet if necessary.
- Ensure no air currents (from fans, open windows, air conditioning) are affecting the scale, especially when the windscreen is not used or improperly assembled.
- Recalibrate the scale using the 200g calibration weight.
- Ensure the weighing platform is clean and free of debris.
- "FAIL" message during calibration: This indicates a calibration error. Verify the scale is level, the environment is stable (no drafts), and the correct calibration weight (200g) is used and placed correctly on the platform when prompted. Repeat the calibration process carefully.
- Display shows "OVERLOAD" or "EEEE": The weight on the platform exceeds the scale's maximum capacity (200g). Remove the excess weight immediately to prevent damage.
- Scale does not register small weights (e.g., below 100mg): While the scale has a 0.01g readability, very small weights might require extreme environmental stability and careful placement. Ensure no vibrations or air movements.
7. Specifications
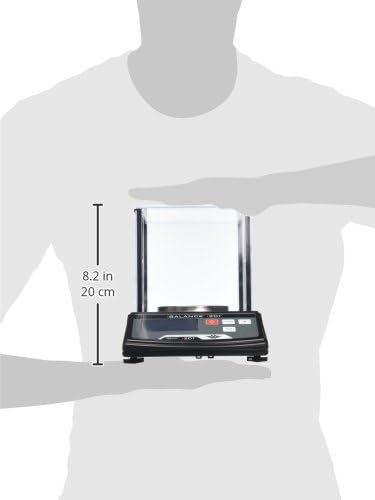
Figure 7.1: Approximate dimensions of the My Weigh iBalance 201 Precision Scale.
| Feature | Detail |
|---|---|
| Brand | My Weigh |
| Model Number | SCM201 |
| Display Type | Digital |
| Weight Limit | 200 Grams |
| Readout Accuracy | 0.01 grams |
| Item Weight | 3.5 Pounds (approx. 1.59 kg) |
| Product Dimensions | 8.7 x 5.4 x 11.7 inches (approx. 22.1 x 13.7 x 29.7 cm) |
| Power Source | AC Adapter or 4 AA Batteries (not included) |
| Included Components | Scale, 200g Calibration Weight, AC Adapter |
| Country of Origin | China |
8. Warranty and Support
Specific warranty details for the My Weigh iBalance 201 Precision Scale are not provided in this manual. For information regarding product warranty, technical support, or service, please contact My Weigh directly through their official website or customer service channels.
Always refer to the manufacturer's official documentation for the most current and accurate warranty information and support procedures.


