Introduction
This user manual provides detailed instructions for the safe and effective operation, setup, and maintenance of your Yellow Jacket Mechanical Manifold Gauge Set. Designed for use with R-410A refrigerants, this 2-valve manifold gauge set is an essential tool for air conditioning and stationary refrigeration systems, offering precise pressure readings and reliable performance.
Safety Information
WARNING: Always read and understand all instructions before operating this equipment. Failure to follow these instructions may result in property damage, serious injury, or death.
- Always wear appropriate Personal Protective Equipment (PPE), including safety glasses and gloves, when working with refrigerants.
- Refrigerants can cause frostbite upon contact with skin or eyes. In case of contact, flush with water and seek immediate medical attention.
- Work in a well-ventilated area to prevent the accumulation of refrigerant vapors.
- Never expose refrigerant cylinders to direct heat or open flames.
- Ensure all connections are tight before pressurizing the system to prevent leaks.
- Do not over-pressurize the system. Refer to equipment manufacturer specifications for correct pressure ranges.
- Only use this manifold gauge set with refrigerants it is designed for (R-410A). Using it with incompatible refrigerants can lead to equipment damage or safety hazards.
- If you are unsure about any procedure, consult a qualified HVAC professional.
Product Overview
The Yellow Jacket Mechanical Manifold Gauge Set is a robust tool designed for accurate measurement of pressure in air conditioning and refrigeration systems. It features two large, easy-to-read gauges and a durable brass manifold body.
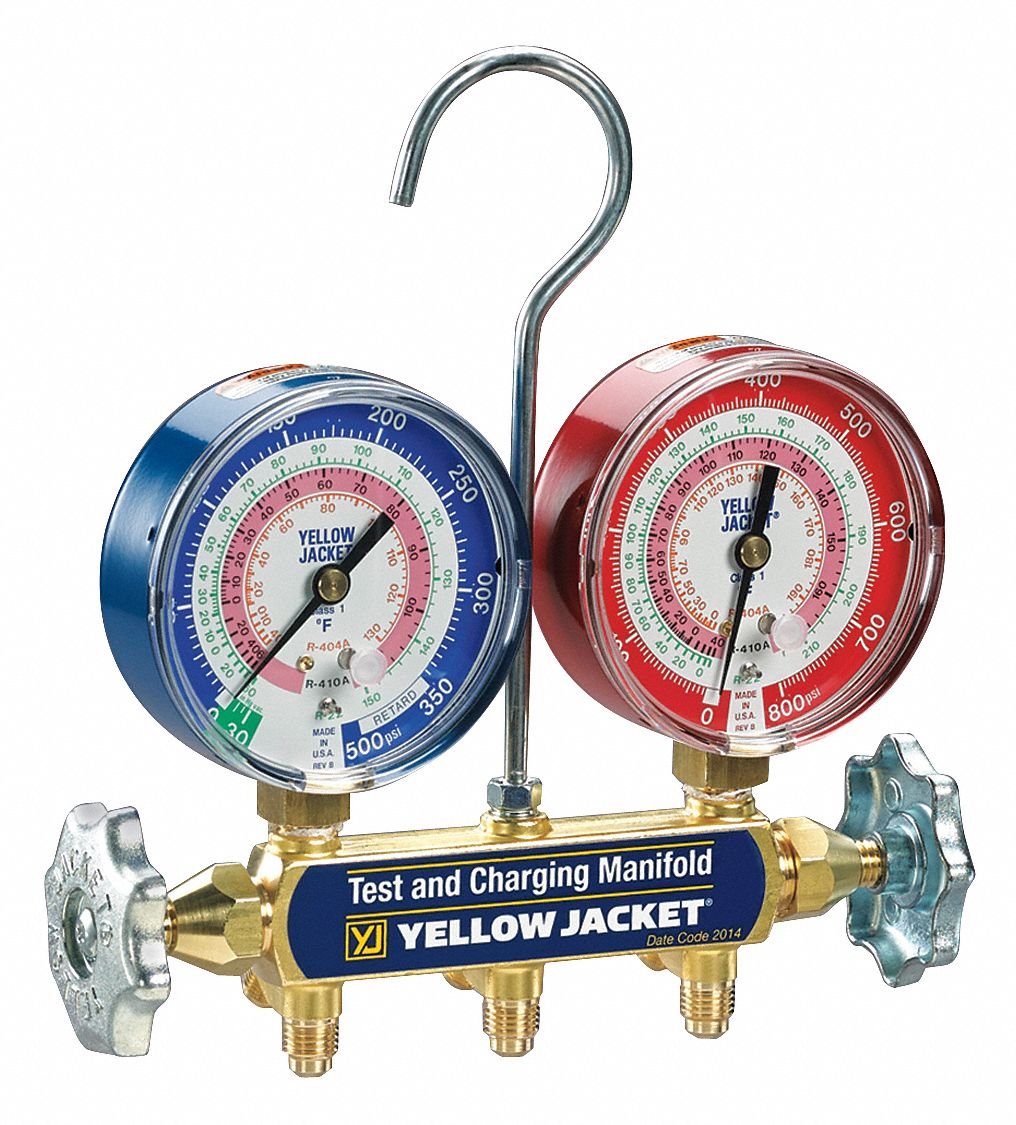
Image: Yellow Jacket Mechanical Manifold Gauge Set, featuring a brass manifold body, two large gauges (blue for low pressure, red for high pressure), and three color-coded hoses (red, yellow, blue).
Key Components:
- Manifold Body: Constructed from forged brass for durability, featuring two handwheels for controlling refrigerant flow.
- High-Pressure Gauge (Red): Measures pressure from 0 to 800 psig, typically connected to the high-side service port.
- Low-Pressure Gauge (Blue): Measures pressure from 30 In. Hg (vacuum) to 350 psi, typically connected to the low-side service port.
- Service Ports: 1/4" connections for hoses.
- Hoses: Color-coded (red, yellow, blue) for easy identification of high-side, low-side, and utility connections.
- Swivel Hook: For convenient hanging during use.
Setup
Unpacking and Initial Inspection
- Carefully remove all components from the packaging.
- Inspect the manifold, gauges, and hoses for any signs of damage. Do not use if any component is damaged.
- Ensure all valve stems are fully closed (turned clockwise) before connecting hoses.
Connecting Hoses to the Manifold
- Connect the red hose to the high-pressure port on the manifold (typically marked "HIGH" or red).
- Connect the blue hose to the low-pressure port on the manifold (typically marked "LOW" or blue).
- Connect the yellow hose to the central service port on the manifold (this is the utility port for vacuum pump, refrigerant tank, or recovery unit).
- Ensure all hose connections are finger-tight, then use a wrench to tighten them an additional quarter turn to ensure a leak-free seal. Do not overtighten.
General Manifold Gauge Set Demonstration
Video: A general demonstration of a manifold gauge set, showing its components and basic handling. This video is provided by Native Pure and is for illustrative purposes of manifold gauge sets.
Video: Another general overview of a test and charging manifold set, demonstrating its features and connections. This video is provided by Felix Nova and is for illustrative purposes of manifold gauge sets.
Video: A demonstration of a test and charging manifold with color-coded gauges, showing how to connect hoses. This video is provided by Native Pure and is for illustrative purposes of manifold gauge sets.
Operating Instructions
This section outlines common procedures using the manifold gauge set. Always refer to the specific service manual for the HVAC system you are working on for exact pressure specifications and procedures.
Pressure Testing (Static Pressure)
- Ensure the HVAC system is off and all manifold valves are closed.
- Connect the blue hose to the low-side service port and the red hose to the high-side service port of the HVAC system.
- Slowly open the low-side (blue) and high-side (red) valves on the manifold.
- Read the static pressures on both gauges. Compare these readings to the manufacturer's specifications for the system.
- Close the manifold valves and disconnect the hoses.
Refrigerant Charging (Liquid or Vapor)
- Perform a vacuum on the system first (see "Vacuuming the System" below).
- Connect the blue hose to the low-side service port and the red hose to the high-side service port of the HVAC system.
- Connect the yellow hose to the refrigerant cylinder. Ensure the cylinder is upright for vapor charging or inverted for liquid charging, as per system requirements.
- Purge air from the yellow hose by slightly opening the manifold valve connected to the yellow hose for a brief moment, then closing it.
- Start the HVAC system in cooling mode.
- Slowly open the low-side (blue) manifold valve to allow refrigerant to enter the system. Monitor the low-side pressure gauge and the refrigerant weight (if using a scale).
- Charge small amounts at a time, allowing the system to stabilize between charges. Do not overcharge.
- Once the desired charge is reached, close the low-side manifold valve and the refrigerant cylinder valve.
- Quickly disconnect the blue hose from the low-side service port to minimize refrigerant loss.
Vacuuming the System
- Ensure the HVAC system is off and all manifold valves are closed.
- Connect the blue hose to the low-side service port and the red hose to the high-side service port of the HVAC system.
- Connect the yellow hose to a vacuum pump.
- Open both the low-side (blue) and high-side (red) manifold valves.
- Start the vacuum pump. Monitor the low-pressure gauge; it should drop into a deep vacuum (below 0 psi, into the "In. Hg" range).
- Allow the pump to run until the desired vacuum level is achieved and held for a specified period (refer to system manufacturer guidelines).
- Close both manifold valves, then turn off the vacuum pump.
- Observe the low-pressure gauge for any rise in pressure, which would indicate a leak in the system.
- Once the vacuum is held, disconnect the yellow hose from the vacuum pump.
Maintenance
Cleaning
- After each use, wipe down the manifold and hoses with a clean, dry cloth to remove any refrigerant oil or debris.
- Periodically check hose gaskets and O-rings for wear or damage. Replace as needed to prevent leaks.
Storage
- Store the manifold gauge set in a clean, dry place, preferably in its original case or a protective bag.
- Utilize the dummy ports on the manifold to store the ends of the hoses, protecting the seals from damage and preventing contaminants from entering the hoses.
- Keep the gauges in a position where they are not subjected to impact or excessive vibration.
Calibration
- The gauges are factory calibrated. If you suspect inaccuracy, consult a qualified technician for recalibration or replacement.
Troubleshooting
| Problem | Possible Cause | Solution |
|---|---|---|
| Gauge not reading pressure | Valve closed; clogged hose; faulty gauge. | Ensure manifold valves are open; check hoses for obstructions; replace faulty gauge. |
| Refrigerant leak at connections | Loose connections; worn O-rings/gaskets. | Tighten connections; replace O-rings/gaskets. |
| Inaccurate pressure readings | Gauge out of calibration; extreme temperature changes. | Have gauges recalibrated; allow gauges to acclimate to ambient temperature. |
| Difficulty turning manifold valves | Dirt/debris in valve mechanism; valve stem corrosion. | Clean valve area; apply a small amount of refrigerant oil to valve stem (if applicable and safe). |
Specifications
- Refrigerant Application: R-410A
- Number of Valves: 2
- Low-Side Gauge Range: 30 In. Hg (vacuum) to 350 psi
- High-Side Gauge Range: 0 to 800 psig
- Gauge Accuracy: +/-1.00%
- Vacuum Port Size: 1/4"
- Material: Forged Brass (Manifold Body)
- Product Dimensions: 9.5 x 8.4 x 3 inches
- Item Weight: 0.01 ounces (Note: This weight seems unusually low and may be a data entry error. Actual weight will be higher.)
- Manufacturer: YELLOW JACKET
- Country of Origin: United States
Warranty and Support
For warranty information, technical support, or service inquiries, please refer to the official Yellow Jacket website or contact their customer service department. Keep your purchase receipt as proof of purchase for any warranty claims.