1. Introduction
Thank you for choosing the BW Deluxe Wireless Baby Monitor. This device is designed to provide reliable monitoring of your baby, offering peace of mind with its advanced features. This manual will guide you through the setup, operation, and maintenance of your baby monitor system.

Image 1.1: The BW Deluxe Wireless Baby Monitor system, featuring the camera unit on the left and the handheld monitor unit on the right. The monitor displays a sleeping baby.
2. Package Contents
Please check the package contents to ensure all items are present:
- BW Deluxe Wireless Baby Monitor Camera Unit
- BW Deluxe Wireless Baby Monitor Handheld Unit (with 2.3-inch LCD)
- Power Adapter (x2) for Camera and Monitor
- Antenna (for camera)
- AV Cable
- Earphone
- User Manual (this document)
- Free Travel Adapter (may vary by region)

Image 2.1: All components included in the BW Deluxe Wireless Baby Monitor package. This includes the camera, monitor, two power adapters, a user manual, an antenna, an earphone, an AV cable, and a free travel adapter.
3. Product Overview
3.1 Camera Unit
The camera unit features a dome-shaped design with a pan and tilt mechanism, infrared LEDs for night vision, and a built-in microphone.
- Lens: Captures video feed.
- Infrared LEDs: Provide illumination for night vision.
- Microphone: Detects audio from the baby's room.
- Antenna Port: For connecting the wireless antenna.
- Power Input: For connecting the AC power adapter.
- Pan/Tilt Mechanism: Allows remote adjustment of camera view.
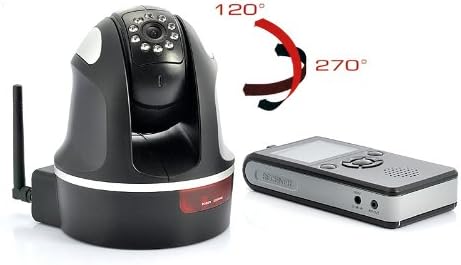
Image 3.1: The camera unit of the BW Deluxe Wireless Baby Monitor, illustrating its 270-degree pan and 120-degree tilt movement capabilities.
3.2 Handheld Monitor Unit
The handheld monitor unit features a 2.3-inch color LCD screen, speaker, control buttons, and a built-in rechargeable battery.
- 2.3-inch Color LCD Screen: Displays real-time video feed.
- Speaker: Outputs audio from the camera.
- Control Buttons: For navigation, zoom, pan/tilt, and menu access.
- Power Button: Turns the monitor on/off.
- AV Output Port: For connecting to an external display (e.g., TV).
- Earphone Jack: For private listening.
- Power Input: For connecting the AC power adapter.
- Antenna: For wireless signal reception.

Image 3.2: Side view of the handheld monitor unit, highlighting the AV output port, earphone jack, and power input port.
4. Setup
4.1 Camera Placement
- Place the camera unit in your baby's room, ensuring it has a clear, unobstructed view of the crib or play area.
- For optimal viewing, consider wall mounting the camera. Ensure it is out of reach of children.
- Position the camera at least 1 meter (3 feet) away from the baby to avoid potential entanglement with cords.
4.2 Powering On
- Camera Unit: Connect one of the provided power adapters to the camera unit's power input port and then plug it into a standard electrical outlet. The camera will power on automatically.
- Monitor Unit: Connect the second power adapter to the monitor unit's power input port and plug it into an electrical outlet. Press and hold the Power button on the monitor until the screen illuminates.
- Allow a few seconds for the camera and monitor to establish a wireless connection. The video feed from the camera should appear on the monitor screen.
4.3 Initial Pairing (if needed)
In most cases, the camera and monitor are pre-paired. If the monitor does not display a video feed after powering on, you may need to manually pair them:
- Access the menu on the handheld monitor unit.
- Navigate to the "Pairing" or "Add Camera" option.
- Follow the on-screen instructions to initiate the pairing process. This usually involves pressing a pairing button on the camera unit within a specific timeframe.
- Once successfully paired, the video feed will appear.
5. Operating Instructions
5.1 Viewing the Live Feed
Once powered on and paired, the monitor will automatically display the live video feed from the camera. The 2.3-inch color LCD provides a clear view of your baby's room.
5.2 Pan, Tilt, and Zoom (PTZ)
Use the control buttons on the handheld monitor to adjust the camera's viewing angle:
- Pan: Use the directional buttons (left/right) to rotate the camera horizontally up to 270 degrees.
- Tilt: Use the directional buttons (up/down) to move the camera vertically up to 120 degrees.
- Zoom: Press the dedicated "Zoom" button to digitally zoom in on the image (2x digital zoom). Press again to zoom out.
5.3 Night Vision
The camera is equipped with automatic infrared (IR) night vision. In low-light conditions, the camera will automatically activate its 10 IR LEDs, providing a clear black-and-white image on the monitor, allowing you to see your baby even in complete darkness.
5.4 Audio Monitoring
The camera's built-in microphone transmits audio to the monitor's speaker. You can adjust the volume on the monitor unit using the designated volume controls.
5.5 AV Output Connection
The monitor unit features an AV output port, allowing you to connect it to a larger display, such as a television or DVR, using the provided AV cable. This enables viewing the baby monitor feed on a bigger screen.
- Connect one end of the AV cable to the AV OUT port on the monitor unit.
- Connect the other end of the AV cable to the corresponding AV input ports on your television or DVR.
- Select the correct AV input source on your television to view the feed.
6. Maintenance
- Cleaning: Use a soft, dry cloth to clean the camera lens and monitor screen. Do not use abrasive cleaners or solvents.
- Power Adapters: Ensure power adapters are kept dry and away from water.
- Storage: If storing the unit for an extended period, ensure it is clean, dry, and stored in a cool, dry place.
- Battery Care (Monitor): To prolong the life of the monitor's rechargeable battery, avoid extreme temperatures and fully charge it before long periods of non-use.
7. Troubleshooting
7.1 No Video/Audio on Monitor
- Ensure both the camera and monitor units are powered on and properly connected to their respective power adapters.
- Check if the camera and monitor are within range (up to 100 meters line of sight). Walls and other obstructions can reduce range.
- Try re-pairing the camera and monitor (refer to Section 4.3).
- Ensure there are no other 2.4 GHz wireless devices causing interference nearby.
7.2 Poor Video Quality
- Move the camera and/or monitor closer to each other to improve signal strength.
- Ensure the camera lens is clean and free from dust or smudges.
- Check for sources of interference (e.g., Wi-Fi routers, microwaves, cordless phones).
7.3 Night Vision Not Working
- Ensure the room is sufficiently dark for the automatic night vision to activate.
- Check if the infrared LEDs on the camera are visibly glowing faintly red in a dark environment.
8. Specifications
| Display | 2.3-inch Color LCD |
| Video Compression | H.264 |
| Camera Pan Angle | 270 degrees |
| Camera Tilt Angle | 120 degrees |
| Digital Zoom | 2x |
| Night Vision | Automatic Infrared (10 IR LEDs) |
| Audio | Built-in Microphone (Camera), Speaker (Monitor) |
| Wireless Range | Up to 100 meters (line of sight) |
| Connectivity | Wireless (2.4 GHz) |
| Power Source | AC Power Adapter (x2) |
| AV Output | Yes |
| Mounting Type | Wall Mount (Camera) |
| Color | Black |
| IP Rating | IP54 (Camera) |
| Model Number | B0098OFDYW |
| UPC | 609528914891 |
9. Warranty and Support
BW products are manufactured to high-quality standards. For information regarding warranty coverage, technical support, or service inquiries, please refer to the warranty card included in your package or visit the official BW website. Please retain your proof of purchase for warranty claims.
For further assistance, you may contact BW customer support through the contact information provided on the product packaging or the official brand website.